27 videos, step by step, beginner cane workshop
What people are saying about this tutorial.
jennifer rose
Just finished this first workshop on how to make canes, and I must say I learned so much. This is exactly what I have been looking for, someone who could explain cane making in a step by step that process that I could replicate. I watched the videos, went into my studio and began to create all of the canes Alice showed. I finally have results I can be proud of, and I say thank you so much for doing this workshop. My only question now is when do we get more workshops. If you are only going to take one online class let it be this workshop. Thank you Alice for your hard work, and your dedication to helping others learn the joys of polymer clay.
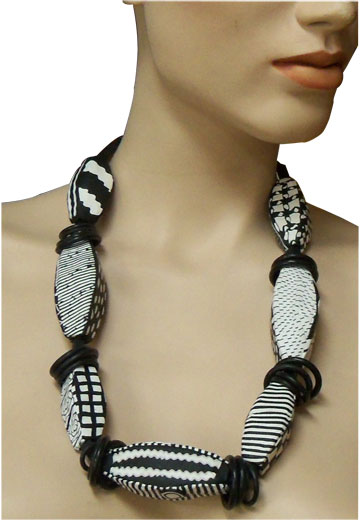
Here’s a necklace I made right after seeing Arty Becca’s (Rebecca Watkins) hollow forms. I needed to make one more of the smaller beads to finish it off and I finally did that last night. I use black rubber O rings in between the beads and extruded black clay bits as spacers.
Extruded black clay bits you ask? I use an adapter made by Makins for their extruder. They come in all different sizes and you can use several different dies with them. I used a square die to make a long piece, bake it and then slice off what I need. Cool.
Here’s another idea I’ve had in the back of my mind. I just ordered the new Lark 500 Paper Objects and was inspired by Lydia Hirte‘s incredible work. She creates some fabulous Jewelry sculptures with paper.
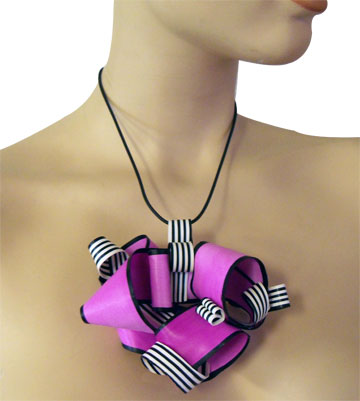
I wanted see if I could do something similar in polymer clay. I really want to do a large scale piece for the wall using these thin pieces, but first I was experimenting to see how thin I could get the clay and what I could make it do. I used Premo and it really is amazing to work with. It bends and doesn’t crack at all.
This piece is incredibly light and it’s been so much fun to play with. It’s very bright I know and I’m not really a pink girl, but this certainly says, “Here I Am!” It would stand out on black for sure.
I’ve just spent a ton of money on quite a few frames and have way too many ideas. I’m already working on a giant 27 x 39 piece that I’m very excited about and will tell you more later. Let’s see which project wins out.
I was cleaning up my work space after covering the hand in the last post and made this Stroppel Cane Jelly roll Cane.
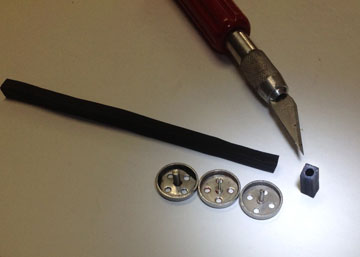
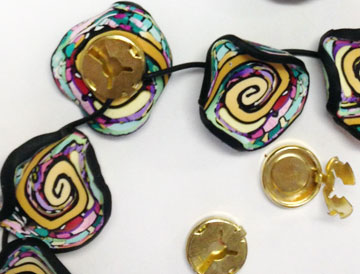
From my pattern business years ago I still have hundreds of brass button covers that for some reason I still have. Okay I admit, it’s because I’m a keeper of “things I might be able to use in my art projects” kind of person. I also have lots of rubber cording. I decide to combine the two making these “beads” removable and interchangeable.
Of course your cording has to be thin enough and flexible enough for the clasp to close.
The second thing I have a few of are brass button on a shank. I pushed one through each slice of my cane and baked them
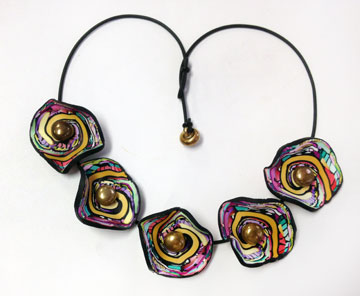
All I had to do is run the cord through the button shank and tada. The cord was just tight enough to keep everything in place and keep them from sliding. Both of these necklaces lay well and look very interesting.
There’s a discussion on FaceBook about Buna Cord or Rubber cording. Several people say that years later the cord gets brittle and falls apart. I’ve heard this before, but I haven’t had it happen to me.
You might want to consider a different cording material if you are going to make anything like this and offer it for sale. These are just for me.
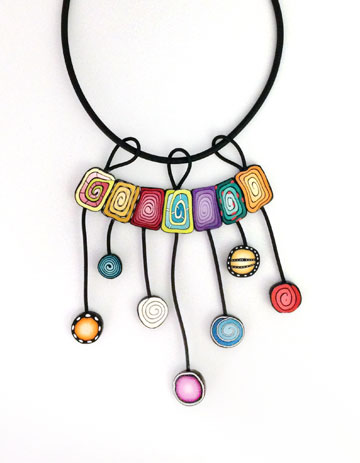
My Circles and Squares necklace was featured yesterday by Sage Bray on The Polymer Arts blog. I do enjoy this piece very much and always have one or two people tell me how fun it is! When I’m told that my work makes people smile of makes them happy, I consider my job accomplish!
I’m always so excited to see my work featured in The Polymer Art magazine or blog, I appreciate the fine work that Sage is doing for our polymer clay community and feel privileged to included with the vast array of talented artists working in polymer clay. Thank you Sage.
——————————————————————
West Coast Polymer Clay Guild
No picture here! I can not believe that I spent the whole day with this lovely, funny group and didn’t take one picture. I blame the guild member actually, I asked them to remind me and to not leave without a group picture. But every single one of them forgot to remind me. 🙂
I really apologize ladies, it was my fault after all. Next time I won’t forget.
All of us at this workshop want to send a giant thank you to Polyform’s Education Manager Iris Weiss and Polyform Products for supplying all the clay and then some.
We had a really great time though, what a talented group of women. I hope to get back to New Port Richey again soon.
—————————————————————
Art Deco
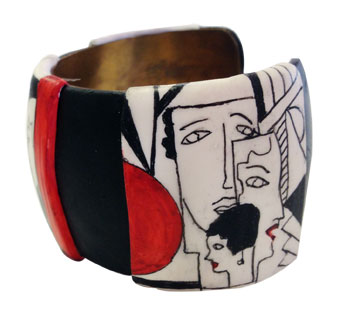
I’ve been drawn to Art Deco all my life. Maybe it was visiting Miami when I was a kid and seeing all those fabulous art deco buildings, or just the clean lines of the jewelry or the advertisements and art work created in that style. I think it might be the romanic vision of the ’20s that draws me in. Such large changes taking place in clothing, hair styles, woman’s rights…the world was changing dramatically.
Right now I’m working on this bracelet using my pen and ink technique. I wanted something new with pen and ink to take to the Orlando Area Polymer Clay Guild when I teach there next week. Working on slides in this style as well.
Having a ball actually, one more panel on this one and I’m finished.
In yesterday’s post I talked about how I don’t plan what to hang my pendants on or from. After thinking about it overnight, I decided that statement wasn’t actually true.
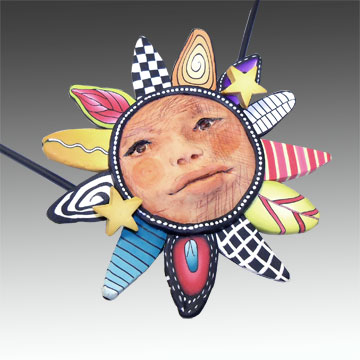
I’m always trying to come up with different ways to add a bail, invent a bail or create a different closure. The project I will be teaching at Fandango this year is a prime example.
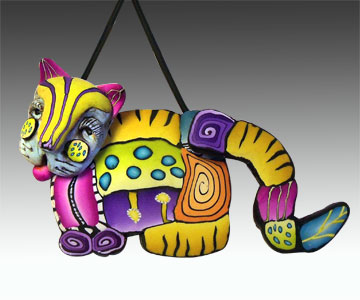
The stars are the closure. It’s an easy solution and adds a 3D element to the piece, that and the sculpted face. This cat uses the same idea with the tail and the head as closures.
You can use this type of closure on almost any design and I’ll show you how at Fandango in a couple of weeks. And there is exciting news from Iris Weiss the Education Manager from Polyform Products, Polyform will be donating some blocks of Premo for my student to use in my class. Thanks Iris and Polyform.
This piece that I posted a couple of days ago is another easy bail alternative. Creating something different and new is something I really enjoy.
I love the creative process of working with polymer clay. However the jewelry making part, findings, stringing, etc, are not on my love list and barely makes my like list. And my usual joy comes from colorful, fun, jewelry. It’s when I decide to create something more sophisticated that I lack the materials on hand to be able to spontaneously finish the piece.
In contrast, I always make sure I have plenty of canes on hand when I begin creating, it’s something I preach to my students. If you have a wide selection of finished canes on hand when you sit down to create, things just flow more smoothly. Not having to stop and make all the canes that need to go into a piece make it possible to create without having to stop the flow.
That’s not to say I don’t start a piece by constructing a couple of new cane, it’s just that I know I have lots of fillers to choose from already made and waiting for me.
So you see, I do plan ahead more than I realize, just not when it involves stringing and findings. So I’m still going to take a look at why I have a block with planning when making something more than a colorful, fun pendant (other than the obvious reason of needing more tools, supplies, etc. ). I’ve accomplished it before and think I just need to get out of my own way. Sound familiar?
So in the mean time, I’ll just keep doing what I love, making fun and funky things to wear and work toward improving my major jewelry construction.
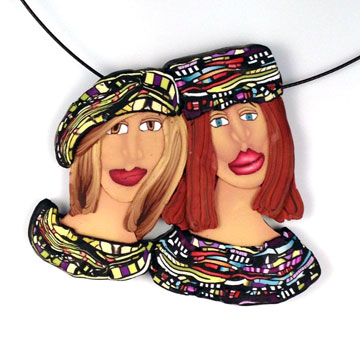
I think these Stroppel Sweater Girls look kind of like Barbara and Cher with red hair. Okay, did that make you smile? Yes? Then my job is finished for today.
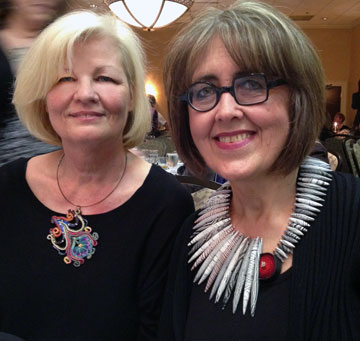
I can only say that I was delighted to have this picture with Kathleen Dustin wearing her stunning Necklace. She is such an incredibly talented artist and the polymer clay community is so lucky to have her as one of our polymer divas continually leading the way to excellence.
The entire Synergy 3 – Seeking Higher Ground was about striving for excellence, improving and growing. Becoming the best that you can be.
The piece I’m wearing I’m sad to admit was made at the last minute. I am challenging myself to continue with the design and improve it if I can.
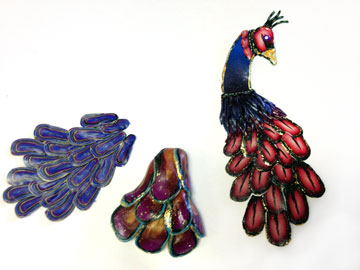
I have a beautiful peacock shawl given to me as a gift that I wanted to wear wear the night of the banquet. I worked on a couple of designs but wasn’t happy with them.
Even though I say it was a last minute thing, I did try out several ideas before moving on to the one I actually wore.
Here are the first three attempts at a pendant. The one on the far right was actually too literal and I wasn’t happy with that. The other two just weren’t coming together. Everything was just too constricted.
I liked this one better, but wish I’d started on it weeks before I needed to wear it.
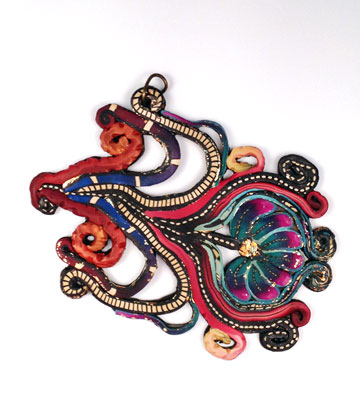
I decided to use my cane mapping technique and add a touch of metallic. It certainly matched my shawl better and I liked the flow. The bad part was not having a fabulous chain to hang it from, even though I wore it just the same. That seems to me to be one of my largest setbacks, making a piece and not thinking about the rest of the story.
It’s why I usually just do pendants and “slides”. I don’t have to think about the rest. I plan to give that part more thought in the future.
So this is my challenge…….plan, plan, plan and Make it Sing
Wish me luck and go spend some time on Kathleen’s webiste if you haven’t been there for awhile.
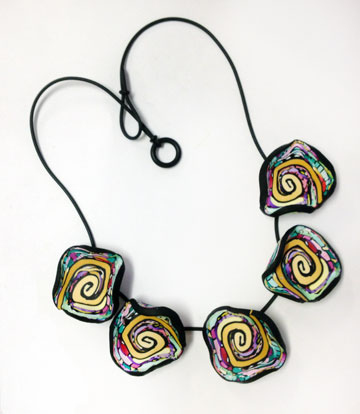
When I was getting ready to travel to Atlanta to attend the Synergy Conference, I wanted to make a few new things to wear. I’ve had a couple of ideas in my head for awhile and thought this would be the perfect opportunity to try them out.
The necklace or “slide” in the picture above was really simple and fun to make. It’s more fun to wear because it has motion. It’s made with spiral canes formed into rectangles and of course round canes. I’ve attached them together with Buna Cord and looped the Buna Cord at the top to allow me to slide whatever chain or cording through and TaDa….it’s ready to wear.
I really like this necklace too. It moves and dangles and is just fun to wear. But I’m concerned with the o-rings shelf life. I’ve talked with several people that say that after many years, they begin to disintegrate and thus your necklace falls apart. So it’s not something that I could ever sell, but maybe it I keep searching, I can find a replacement.
I have so many things to show you and talk about concerning Synergy and the inspiring things that went on, what was shared, the friends I got to see again, the friends I met in person for the first time and just the overall experience.
Unfortunately I came home sick and am just not getting back to normal. I have lots of catching up to do.
DO take a minute to click on the sun on the righthand side of this page and see what is being offered at this years Fandango retreat. I’m teaching along with Suzanne Ivester, Sydnee Holt, Linda Hess and Penny Jo Couch. I hope to see you there.
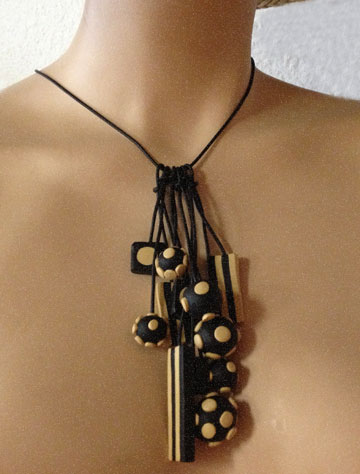
I was messing around with a large Stroppel Cane a couple of weeks ago and came up with this idea. This is actually my second one like this because I wanted to make a simple necklace to match. They are both simple and quick to make but the possibilities are endless.
I left the black surfaces lumpy-bumpy just because, but those surfaces could be smooth or covered any way your imagination takes you.
I used a square cutter to cut the hole in the middle but had to go back and trim again with my blade because the cutters aren’t sharp enough. I used my blade to trim around the outside. Of course you can use oval, circle or square cutters.
Tomorrow I’ll share the new camera phone light box set up I just ordered. Actually you can use it with a regular camera too. Very cool.
I must be in a creative mood, I can’t seem to stop myself. You’re going to laugh at this one.
I ordered some Buna cord and some o-rings but when the order came in, I had o-rings that were 1 – 3/4 inches in diameter. What? Oh good grief.
Now months later I started playing around with adding things to a pin to make things more interesting and used buna cord to support a slice of cane. Experiment! I baked it and nothing appeared to happen to it. so ……ahhhhhhh I thought .
I dug out my mis-ordered o-rings and began to play around. What about different sizes? hmmmm. My husband has a whole little box full of different sizes. (Don’t tell. *G*)
Man, this would be perfect. Fill the circles with clay, bake and tada. Well the o-rings didn’t shrink, but the clay did. I knew that!
So I glued the clay in the o-rings.
Now how to string it. I put everything together and baked it. Uh Oh, the Buna cord DID shrink, not in length, but in diameter. Darn! Okay, make the pieces separately, bake the clay, drill holes, glue and there you go.
I thought my experimental necklace needed some thing to add even more dimension and interest so I add the aluminum coil. Then I added matching beads but I’m thinking they may not be necessary and will probably leave them off.
I’ve added some of what I call my dot – dot – dot cane around the edge. This picture shows you just how dimensional this piece has become.
I truly am having fun moving in this direction. More ‘spirments on the way.


Comments