Just finished this first workshop on how to make canes, and I must say I learned so much. This is exactly what I have been looking for, someone who could explain cane making in a step by step that process that I could replicate. I watched the videos, went into my studio and began to create all of the canes Alice showed. I finally have results I can be proud of, and I say thank you so much for doing this workshop. My only question now is when do we get more workshops. If you are only going to take one online class let it be this workshop. Thank you Alice for your hard work, and your dedication to helping others learn the joys of polymer clay. Jennifer Rose
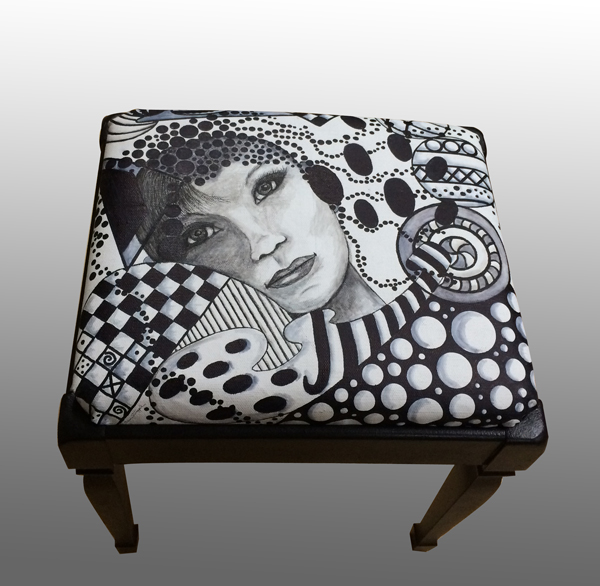
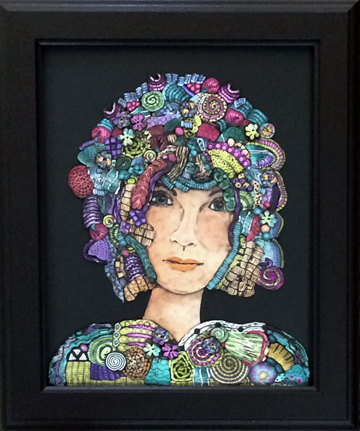
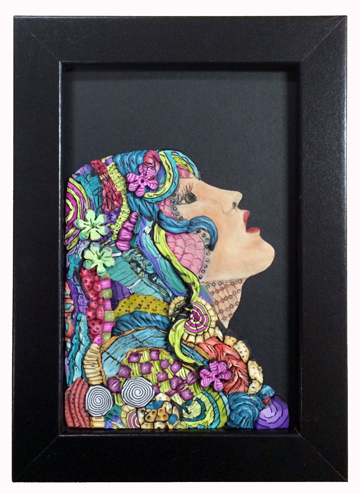
I drew this woman on canvas last June with the idea that I was going to frame her, she has been patiently wanting to become something. I found this perfect wooden stool at a garage sale this week-end, painted it black and now my girl has a home. I have several other pieces I’ve been working on and will be sharing soon.
She is going to be for sale and I’ll be telling you more about that by the end of the week. I have some exciting news to share and can’t wait for it to happen. See you a a day or two or three.
‘One side will make you grow taller, and the other side will make you grow shorter.’
‘One side of what? The other side of what?’ thought Alice to herself.
‘Of the mushroom,’ said the Caterpillar, just as if she had asked it aloud; and in another moment it was out of sight.
Alice’s Adventures in Wonderland, by Lewis Carroll
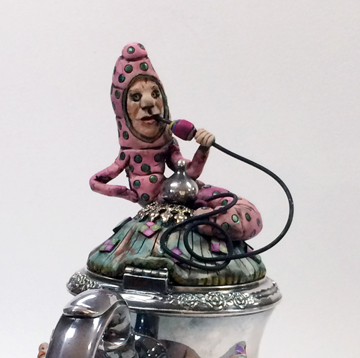
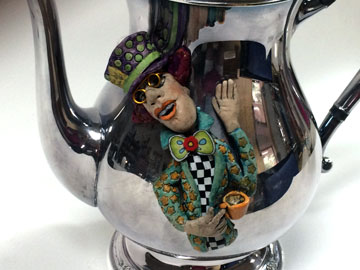
I’ve finally had time to working a bit more on my Alice in Wonderland tea set and I’ve added the caterpillar with his hookah. There are so many more characters I want to add to the set so I need to get busy.
The reason I’ve been too busy to work on Alice and her friends is that I took a trip to SanDiego to attend Sandy Camp (a well established polymer clay retreat) and to visit my friend Meisha Barbee. What fun I had and what a great group of clayers there are in California. More about that in my next post.
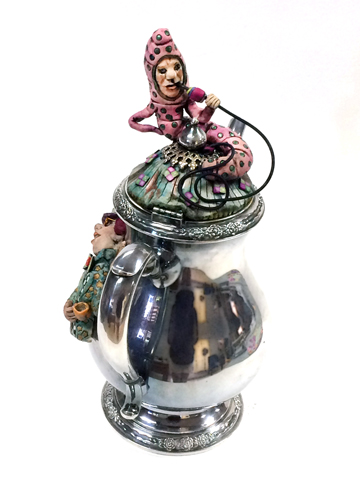
Character for this side?… maybe the Dormouse and the rabbit that was at the tea party.
“If I had a world of my own, everything would be nonsense. Nothing would be what it is, because everything would be what it isn’t. And contrary wise, what is, it wouldn’t be. And what it wouldn’t be, it would. You see?” Lewis Carroll, Alice’s Adventures in Wonderland & Through the Looking-Glass
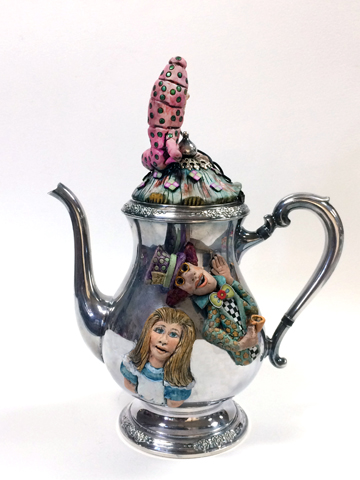
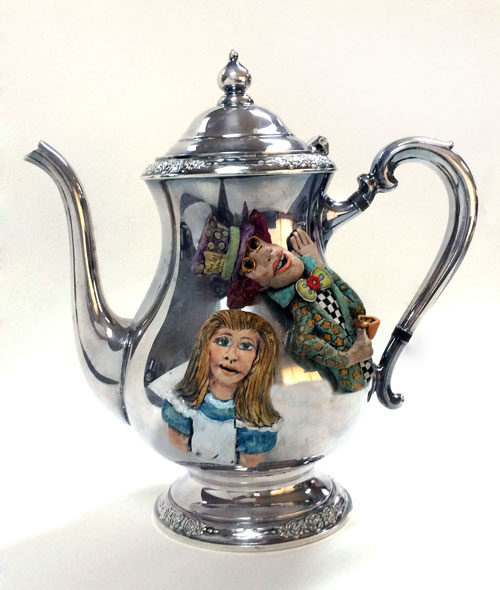
As you can see I’ve been working on Alice herself and here she is with the Mad Hatter. You’ll notice that I’ve moved the hatter and here’s why.
The other night after my post here and on Facebook, Ellen Prophater call me to share her thoughts on how to adhere my figures to the silver teapot. Thanks so much Ellen it’s nice to have a friend looking out for you. She suggested I use Genesis Artist Colors Thick Medium-Extender. She uses it all the time and with great success.
Oh course I have some, I bought it from her, naturally. Elleen and Sue Sutherland own Creative Journey Studio and carry almost everything you might want or need for claying. I’ve actually used it once or twice but didn’t really like the consistency of it and put it aside. But to be fair I didn’t use it long enough to really judge but it’s hard to spread.
And she’s right, super glue was not a good choice for this project so I popped the Hatter off the teapot and reattached him using Genesis, it worked very well. At least the bond is strong and solid.
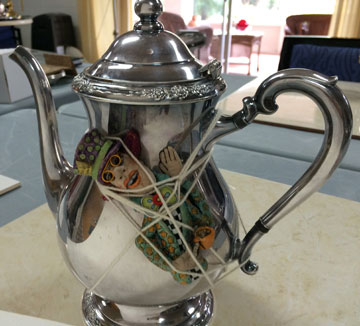
Now you’re going to laugh, I had to tie the Hatter to the pot.
I told you that you were going to laugh.
Because of the dip in the teapot the Mad Hatter just didn’t want to stay in place. With Genesis on his back he just slid all around. It’s a problem I have with any liquid clay and with Genesis obviously.
Because he was already baked and solid I could tie him down, obviously this wouldn’t work with uncured clay. That leads me back to my post from yesterday where I talked about sculpting the Hatter about three weeks ago and he wasn’t very pliable, he was hard to fit to the shape of the tea pot.
Oh and I decided to move him to the right side of the teapot and like him there better so it all worked out.
Yesterday I sculpted Alice and placed her on the teapot right away while she was still soft. She stuck pretty well and didn’t move around when I baked her. I didn’t use the Genesis on Alice before baking because it’s thick and hard to spread, I didn’t want to mess up my sculpting efforts by push to hard.
She’s stuck to the teapot pretty well without anything but just the same I’ll pop her off and use Genesis before I bake the teapot again.
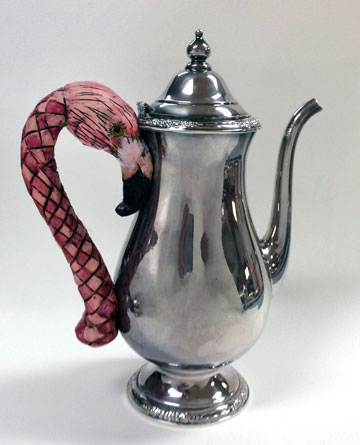
The flamingo makes me smile, being from Florida the flamingo is a favorite Alice Character of mine, not that there are any in my part of the state! Sandhill cranes yes, Flamingos no.
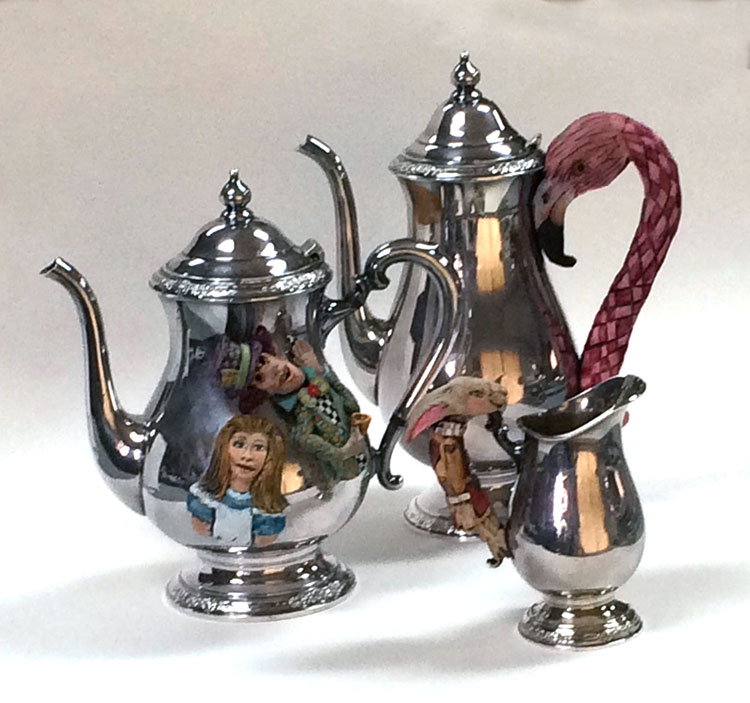
Here’s how the set is shaping up and you know that by the time I’m finish, I’ll have to add a few Alice crazy flowers. Thanks for following along.
I found this tea set while I was working on my silver pitcher, it was a really good deal at my local antique store. I mentioned in the silver pitcher post that I was working on something else and it was going to be fun. (for me at least) Well it’s been over a month since I started it and I’ve done oh so many other things since then. But I finally got back to it yesterday and I can see it is going to take me several months to finish it.
I’m labeling it my year long project. Alice in Wonderland tea/coffee set. I can already see that there are going to be challenges along the way. I have to remember that eventually the silver will tarnish and the pieces will have to be polish and rinsed. I’ll have to careful that the finishes don’t rub off and all the pieces are secure. It will be interesting I think, so follow me down the rabbit hole if you dare.
First of all I do not plan on using this tea/coffee set. I don’t think the clay would fair well, plus the insides of the tea and coffee pots are in the greatest shape. But most of all, I don’t serve tea and coffee with a silver service! Who knew? It’s going to be purely for display.
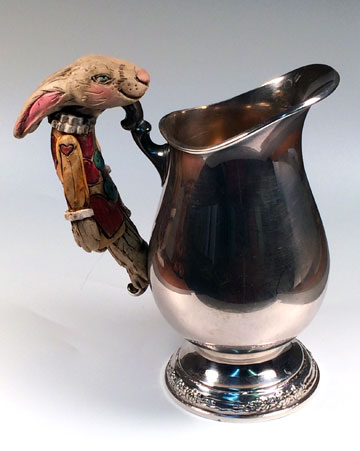
This was the first figure I sculpted. one of the Queen’s herald rabbits. I sculpted him right onto the handle of the creamer. There are going to be more things added to this piece, it’s not finished.
I’m notorious for jumping around so I jumped right to the Mad Hatter. I had a couple of problems with him and I’m still working on them. The first thing is that I sculpted him about three weeks ago and he’s just been sitting there. (lesson # one, if you begin it, finish it then) I put the finishing touches on him and placed him on the tea pot. Well, naturally he was not as pliable as when I first sculpted him and he didn’t want to conform. Sounds just like the Mad Hatter doesn’t it?
I placed him on the tea pot, supported his tea cup with a bit of polyfil and put him in the oven. When I brought him out of the oven, he had slid up on the pot. I placed a towel over him and gently moved him back into position and press him just as gently into place. Well…this works well for thinner pieces, but he’s thick and he cracked a bit along the middle, his head fell off (“off with their heads” said the Queen), plus I broke the tea cup off and it took his finger with it. No problem, glued the crack together, and glued his head back on.
Then I had fun adding color using markers, make up and my new fun coloring toy Inktense sticks. (water color in stick form)
I glued him to the tea pot (superglue Gel), I had to hold him in place while the glue dried, but he stayed put. Then I couldn’t find the little tea cup that had broken off so I made another cup and finger and attached it with TLS. I actually like this cup better so all’s good. I put the tea pot with the Mad Hatter back into the oven and baked again. Alice is going to go right next to him and the dormouse and the March Hare will probably end up on the other side. Lewis Carroll certainly liked rabbits I think. The White rabbit and the herald and the March Hare all appear in this adventure.
Next I have to cover him with TLS so that his finish won’t come off when it’s time to polish, then back into the oven again. Whew. We’ll see how that works.
So this is my adventure, I’m learning and have fun. I’ll post more as I progress, but don’t be surprise if other things get posted about in-between.
I have a lot to do this week. I’m very excited to tell you that I am going to Sandy Camp in California next month. I’m going to be doing a demo. Thanks so much to the San Diego Polymer Clay guild and Nancy Ulrich for letting me join everyone this year.
I’m spending some time making girlfriend bracelets to take along with me plus some other goodies.
But in-between I’m using scrap to create some fun pieces. Jainnie Jenkins named them Scappy girls. Love that, thanks Jainne.
The hair and clothes are mostly from scraps. I textured them, cured them, then stained the whole piece. Mounted it on mat board and then framed them.
So many ideas too little time.
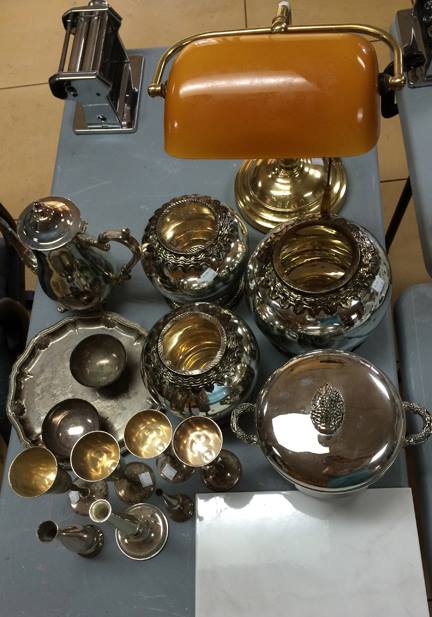
I have a big silver project I’m working on too this month and it doesn’t even include this pile of silver I brought home after a thrift shop adventure that put me into overload. *g*.
Wish me luck!
If you’re going to be at Sandy Camp, see you there.
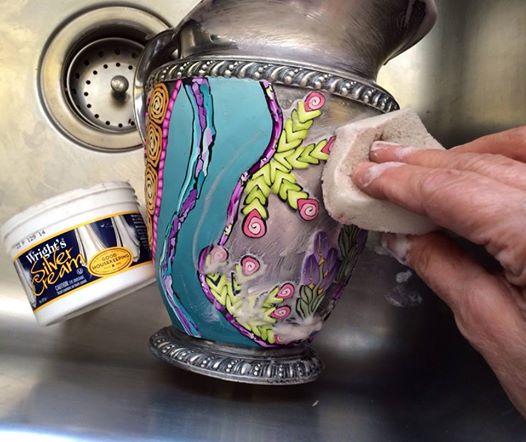
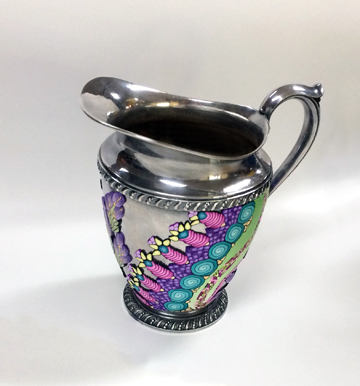
I wanted to see what would happen when I cleaned the pitcher with silver polish. I really didn’t think there would be a problem. After all polymer is plastic and pretty sturdy.
It worked perfectly. The only thing I needed to do was use an old toothbrush to get the polish off the edge of the polymer. But hey, there was 50% less silver to polish! Fist pump.
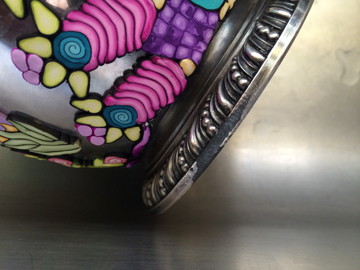
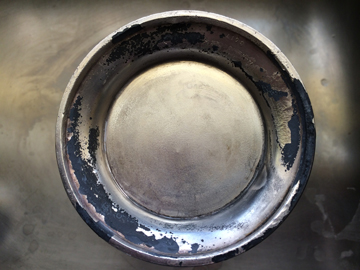
The next thing I needed to address was the silver plate coming off the bottom. Since this is for me, I could have left it and no one would have ever noticed, but I believe you should finish every piece to the best of your ability. Just think about all the people that might see it someday. (yes I mean after I’m dead)
Plus the bottom was peeling pretty badly and I’m afraid it would have continued to peel. So I decided to add a border and cover the bottom.
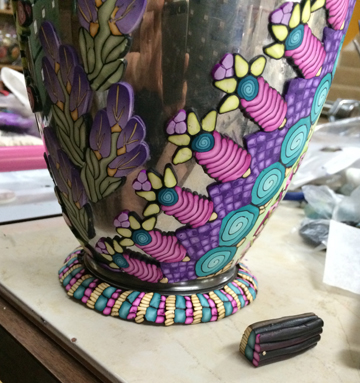
I really didn’t like this, too busy, so I ended up with this extruded purple band.
But I never like to waste anything so on to the bottom the first try went. Still busy, but not seen but by a few. (me)
The plus is that it has sealed the bottom and will keep it from continuing to peel.
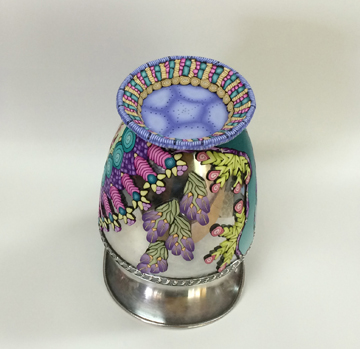
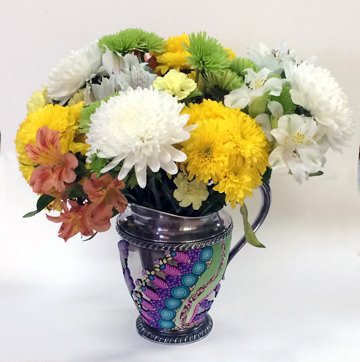
So now I can put my flowers back in it and enjoy. But first I need to sign it, you know, so all those people who will see it some day will wondered who the heck was Alice Stroppel. hehehe.
I’ve been away on retreat and experimented with several things while I was away. I’ll post more about that as I finish up another project I’m working on, I’m excited about it.
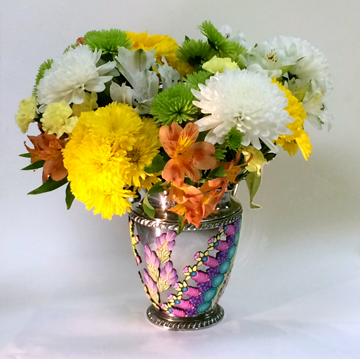
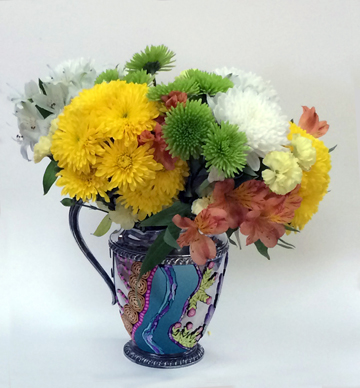
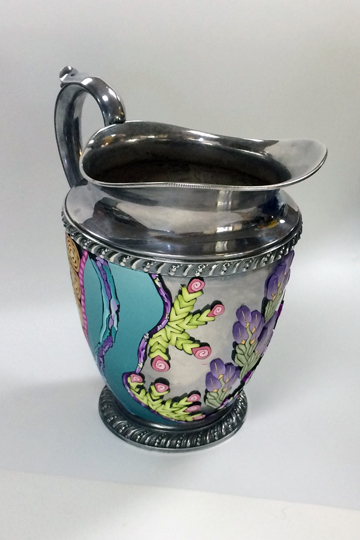
Before I left on my retreat I picked up this silver plated pitcher at a thrift store. The inside has lost some of it’s finish but I think it could be polished up and still used. However, I already have a silver pitcher along with several other so I’m dedicating this one to flowers.
I covered parts of it with polymer clay leaving quite a bit of silver showing. I really like it and will be looking for more silver to pair with polymer.
A couple of years ago my husband asked me what I wanted for my birthday. I couldn’t think of a thing, then an idea came to me. I told him I would love flowers at least once a month and they didn’t have to be expensive.
So now at least once a month, sometimes more, I have a pretty bouquet of flowers to brighten my day. He doesn’t ever have to worry about a birthday present again. I feel loved and special. Win – Win!
Now a I have a dedicated vase just for my special flowers.
I can’t decide if I want to add more clay, I love the way the silver shines through. I decided to give it a day or two of looking at it from every angle and then make up my mind.
Can wait until you can see what I’m working on now…always fun.
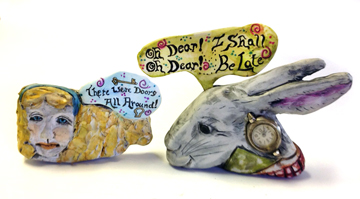
Just like the white rabbit, Oh dear, Oh dear, I’m late, I’m late. And like Alice, I don’t quite know which door to open first.
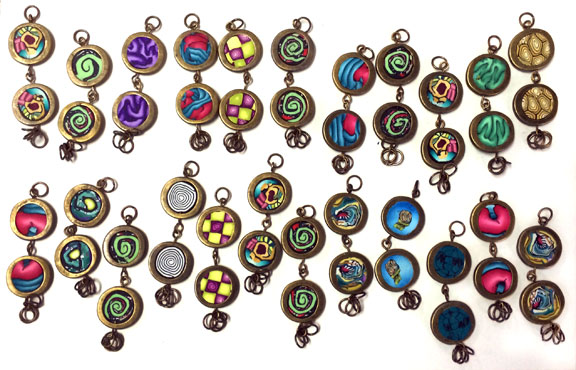
I’m going on retreat and just finished the charms for the charm exchange, finishing up the brown bag exchange gift, figuring out what to donate for the auction and washing clothes. Whew!
The stressful part is trying to stay under the 50lb bag limit. Packing, weighing, taking important stuff out and then putting it back in again and leaving out some clothes. I figure I’ll just wear the same thing over and over. Better that than leaving out important polymer clay stuff…..
I was very happy to see that my rabbit and I were featured on Polymer Clay Daily today. Cynthia is spot on today, I feel just like the other Alice running around in wonderland. But I actually feel like Alice more often than not, after all I am Alice. *Grin*
I hope today finds everyone having a Wonderland kind of day. Just stay off the roads if you are. hehe
I’ve had a very exciting week. I took a class with Kate Church and created a very funny and cool doll. I received two trades in the mail from two extremely accomplished artists and I finished 20 something charms for an exchange. Whew.
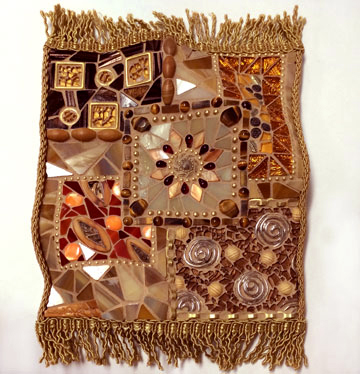
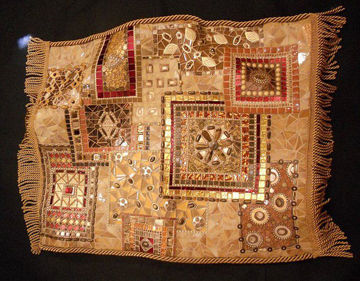
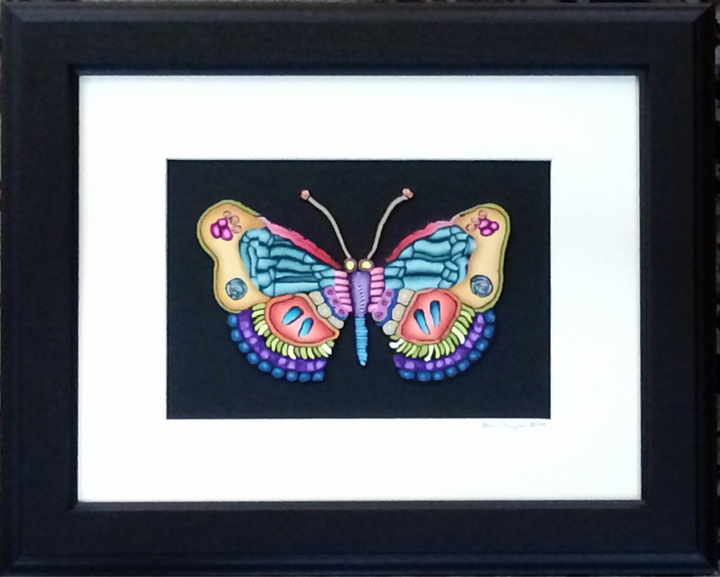
I’ll tell you all about each of them in separate posts, the first one being this over the top cool mosaic magic carpet I received from Sherry Moon.
When I first saw her large carpet I just fell in love, here’s a picture, tell me you don’t feel the same.
Sherry Moon
It’s just so luscious and looks so much like a real carpet. I was thrilled when Sherry said she wanted to trade for one of my cane mapped butterflies and she agreed to do a mini version of her carpet. Here’s the butterfly that now lives with Sherry. Thank you so much Sherry, your work is sterling and I’m honored to own this bit of magic.
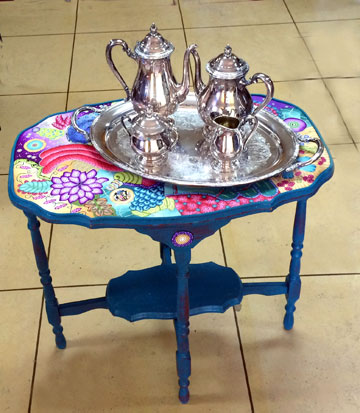
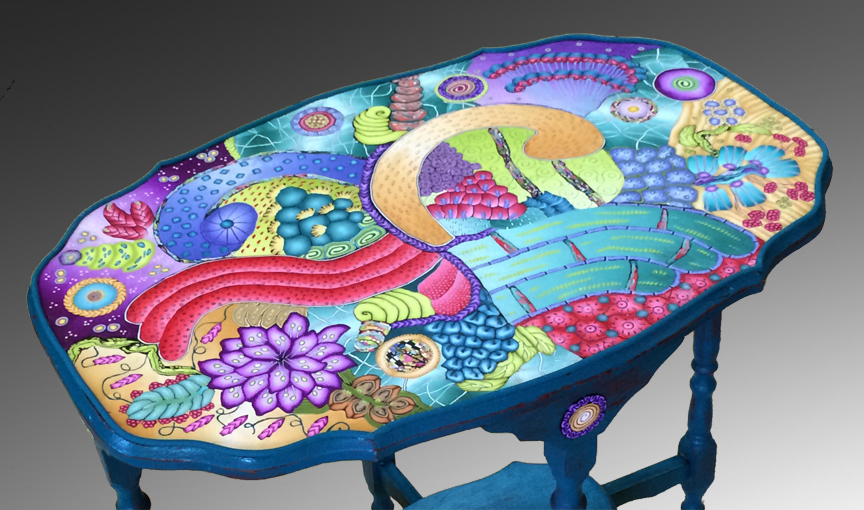
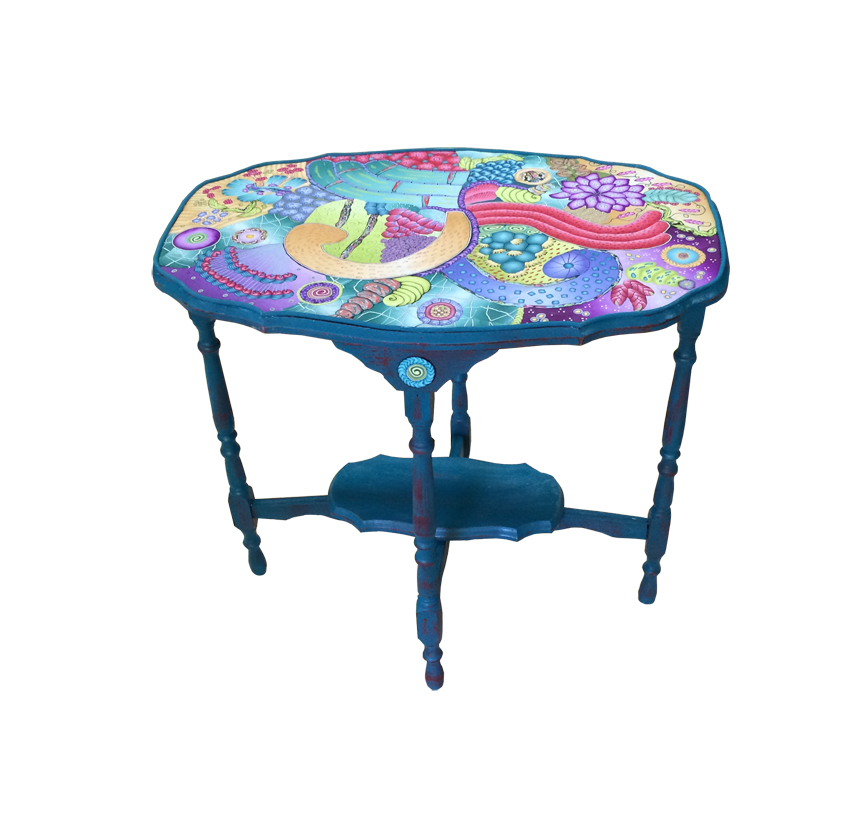
A reclaimed table finds new life in my house. It started out as a wobbly table made from solid oak but with a few years and coats of red paint under in it’s history. I brought it home and almost ave up on fixing the wobble, but fortunately my husband, who is not a wood guy, saved the day and came to the rescue for both me and the table. I spray painted teal over the red and then sanded a bit here and there. Let her dry and then I was ready to start. I’ve been doing large pieces to frame and hang on the wall and thought why not give furniture a try.
This is the same technique I use for my smaller pieces of wall art too, I call it cane mapping. Laying out a map and filling it with clay.
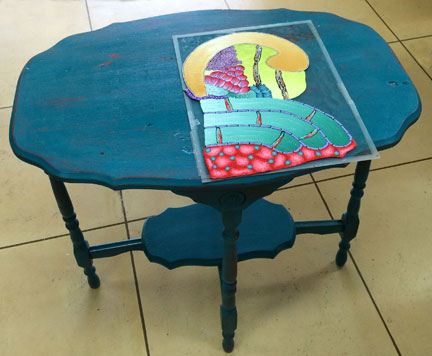
I started with a smaller table and it worked pretty well so I decided to give this larger one a go. It’s 28″ H 29″ L 18″W.
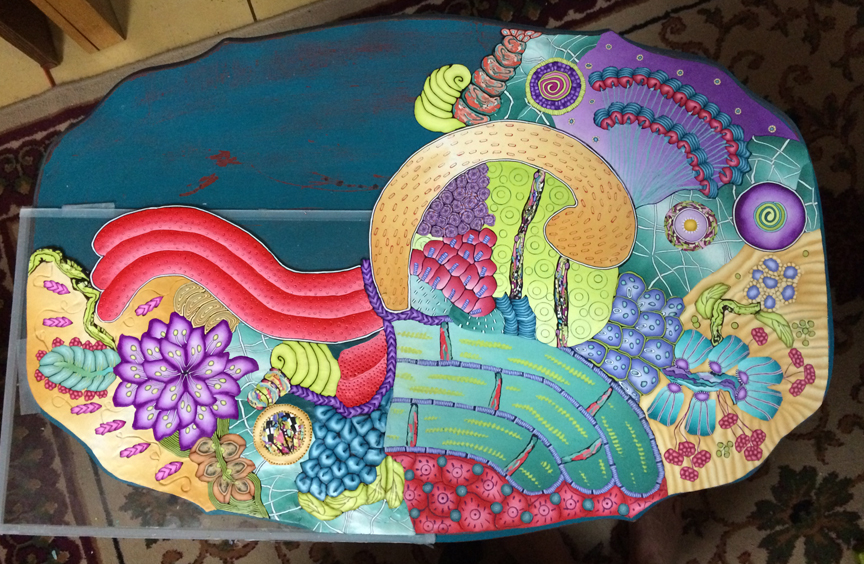
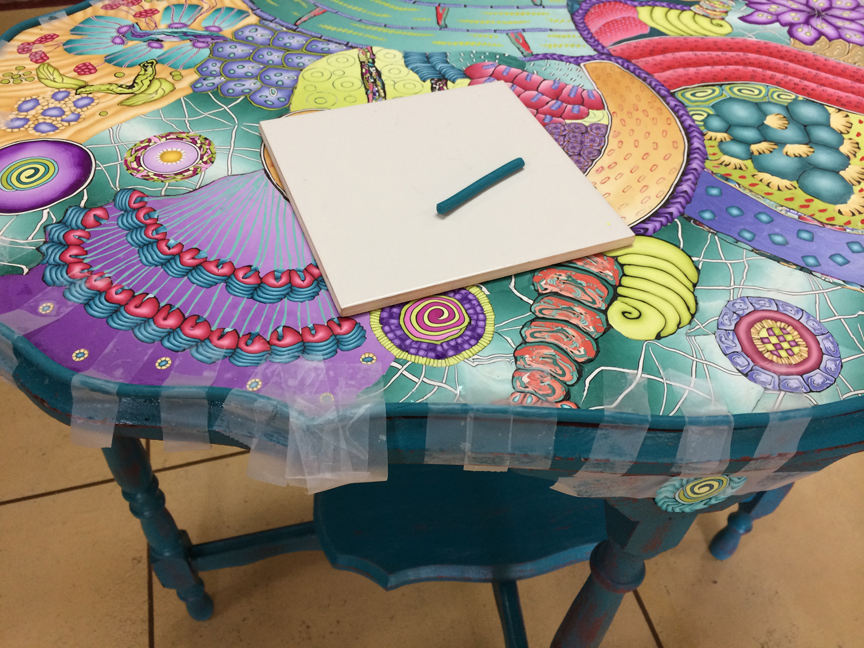
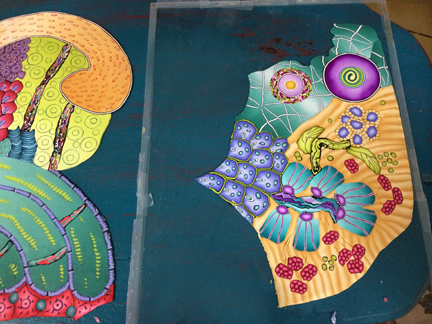
I start out by making a paper pattern of the top and draw my design on the paper. Then I place the pattern under a large piece of glass and just start laying clay.
Once I have a good deal completed I bake it and then move on to the next part of the pattern. I end up with several large puzzle pieces that I then glue onto the table top. If I work on too large a piece I tend to rest my hand on on drop something on the part that was finished and have to redo parts of it, Baking in pieces helps to preserve the work I’ve already completed.
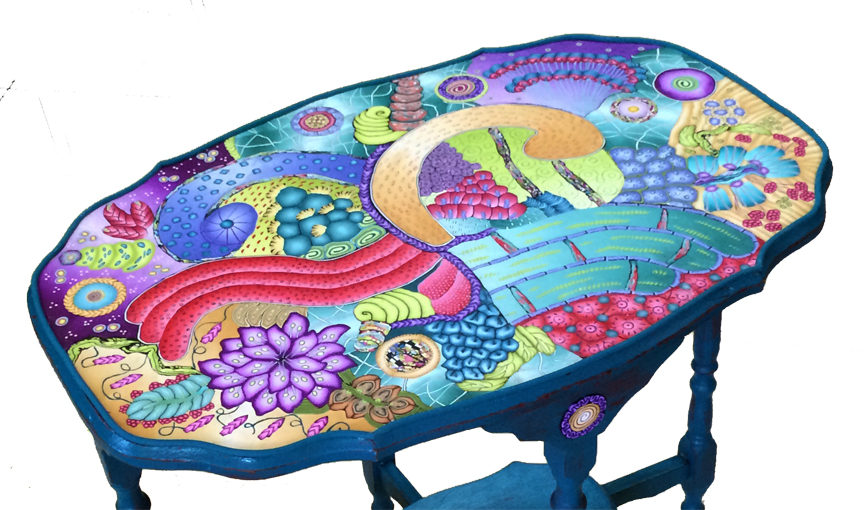
I use Liquid Fusion clear urethane adhesive. It dries fairly quickly, but takes 24 hours to completely dry. When I was finish with all the pieces for the top, I glued them together right on the wood.
Then I exuded a matching teal round snake from the edge. I baked it in four sections in roughly the same shape as the edge of the table. I use Premo because it’s flexible and it was easy to apply. However, to make sure it stayed in place, I taped it all around and left it until morning.
I don’t add a finish to the top, if I could stand to do it, I might sand and buff it. But until I get myself a do-boy…well…it will just get pretty with age and develop it’s own patina. I feel this way… it’s plastic…water won’t hurt it…you can wash it with a damp rag. The only thing I will do it make sure to use a coaster for hot beverages. I know the bracelets that I made years ago and wear often have this wonderful feel to them. So I say use it what’s the worse that can happen?
Thanks for all the wonderful words of encouragement, the likes, the shares, on Facebook and thank you in advance for any comments left here. On to the next project!!!
Follow me on Facebook if you want. https://www.facebook.com/alice.stroppel


Comments