Polymer Clay Canes for Beginners

27 videos, step by step, beginner cane workshop beginner Cane Tutorial What people are saying about this tutorial. jennifer rose Just finished this first workshop on how to make canes, and I must say I learned so much. This is exactly what I have been looking for, someone who could explain cane making in a step by step that process that I could replicate. I watched the videos, went into my studio and began to create all of the canes Alice showed. I finally have results I can be proud of, and I say thank you so much for doing this workshop. My only question now is when do we get more workshops. If you are only going to take one online class let it be this workshop. Thank you Alice for your hard work, and your dedication to helping others learn the joys of polymer clay.

Online Workshops with Alice Stroppel

Catagories

[caption id="attachment_102" align="aligncenter" width="100" caption="Member IPCA"]Member IPCA[/caption]

If I Had a World of My Own

“If I had a world of my own, everything would be nonsense. Nothing would be what it is, because everything would be what it isn’t. And contrary wise, what is, it wouldn’t be. And what it wouldn’t be, it would. You see?”  Lewis CarrollAlice’s Adventures in Wonderland & Through the Looking-Glass

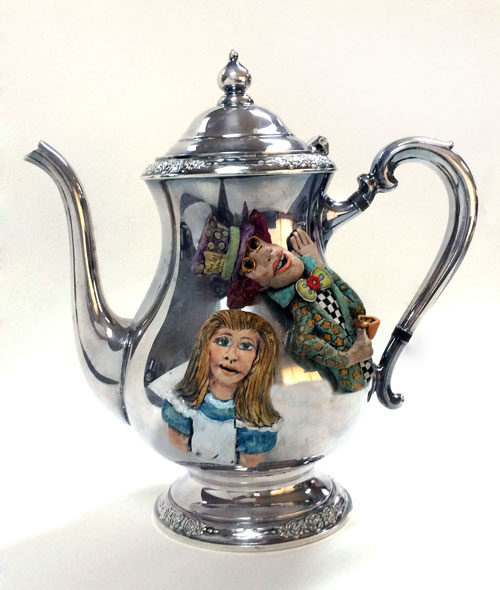
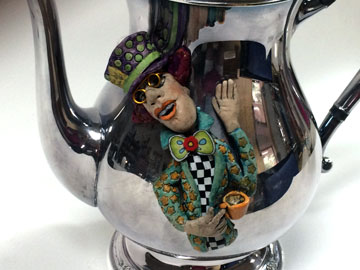
As you can see I’ve been working on Alice herself and here she is with the Mad Hatter. You’ll notice that I’ve moved the hatter and here’s why.

Alice and the Hatter Alice Stroppel

The other night after my post here and on Facebook, Ellen Prophater call me to share her thoughts on how to adhere my figures to the silver teapot. Thanks so much Ellen it’s nice to have a friend looking out for you.  She suggested I use Genesis Artist Colors Thick Medium-Extender. She uses it all the time and with great success.

Oh course I have some, I bought it from her, naturally.  Elleen and Sue Sutherland own Creative Journey Studio and carry almost everything you might want or need for claying. I’ve actually used it once or twice but didn’t really like the consistency of it and put it aside.  But to be fair I didn’t use it long enough to really judge but it’s hard to spread.

And she’s right, super glue was not a good choice for this project so I popped the Hatter off the teapot and reattached him using Genesis, it  worked very well. At least the bond is strong and solid.

Now you’re going to laugh, I had to tie the Hatter to the pot.

Hatter

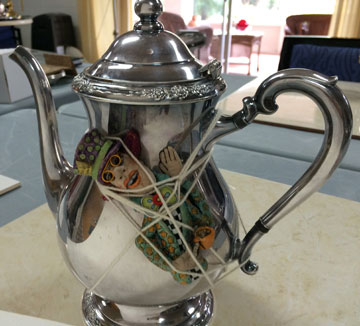
I told you that you were going to laugh.

Because of the dip in the teapot the Mad Hatter just didn’t want to stay in place. With Genesis on his back he just slid all around. It’s a problem I have with any liquid clay and with Genesis obviously.

Because he was already baked and solid I could tie him down, obviously this wouldn’t work with uncured clay. That leads me back to my post from yesterday where I talked about sculpting the Hatter about three weeks ago and he wasn’t very pliable, he was hard to fit to the shape of the tea pot.

Oh and I decided to move him to the right side of the teapot and like him there better so it all worked out.

Yesterday I sculpted Alice and placed her on the teapot right away while she was still soft. She stuck pretty well and didn’t move around when I baked her. I didn’t use the Genesis on Alice before baking because it’s thick and hard to spread, I didn’t want to mess up my sculpting efforts by push to hard.

She’s stuck to the teapot pretty well without anything but just the same I’ll pop her off and use Genesis before I bake the teapot again.

Alice Flamingo Alice Stroppel

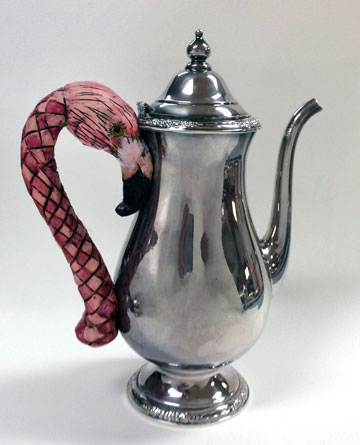
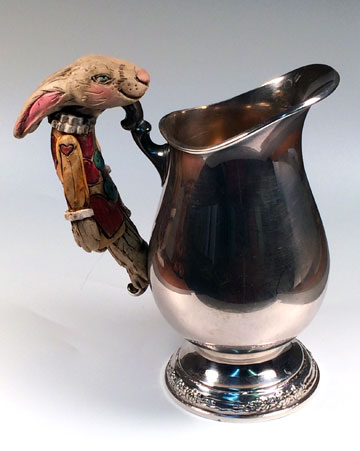
The flamingo makes me smile, being from Florida the flamingo is a favorite Alice Character of mine, not that there are any in my part of the state! Sandhill cranes yes, Flamingos no.

Alice group- Alice Stroppel

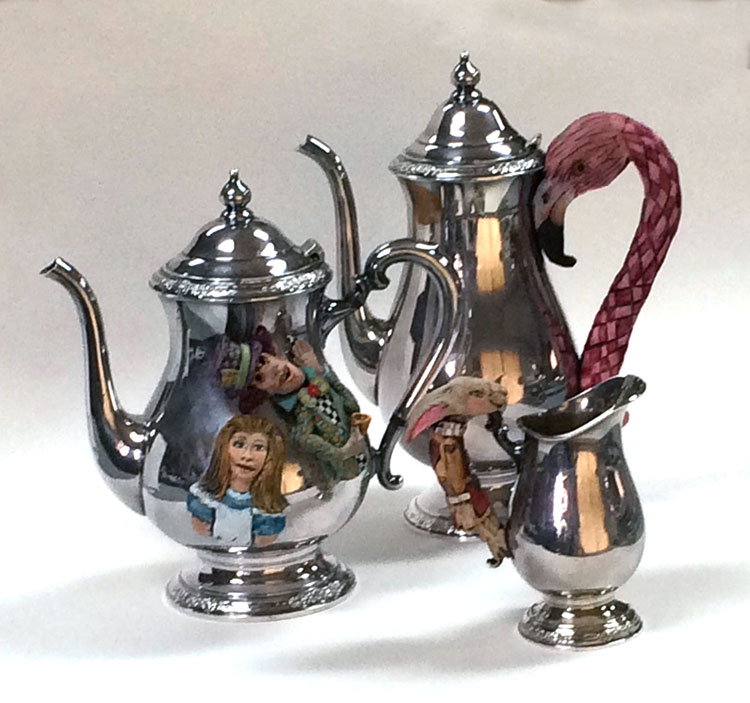
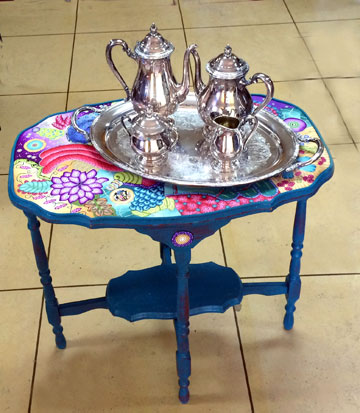
Here’s how the set is shaping up and you know that by the time I’m finish, I’ll have to add a few Alice crazy flowers. Thanks for following along.

Alice’s Wonderland Silver Tea Set.

Alice Stroppel tea  set and table


I found this tea set while I was working on my silver pitcher,  it was a really good deal at my local antique store. I mentioned in the silver pitcher post that I was working on something else and it was going to be fun. (for me at least) Well it’s been over a month since I started it and I’ve done oh so many other things since then. But I finally got back to it yesterday and I can see it is going to take me several months to finish it.

I’m labeling it my year long project. Alice in Wonderland tea/coffee set.  I can already see that there are going to be challenges along the way. I have to remember that eventually the silver will tarnish and the pieces will have to be polish and rinsed. I’ll have to careful that the finishes don’t rub off and all the pieces are secure. It will be interesting I think, so follow me down the rabbit hole if you dare.

First of all I do not plan on using this tea/coffee set. I don’t think the clay would fair well, plus the insides  of the tea and coffee pots are in the greatest shape. But most of all, I don’t serve tea and coffee with a silver service! Who knew? It’s going to be purely for display.

Alice Stroppel heart-rabbit


This was the first figure I sculpted. one of the Queen’s herald rabbits. I sculpted him right onto the handle of the creamer. There are going to be more things added to this piece, it’s not finished.

Alice Stroppel Mad Hatter


I’m notorious for jumping around so I jumped right to the Mad Hatter. I had a couple of problems with him and I’m still working on them. The first thing is that I sculpted him about three weeks ago and he’s just been sitting there.  (lesson # one, if you begin it, finish it then) I put the finishing touches on him and placed him on the tea pot. Well, naturally he was not as pliable as when I first sculpted him and he didn’t want to conform. Sounds just like the Mad Hatter doesn’t it?

I placed him on the tea pot, supported his tea cup with a bit of polyfil and put him in the oven. When I brought him out of the oven, he had slid up on the pot. I placed a towel over him and gently moved him back into position and press him  just as gently into place. Well…this works well for thinner pieces, but he’s thick and he cracked a bit along the middle, his head fell off (“off with their heads” said the Queen),  plus I broke the tea cup off and it took his finger with it. No problem, glued the crack together, and glued his head back on.

Then I had fun adding color using markers, make up and my new fun coloring toy Inktense sticks. (water color in stick form)

Alice Stroppel Mad Hatter

I glued him to the tea pot (superglue Gel), I had to hold him in place while the glue dried, but he stayed put. Then I couldn’t find the little tea cup that had broken off so I made another cup and finger and attached it with TLS. I actually like this cup better so all’s good. I put the tea pot with the Mad Hatter  back into the oven and baked again. Alice is going to go right next to him and the dormouse and the March Hare will probably end up on the other side. Lewis Carroll certainly liked rabbits I think. The White rabbit and the herald and the March Hare all appear in this adventure.

Next I have to cover him with TLS so that his finish won’t come off when it’s time to polish, then back into the oven again. Whew. We’ll see how that works.

So this is my adventure, I’m learning and have fun. I’ll post more as I progress, but don’t be surprise if other things get posted about in-between.