Just finished this first workshop on how to make canes, and I must say I learned so much. This is exactly what I have been looking for, someone who could explain cane making in a step by step that process that I could replicate. I watched the videos, went into my studio and began to create all of the canes Alice showed. I finally have results I can be proud of, and I say thank you so much for doing this workshop. My only question now is when do we get more workshops. If you are only going to take one online class let it be this workshop. Thank you Alice for your hard work, and your dedication to helping others learn the joys of polymer clay. Jennifer Rose
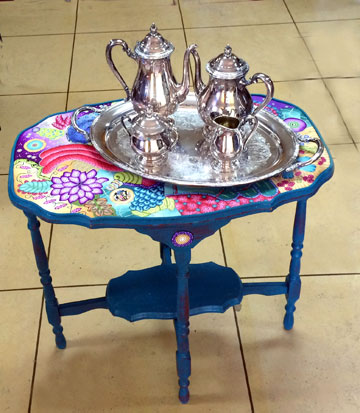
I found this tea set while I was working on my silver pitcher, it was a really good deal at my local antique store. I mentioned in the silver pitcher post that I was working on something else and it was going to be fun. (for me at least) Well it’s been over a month since I started it and I’ve done oh so many other things since then. But I finally got back to it yesterday and I can see it is going to take me several months to finish it.
I’m labeling it my year long project. Alice in Wonderland tea/coffee set. I can already see that there are going to be challenges along the way. I have to remember that eventually the silver will tarnish and the pieces will have to be polish and rinsed. I’ll have to careful that the finishes don’t rub off and all the pieces are secure. It will be interesting I think, so follow me down the rabbit hole if you dare.
First of all I do not plan on using this tea/coffee set. I don’t think the clay would fair well, plus the insides of the tea and coffee pots are in the greatest shape. But most of all, I don’t serve tea and coffee with a silver service! Who knew? It’s going to be purely for display.
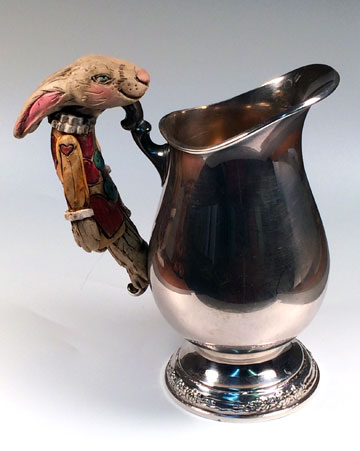
This was the first figure I sculpted. one of the Queen’s herald rabbits. I sculpted him right onto the handle of the creamer. There are going to be more things added to this piece, it’s not finished.
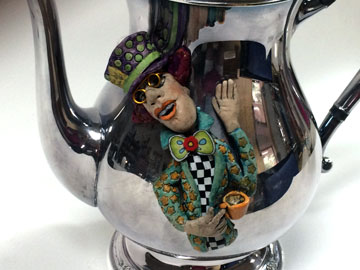
I’m notorious for jumping around so I jumped right to the Mad Hatter. I had a couple of problems with him and I’m still working on them. The first thing is that I sculpted him about three weeks ago and he’s just been sitting there. (lesson # one, if you begin it, finish it then) I put the finishing touches on him and placed him on the tea pot. Well, naturally he was not as pliable as when I first sculpted him and he didn’t want to conform. Sounds just like the Mad Hatter doesn’t it?
I placed him on the tea pot, supported his tea cup with a bit of polyfil and put him in the oven. When I brought him out of the oven, he had slid up on the pot. I placed a towel over him and gently moved him back into position and press him just as gently into place. Well…this works well for thinner pieces, but he’s thick and he cracked a bit along the middle, his head fell off (“off with their heads” said the Queen), plus I broke the tea cup off and it took his finger with it. No problem, glued the crack together, and glued his head back on.
Then I had fun adding color using markers, make up and my new fun coloring toy Inktense sticks. (water color in stick form)
I glued him to the tea pot (superglue Gel), I had to hold him in place while the glue dried, but he stayed put. Then I couldn’t find the little tea cup that had broken off so I made another cup and finger and attached it with TLS. I actually like this cup better so all’s good. I put the tea pot with the Mad Hatter back into the oven and baked again. Alice is going to go right next to him and the dormouse and the March Hare will probably end up on the other side. Lewis Carroll certainly liked rabbits I think. The White rabbit and the herald and the March Hare all appear in this adventure.
Next I have to cover him with TLS so that his finish won’t come off when it’s time to polish, then back into the oven again. Whew. We’ll see how that works.
So this is my adventure, I’m learning and have fun. I’ll post more as I progress, but don’t be surprise if other things get posted about in-between.
Sometimes things appear when you aren’t expecting them. Well, I guess that isn’t entirely true. I wanted to create something new to teach that could incorporate several skills and still have my love of whimsey and pops of color. So I was kind of hoping something would come to me.
I’ve been busy getting ready for my trip to GA to teach at Creative Journey Studios and to have a few things to add to my inventory there when this sunshine piece popped into my mind. I worked on another sun a couple of weeks ago and had thought about teaching that, but it’s complicated and I wanted something I could teach in a day.
The closure on this necklace was a bonus thought that came to me. I was impressed with the closure that Melaine West came up with using magnets. I was having trouble with the closure on my appleman and Jan Montarsi aka Jembox, suggested I use magnets. I haven’t gotten around to playing with them yet and was happy to be able to share in Melaine’s solution on how to use the magnets. She has saved me hours of testing and I think it is so generous of her to share her method. Thanks Melaine, your work is simply stunning.
I thought I might use Melaine’s idea somehow in this necklace that I envisioned, but I hadn’t ordered any magnets so another idea pushed that one right out of my head.
Here’s my answer when you don’t have magnets, not as sophisticated as Melaine’s but this is a different kind of necklace……. cut a channel for your necklace cord to slide into, drill a hole in the back of a small accent piece made from pc and glue in your cord. Easy!
Now, I’d love to teach this class for your guild or group. Complete with a bit of easy to master sculpting… yes you can…..some fun cane work…teaching you to jump out of that box…….(I’ll be working on some new and different canes to include) plus some contouring work. I had so much fun making it that I know it will be a fun class.
Anyway, I’m happy with this guy and wanted to share my new closure with you and show you a bit about how my crazy mind works…jumping from one thing to the next until something just has to spill out.
How one project can lead to another and other artists can spark an idea that ends with an finished product that is my own is an amazing thing and something I hope I never stop doing.
I gather inspiration from everyone and everything, I hope you do too.
Surprise, a second post in one day. I just wanted to share what I’ve done today at my clay table.
I’m still working on appleman and the concept. It’s a sweet little cabinet ( Doreen, I just need to figure out how to add a shelf or drawer) or box with a quick surprise inside and room to hold a special treasure or two.
I’ve added canes to the inside with my mosaic technique (modified) and baked him one more time. One of the things I want to work out is fewer baking sessions.
This one will end up on my shelf and I’ll enjoy him for a very long time. I have ideas for more in my head and am looking forward to translating them into clay.
I worked on my apple man yesterday, cutting him apart and adding a hinge, a clasp and some little ball feet. Today I’ll finish the inside.
I need more experience with hinges and making a really good fit, but I’m excited about the possibilities. He’s just such a fun little box. Or do you call it a box if it opens from top to bottom? Would it be called a cabnet instead?
You might have to look twice at this apple, my husband did. He came into my studio and said, ” oh I thought you had an apple in your hands, oh it is an apple, oh it has a face! That’s cool.”
Now you have to understand that for years all I could get out of him was, “what were you thinking?”. But in the last few years his comments have gotten more complimentary and “that’s cool” is amazingly high on the list of compliments so far. Hehehe…..I’m wearing him down.
He loves that I love what I do, and he’s oh so supportive, but I’m not sure he has ever understood my crazy way of thinking. But that’s okay I don’t understand his obsession with cars either, so we’re kind of tied. I’ll take “that’s cool” and love it.
After the sculpting workshop I taught last weekend, I decided to play around with some ideas I’ve had in the back of my head for a long time. I started this apple man with the idea of making him an ornament like The Baker Man ornament I made when shooting my found objects video.
I can’t believe that was almost 2 1/2 years ago. It just proves that no idea is ever lost.
Well apple man quickly turned into something entirely different. He is a work in progress so you’ll have to come back to see him finished. I think this idea is pretty “that’s cool”, so keep your fingers crossed that my experiment works.
By the time our two day workshop was over, we were all totally into body parts. Feet and lips and noses and HANDS. The picture above is an indication of the fun we had, you can see it was a crazy time with a great group of talented friends. I think they all invited their muses to join us while some pretty impressive face and body parts came to life.
I love teaching, the ah ha moments that produce giant smiles and the looks on faces that say, “got it, I can do that”. It’s so satisfying to watch people step out of their comfort zone and realize how much talent they have.
Just look at these face and body parts that this class made. Everyone made their own sample parts so They’ll have them to look at when they’re ready to make their next character.
Seriously, everyone did a fabulous job and I’m so grateful to be able to share what I know. Thank you ladies.
Finally having time to work on my sculpting for my workshop next weekend. I’m going to leave it here and finish during class.
I want to start an old man next, wrinkles are fun to make if not to have……
It’s cold here. going to be 30 here tonght. We’ve been spoiled this winter, the weather has been in the upper 70s and 80s so I shouldn’t complain, but it’s too cold for me.
I’ve been cleaning up and cleaning out, my studio and my bedroom closet. It’s so hard to let things go, but once you do it is very liberating.
Good bye clothes that no longer fit me and even if I did ever lose enough weight to wear you again you would be so far out of style people would laugh anyway………. feels good.
But my art supplies, that’s a whole other story, those things will never go out of style right? Dry up and become unusable maybe, but hey, even the 70’s crafts are coming back aren’t they? Okay I know, some of it had to go, but I know I’ll be sorry someday when I need that pound of wool fiber for something……..
I think I might “creep” some people out with this picture of the foot that I did for my sculpting workshop. But hey, we’re doing realistic sculpts in the workshop.
I’ve been racking my brain to figure out what I can make with just the foot without it really being creepy. Not sure I can. I’d like to incorporated it into a mixed media piece instread of just adding it to the collection of polymer clay hands that I made.
It’s not actually a collection, or at least didn’t start out that way. I made a giant mermaid and the first set of hands were too big and then the second set was too small, and one set was just right. (sounds like Goldilocks and the Three Bears). That set went on the mermaid and the other two sets are now “a collection”.
Oh and I forgot the hands I made for the almost life sized santa I have standing here waiting for me to dress him. Those hands are kind of part of the “collection”.
I know….I’m kind of strange, but I always, always, have fun.
Oh man I’m having a blast. I’ve been wanting to do my own mixed media sculpts and Charlene Ahlgreen has made me get moving towards that very thing. Okay, Charlene doesn’t realised that by asking me to share what I know about sculpting hands etc in a workshop that she was going to unlease this whole new direction for me. Thank you Charlene.
I’m not got to be teaching this exactly, just the sculpting part, but I don’t see any harm is a little side trip for me while I’m getting ready for the class. (see me grinning with a twinkle in my eye?)
I love color don’t you? I like beautiful soft color, sophisticated color, and understated color too, but somehow the bright exuberant colors just make me smile.
I’m still thinking I need to add more cane slices. Here’s where the question, “when do you know it’s time to stop?” comes in.
Should I title it “look up”, “heads up” or…..help me here, leave me a suggestion just for fun!
I’ve started working on the samples for the sculpting workshop I’m going to teach in February. We’re going to study hands, feet, heads and armature. We’ll be looking at wrinkles, veins, and fingernails. In other words, we’re going to have a bunch of fun and create some incredible sculpts.
I decided to do a pointing hand because I have some ideas floating around in my head and you know it has to involve color. So stay tuned, it could be fun.


Comments