27 videos, step by step, beginner cane workshop
What people are saying about this tutorial.
jennifer rose
Just finished this first workshop on how to make canes, and I must say I learned so much. This is exactly what I have been looking for, someone who could explain cane making in a step by step that process that I could replicate. I watched the videos, went into my studio and began to create all of the canes Alice showed. I finally have results I can be proud of, and I say thank you so much for doing this workshop. My only question now is when do we get more workshops. If you are only going to take one online class let it be this workshop. Thank you Alice for your hard work, and your dedication to helping others learn the joys of polymer clay.
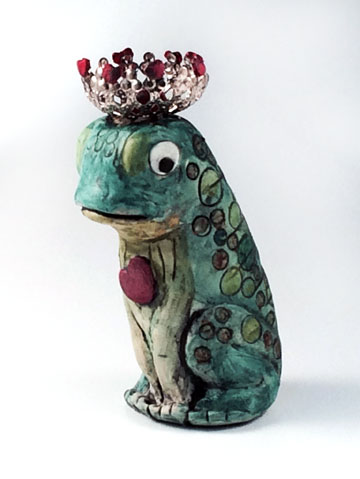
And when the princess opened the door the frog came in, and slept upon her pillow as before, till the morning broke. And the third night he did the same. But when the princess awoke on the following morning she was astonished to see, instead of the frog, a handsome prince, gazing on her with the most beautiful eyes she had ever seen and standing at the head of her bed.
He told her that he had been enchanted by a spiteful fairy, who had changed him into a frog; and that he had been fated so to abide till some princess should take him out of the spring, and let him eat from her plate, and sleep upon her bed for three nights.
‘You,’ said the prince, ‘have broken his cruel charm, and now I have nothing to wish for but that you should go with me into my father’s kingdom, where I will marry you, and love you as long as you live.’
With Valentines Day coming up, I couldn’t resist making a frog prince to sell at Studio 215. He’s just waiting for his princess to take him home.
There are still spaces available in Meisha Barbee’s workshop. It’s going to be so much fun, leave me a message here in the comment section if you want to secure your place and I’ll get back to you .
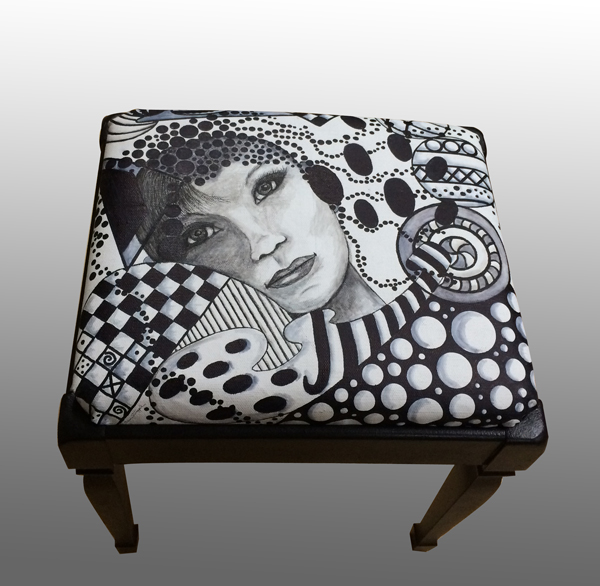
I drew this woman on canvas last June with the idea that I was going to frame her, she has been patiently wanting to become something. I found this perfect wooden stool at a garage sale this week-end, painted it black and now my girl has a home. I have several other pieces I’ve been working on and will be sharing soon.
She is going to be for sale and I’ll be telling you more about that by the end of the week. I have some exciting news to share and can’t wait for it to happen. See you a a day or two or three.
‘One side will make you grow taller, and the other side will make you grow shorter.’
‘One side of what? The other side of what?’ thought Alice to herself.
‘Of the mushroom,’ said the Caterpillar, just as if she had asked it aloud; and in another moment it was out of sight.
Alice’s Adventures in Wonderland, by Lewis Carroll
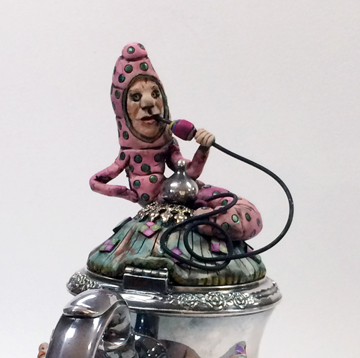
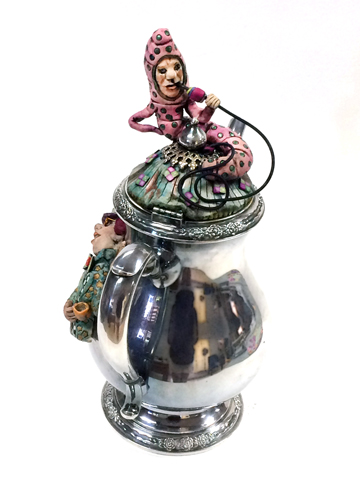
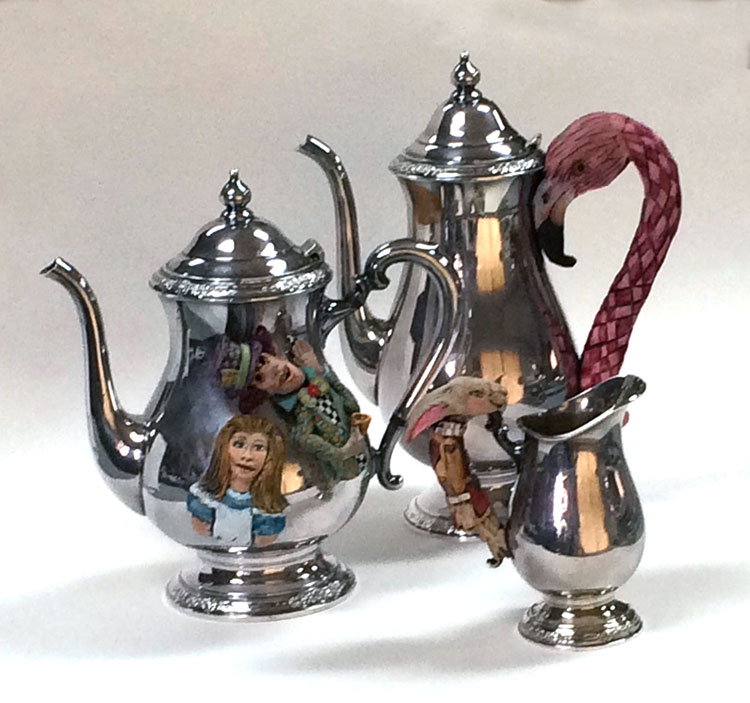
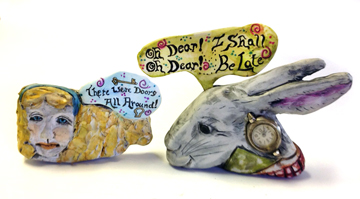
I’ve finally had time to working a bit more on my Alice in Wonderland tea set and I’ve added the caterpillar with his hookah. There are so many more characters I want to add to the set so I need to get busy.
The reason I’ve been too busy to work on Alice and her friends is that I took a trip to SanDiego to attend Sandy Camp (a well established polymer clay retreat) and to visit my friend Meisha Barbee. What fun I had and what a great group of clayers there are in California. More about that in my next post.
Character for this side?… maybe the Dormouse and the rabbit that was at the tea party.
“If I had a world of my own, everything would be nonsense. Nothing would be what it is, because everything would be what it isn’t. And contrary wise, what is, it wouldn’t be. And what it wouldn’t be, it would. You see?” Lewis Carroll, Alice’s Adventures in Wonderland & Through the Looking-Glass
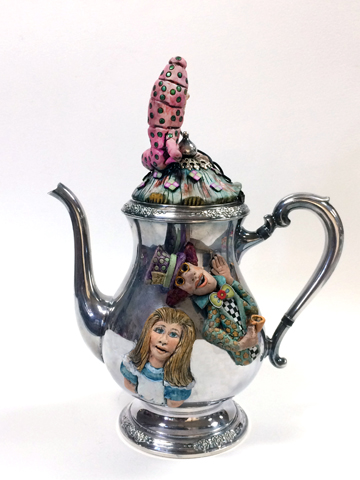
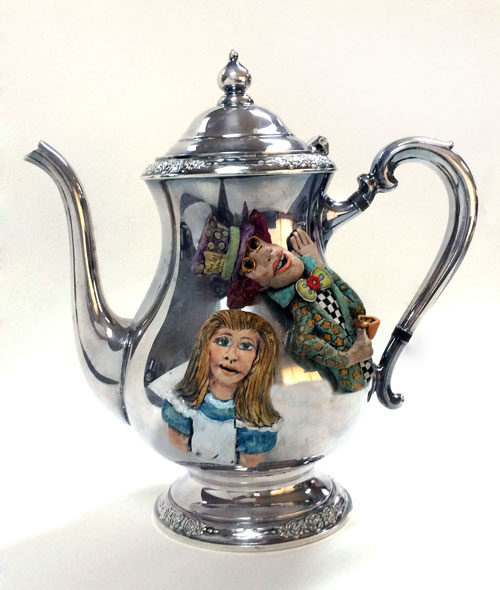
As you can see I’ve been working on Alice herself and here she is with the Mad Hatter. You’ll notice that I’ve moved the hatter and here’s why.
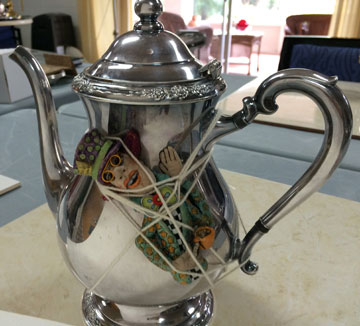
The other night after my post here and on Facebook, Ellen Prophater call me to share her thoughts on how to adhere my figures to the silver teapot. Thanks so much Ellen it’s nice to have a friend looking out for you. She suggested I use Genesis Artist Colors Thick Medium-Extender. She uses it all the time and with great success.
Oh course I have some, I bought it from her, naturally. Elleen and Sue Sutherland own Creative Journey Studio and carry almost everything you might want or need for claying. I’ve actually used it once or twice but didn’t really like the consistency of it and put it aside. But to be fair I didn’t use it long enough to really judge but it’s hard to spread.
And she’s right, super glue was not a good choice for this project so I popped the Hatter off the teapot and reattached him using Genesis, it worked very well. At least the bond is strong and solid.
Now you’re going to laugh, I had to tie the Hatter to the pot.
I told you that you were going to laugh.
Because of the dip in the teapot the Mad Hatter just didn’t want to stay in place. With Genesis on his back he just slid all around. It’s a problem I have with any liquid clay and with Genesis obviously.
Because he was already baked and solid I could tie him down, obviously this wouldn’t work with uncured clay. That leads me back to my post from yesterday where I talked about sculpting the Hatter about three weeks ago and he wasn’t very pliable, he was hard to fit to the shape of the tea pot.
Oh and I decided to move him to the right side of the teapot and like him there better so it all worked out.
Yesterday I sculpted Alice and placed her on the teapot right away while she was still soft. She stuck pretty well and didn’t move around when I baked her. I didn’t use the Genesis on Alice before baking because it’s thick and hard to spread, I didn’t want to mess up my sculpting efforts by push to hard.
She’s stuck to the teapot pretty well without anything but just the same I’ll pop her off and use Genesis before I bake the teapot again.
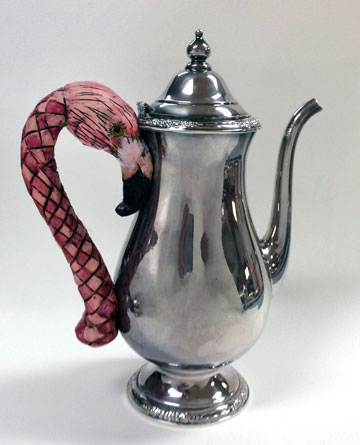
The flamingo makes me smile, being from Florida the flamingo is a favorite Alice Character of mine, not that there are any in my part of the state! Sandhill cranes yes, Flamingos no.
Here’s how the set is shaping up and you know that by the time I’m finish, I’ll have to add a few Alice crazy flowers. Thanks for following along.
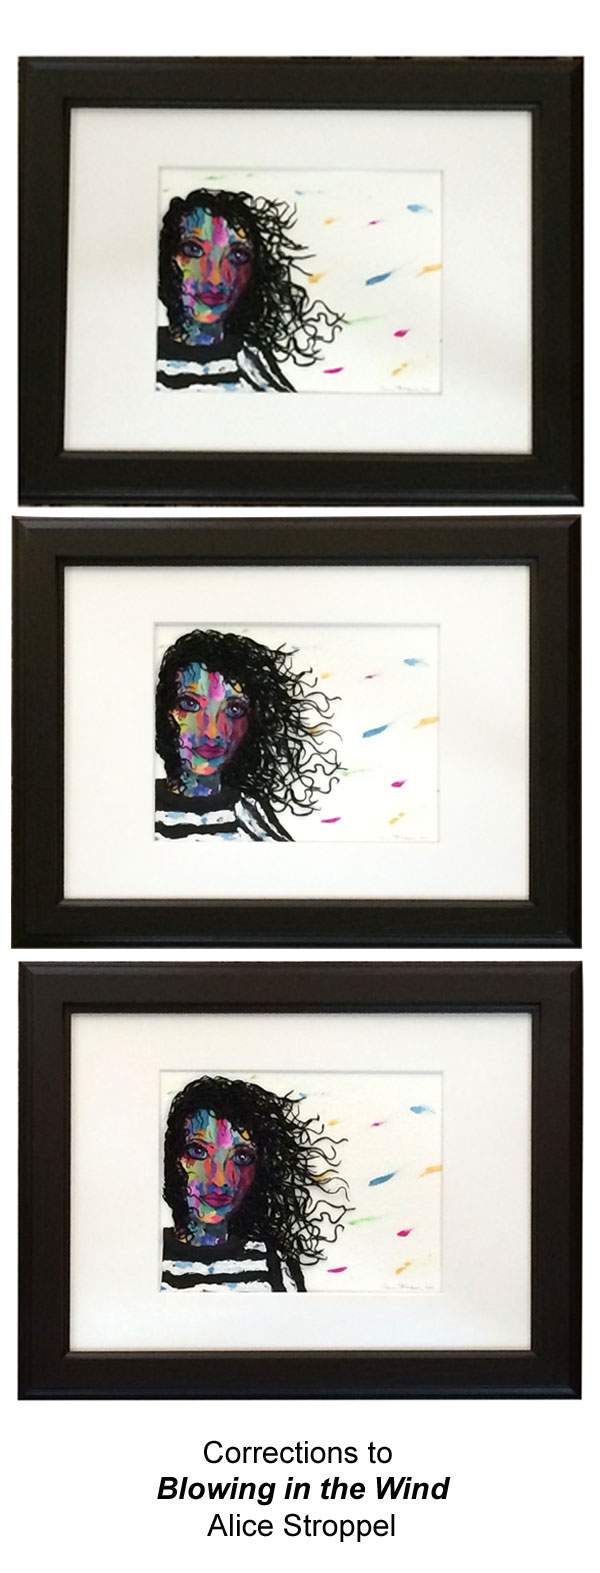
I been having fun with these polymer painted faces. This one I stopped working on late one night. I was happy with it and took a picture before stopping for the night. I had already cured it in the oven and attached it to a peace of heavy water color paper. the bits of color in the background are bits of pc not watercolor.
The first photo shows this first edition. When I saw it the next morning, I laughed because I could see right away that she was missing the top of her head. Not enough height to her hair. I was tired the night before and didn’t want to make any more hair I guess. Another reason why stepping away from a project and coming back to it or even taking a photo of it is very helpful.
I often see things in photos of a piece that I just couldn’t see when I was working on it up close. It helps to step back from the work, but sometimes taking a photo is even better.
The second photo is where I noticed that her shirt was just wrong, not enough shoulder. I guess I was too focused on the hair to notice the shirt first time around.
This is also another vote for sketching before hand, I did sketch the face, but didn’t know I wanted the shirt until I was in the middle of it all. So I work both ways, planning and as I go.
The third photo is my final try. Quite a difference I think!
I figure I’m a work in progress more than than work. As always, thanks for stopping by.
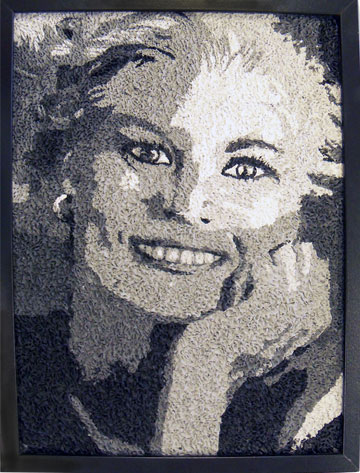
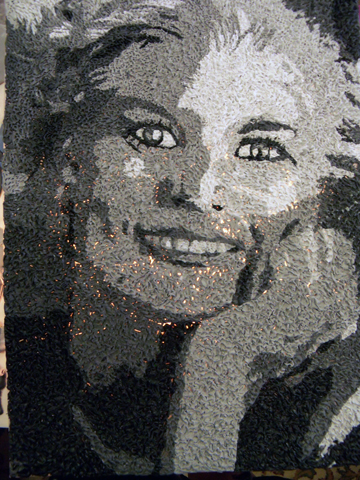
So here I am with the finished portrait. I’ve learned a couple of important thing about this process and I’ll share them with you. I had a great time doing this and I’ve managed to make an anniversary present for my husband. He actually liked it very much, reminds him of all the years we’ve been together, 44 years is a bunch.
I somehow lost track of my shades of gray and didn’t follow through with the right shade on the top right. By the time I got to the bottom and the arm I realized my mistake and didn’t have enough of the lighter shade mixed so… I just continued with the darker shade. It’s okay, I’m still happy with the over all outcome but lesson #1…mix enough clay. It was just hard for me because I had trouble mixing that much gray from perfectly good black and white new clay. I actually have enough scrap gray thank you very much! If it would have been any color, I could always used the left overs for something else.
I believe I might do it again just to see how different it will look if I actually follow the picture. Whaaat? follow the pattern, pheeew.. but this time it’s going to be a color.
Part of Lesson #2 I already knew, there will be places that you have to fill in. The lesson came in when I realized I was in a big hurry to finish it last night and didn’t take enough time to cover well at all. I had to spend that time this morning filling in anyway. So Lesson #2 is take your time. HA!
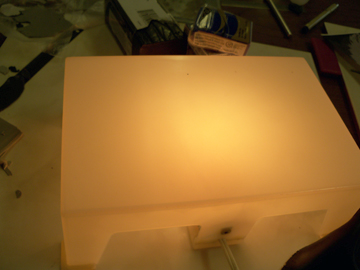
Part of the problem was it was hard to see, the paper picture on the back of the glass didn’t let light through and it was night time. ( cant’ think of any more excuses for this one)
I have this little light box that came in handy for finding the holes to fill in. I just placed the piece on top and filled away.
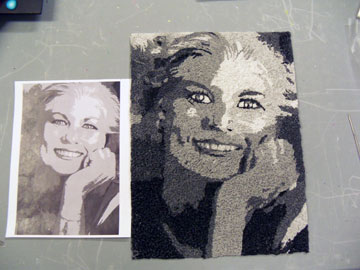
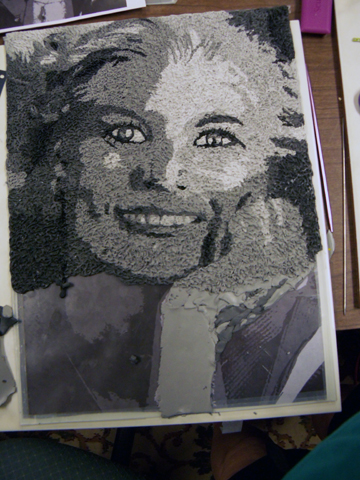
Here it is a little more than half way finished. First I lay out my clay following the picture and then stipple it with a knitting needle, my fingers are not very happy with me.
I think you might really enjoy giving this a try. It was pretty easy to do and not as time consuming as other techniques. You could do it with a drawing as well, or a photo of a landscape, it doesn’t have to be a portrait. And it doesn’t have to be a large wall piece.
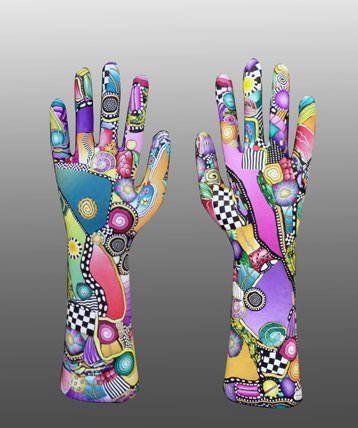
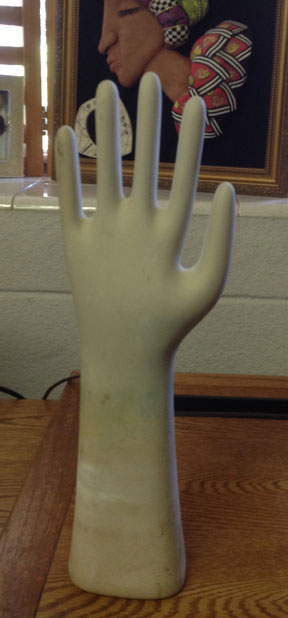
I bought two hand molds at a flea market several months ago with the intention of coming right home and covering them with clay. It certainly wasn’t right away but believe it or not, I’m proud I actually got one of them covered before the year was out. Usually projects like this sit around staring at me forever.
This is one hand, I’m just showing you both sides at the same time. I still have some work to do on it before I begin on the second one. I have a bit of ……*choke, cough, choke* ………sanding to do and buffing it up. You see how much I wanted these, I do not like to sand or buff. but it will be worth it.
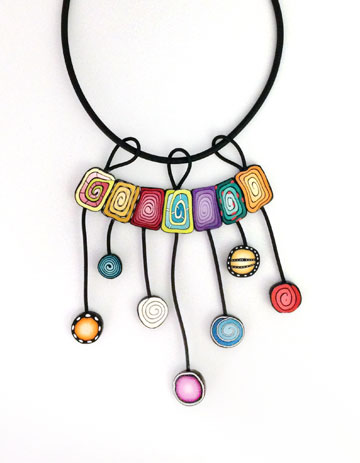
These are colorful, funky and a perfect sampler of many of my canes. I’ll be happy to have it to remind me of them all.
These hand are molds for rubber gloves. The flea market vendor had about 20 of them and I wanted to buy them all. I know, I know, I’m having trouble finishing two so what would I do with 20? Anyway, I’m glad I bought the two. You can find plenty of these glove molds online should you be so inclined to cover one.
Even if you didn’t cover them, they would make great display pieces just like they are. Hang your necklaces or bracelets from the fingers.
now…..what should I do with the second one. Black and white? more color? hmmmmmm.
My Circles and Squares necklace was featured yesterday by Sage Bray on The Polymer Arts blog. I do enjoy this piece very much and always have one or two people tell me how fun it is! When I’m told that my work makes people smile of makes them happy, I consider my job accomplish!
I’m always so excited to see my work featured in The Polymer Art magazine or blog, I appreciate the fine work that Sage is doing for our polymer clay community and feel privileged to included with the vast array of talented artists working in polymer clay. Thank you Sage.
——————————————————————
West Coast Polymer Clay Guild
No picture here! I can not believe that I spent the whole day with this lovely, funny group and didn’t take one picture. I blame the guild member actually, I asked them to remind me and to not leave without a group picture. But every single one of them forgot to remind me. 🙂
I really apologize ladies, it was my fault after all. Next time I won’t forget.
All of us at this workshop want to send a giant thank you to Polyform’s Education Manager Iris Weiss and Polyform Products for supplying all the clay and then some.
We had a really great time though, what a talented group of women. I hope to get back to New Port Richey again soon.
—————————————————————
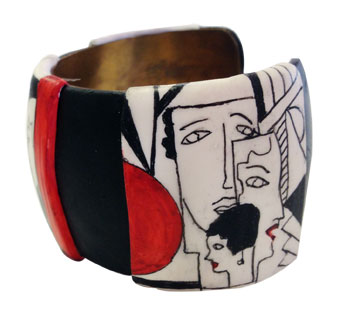
Art Deco
I’ve been drawn to Art Deco all my life. Maybe it was visiting Miami when I was a kid and seeing all those fabulous art deco buildings, or just the clean lines of the jewelry or the advertisements and art work created in that style. I think it might be the romanic vision of the ’20s that draws me in. Such large changes taking place in clothing, hair styles, woman’s rights…the world was changing dramatically.
Right now I’m working on this bracelet using my pen and ink technique. I wanted something new with pen and ink to take to the Orlando Area Polymer Clay Guild when I teach there next week. Working on slides in this style as well.
Having a ball actually, one more panel on this one and I’m finished.
I’ve always love fairytales and Alice in Wonderland, ( I wonder why) so I’m playing with some of the characters.
I tried some Sculpey original white clay for the rabbit. It takes the alcohol ink differently than the white Premo. I need to play with it more to see which I like better. There are pros and cons to both it seems.


Comments