27 videos, step by step, beginner cane workshop
What people are saying about this tutorial.
jennifer rose
Just finished this first workshop on how to make canes, and I must say I learned so much. This is exactly what I have been looking for, someone who could explain cane making in a step by step that process that I could replicate. I watched the videos, went into my studio and began to create all of the canes Alice showed. I finally have results I can be proud of, and I say thank you so much for doing this workshop. My only question now is when do we get more workshops. If you are only going to take one online class let it be this workshop. Thank you Alice for your hard work, and your dedication to helping others learn the joys of polymer clay.
I just wanted to take a minute to celebrate with Cynthia Tinapple. Today marks her 2,000 post on Polymer Clay Daily. Cynthia has created a window into the studios of polymer artists from around the world, introducing us to work we might not have ever found on our own.
We’ve been inspired and entertained by, in awe of, and delighted to be introduced to the artists Cynthia has shined a light on. PCD is an important stop in most polymer artists’ day.
I am most impressed by Cynthia’s continuing support of the women of Nepal and their quest for individual freedom and expression. She shared her polymer clay Shisha technique with the women of Samunnat on a visit to Nepal.
You can see her Shisha necklace in the picture below and you can order your own Shisha bracelets made by the ladies here in their Sumunnat Shop on Etsy.
Recently, Cynthia, Wendy Moore and Ron Lehecky have succeeded in helping to fund a building project for the women of Sumunnat. And there is still time to donate and I hope you do. Here’s a link to learn more about this worthwhile project.
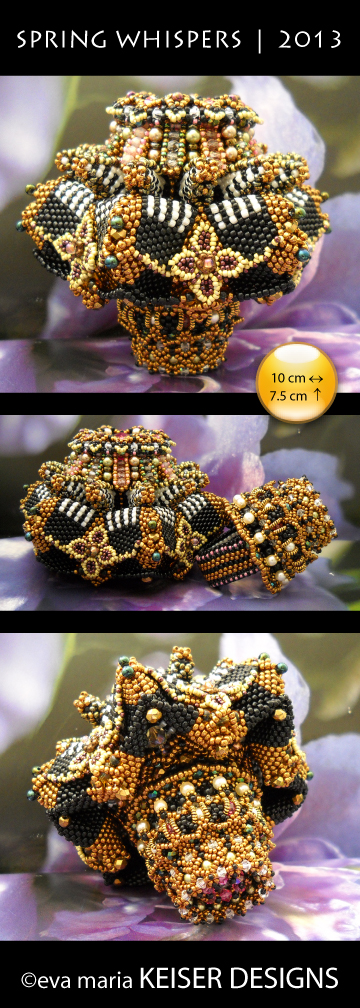
I am delighted to be featured on Eva Maria Keiser’s blog as one of her chosen artists for her Colorway series. Thank you so much Eva Maria.
Eva Maria is an accomplish, incredible bead artist. From vessels to adornment, you will find her work mesmerizing. If you are a bead artist, Eva Maria offers several free tutorials on her blog. Grab a cup of your favorite beverage, you’ll be spending quite a while on this blog.
For a couple of years now, I’ve been using a “light box” that I made myself out of an old cardboard box, paper, and muslin. It really has worked well for me but it began to be worse for wear and I decided to order a “real” one.
Cynthia Tinapple mentioned something on her blog, Polymer Clay Daily, or maybe in her newsletter, StudioMojo, (couldn’t find it on either) about a portable lightbox that people were using. I put it on my Amazon wish list and to my surprise, I got it for Christmas. I should have posted it to my shopping list instead….
Anyway, when I opened it, it was huge and wouldn’t fit in my photography space. I should have taken a closer look at the size. Anyway I sent it back and continued to look. I found Modahaus and their tabletop set up. The really cool thing is that I can take photos with my iPhone or my camera. Sometimes I just want a quick picture for my blog and sometimes I need a more professional photo.
There are several toppers that allow you to use different devices. The one in this picture is for an iphone. I do have a set of lights that I use, one on each side, that I’ve had since my sewing pattern days.
I have both a Steady Stand and a Tabletop Studio. I just wish I would have ordered the next widest Tabletop Studio. I might just have to anyway.
I think the price is reasonable and I’m very happy with the quality and the performance of this product. You can see all their products on their website Modahaus.
The other cool iphone helper is this iphone tripod adaptor from Studio Neat. When I first wanted to video a few things with my iPhone, I found that there wasn’t any way to attach it to a tripod. I found this cool adaptor and now I take my videos with my iPhoto. A far cry from the $1,000 plus camera I had a few years ago and now doesn’t take such great videos.
There’s also a snap app for iphones editing videos, it’s iMovie. I have the full version on my computer, but this little app is perfect for small projects. Sorry, put I don’t know about any other editing apps for other phones. Been a Apple girl for over 30 years and not switching now.
I’m thrilled to have a piece of my working included in Christi’s new book Flourish. On another page, Christi also uses the Stroppel Cane to make a swirly, twirly, flowery thingy, which is exactly Christi-like and so much fun.
My piece in Christi’s book is a piece I made using some of the tropical leaves from my…wait for it…Tropical Leaves tutorial that I have for sale in my Etsy shop. It’s both a video and a detailed pdf.
Here it is in the book and thank you Christi.
One thing I’ve noticed with artists that self publish is that their publications are crammed with information. It reminds me of myself when I’m teaching. I want to share and show you everything I can in the short time we have together. The other recent book that I’m thinking of is Helen Breil’s Shapes.
Each of these books are so full of information, photos and techniques that each new owner will have projects to last them weeks and enough inspiration to start ideas popping in their heads like fireworks on New Years Eve.
I’m getting ready for Synergy and looking forward to a very exciting, inspiring time. Along with all the talent gathering in one place, I’ll get to spend time with old friends and meet in person friends I’ve only met online. I hope to see you there.
This picture shows you just how happy I was to be asked to teach for three days at Maureen Carlson’s Center for Creative Arts. I was in Jordan MN at Maureen’s Center over a week and a half ago and I wish I were still there or at least lived close enough that I could visit, spend the night and enjoy the camaraderie of fellow seekers of artist expression or just plain good company.
Last night I was at Highlands Art League in Sebring, FL giving a polymer clay demo and Chuck and Vada Thomas were there. Like me, they saw Maureen on the Carol Duvall show in the late 1990’s and heard her mention that she had a center in Jordan where you could take a class and spend the night in the dorm rooms upstairs. They called Maureen and were shortly on their way to Minnesota. Maureen remembers them and says that Chuck’s sweet potato carving and wooden gnome carving still grace her shelves. It’s a small world, even here in this little county in Florida Maureen has touched many people.
These are a few of the polymer clayers that were at Maureen’s. Kit is pictured below, but sorry to say we never did get a picture of Ann Poulson and Kit Wojcik on the day they were there, Maureen took this of Kit on another day. Sorry Ann.
Linda Garbe, Maureen Carlson, Beth Wegener, Karen Nelson, Renee Carlson, Anne Brown
Kit Wojcik
We did face canes and pen and ink and cane mapping, and as usual, there were some wonderful pieces that were created. We all enjoyed each other and everyone finished pieces that they really liked. In fact Kit went back to Maureen’s another day and she, Maureen, Renee kept working and creating more projects. they said they had a ball with the Stroppel Cane.
Anne ‘s face cane was it was really good. She made this bracelet with a slice. Wish you could see it on her, taking pictures of a face on the curvature of a bracelet doesn’t do it justice.
Karen created this fabulous, funky, colorful cane mapped cat. I’d say she likes purple. She kept saying, “I’ll never be able to do this, I don’t like intricate work”. But oh how wrong she was, I think she had a good time too.
Renee hasn’t finished this butterfly, but I hope to have pictures when she does. Just so fabulous I can’t wait to see the finished piece.
Linda had fun with her faces and made a beautiful bracelet and cane mapped design. Wonder what she’s going to do with them?
Beth was in a avian mood and made several stunning birds. Wish I’d gotten a better photo of her work. Try and zoom in on this bird, it’s beautiful. Beth if you read this, send pictures, pretty please.
A shot of the classroom. It’s the best place to be, seriously just like home, full of touches of Maureen’s art and others all around the room.
Anne Brown created this beauty that holds special meaning to her. It really made me happy to see the smile on her face when she finished it.
Maureen combined her cane mapped piece with a pen and ink face and accents to create this enchanting pendant. I love this piece.
Now really, who would have ever believed that Maureen would be sitting in classes taught by me? Not this girl! She was pretty well behaved and as expected, a model student, accept when she and Renee were cutting up and laughing too hard.
Renee made these when Kit came back another day to play.
And Kit made these excellent bracelets on that day. Two are from Stroppel Canes and the last features her pen and ink face.
More after class fun and co-ordinated “homework” by Renee. Love them both.
Just to show you how much fun we had and what a crazy bunch of woman were in attendance, Linda made these outrageously fabulous earrings that she and Karen are modeling. (she didn’t make them in my class, she just brought them to share.) They’re titled, Ears to You Mr. Spock. How Funny! You should take a look at some of Linda’s videos, her work and stories are wonderful and you’ll learn something, I promise you.
There are picture on Maureen’s website, showing the outside of the center and the dorms. Here’s the charming room I stayed in. Complete with WiFi and all.
When you first walk through the front door you’re charmed and know you are at Maureen’s. Wee Folk, Maureen and her husband Dan’s creations, are everywhere, smiling at you from all directions. Look to your right and you see the stairs leading up to the dorm rooms upstairs.
Look to your left and be lead through Maureen’s workspace into the classroom.
Peaking into Maureen’s office you are greeted by this jolly life size Santa and Maureen freely admits that it’s a museum of sorts, housing many pieces of her’s and other artists. Love the positive words dancing across the walls.
Here’s Renee’s sweet dog, Poochie, keeping great company among some of Maureen’s favorites surrounding her work space.
Maureen sells finished items but also all the supplies you might need for any of her class. See…. once you get there, you never have to leave. Unless of course you’re tempted by charming antique shops and delightful cafes, then you might want to stretch your legs with a walk up the street. Or maybe sit by the sweet babbling creek out the back door.
So there you have it, a very full, fun filled 5 days at Maureen’s, a dream come true. Now to start planning my trip back, maybe as a student taking a class with Maureen or one of her guest artists.
Here’s Maureen, Anne and me on the last morning, I hated to leave. Anne was driving right by the airport on her way home and graciously offered me a ride. Thanks so much Anne.
Come over ….or up …….or down to Maureen Carlson’s Center for Creative Arts in Jordan, MN. Join me at Maureen’s for three full days of fun filled classes, take one class or all three, spend the night or just come for the day.
Isn’t this the coolest thing you can think of to actually own? Your very own shop where you have a fabulous studio to create in, you can teach classes and week long workshops, have guest instructors visit and on top of that students get to sleep upstairs. Slumber party!! Retreat time for sure.
Well this is exactly what Maureen Carlson has and I’m lucky enough to be a guest instructor on September 21 – 23 2012. I’ll tell you more about the three classes I’m going to teach in a minute.
I have been a fan of Maureen and her work for years. One of the first polymer clay books I bought was her book Family and Friends in Polymer Clay. Then I watched her on the Carol Duval show and loved her more.
When I finally was able to concentrate on polymer clay alone, I started two blogs, this one and The Figurative Artbeat. Maureen was kind enough to allow me to do an post on her and her fabulous work. It was the first time I actually contacted Maureen and then we met at Fandango that year were she was demonstrating her new face bead molds, she is just as fun and warm and inspiring in person. We’ve been friends ever since.
I’ve have wanted to visit her Center for Creative Arts for years, so this year is it. If you’re a fan of Maureen’s and want to experience the fun of her center, come on and explore it with me, we’ll have the best time, I know we will. Plus I’ll be sharing some of my favorite techniques, tips and ideas with you.
Now… I’ll be teaching three of my favorite things. Profile Face Canes, Cane Mapping/Contouring, and Pen and Ink. Each class is filled with as much information as I can fit into one day. August 21st is the reserve – by date for all three classes so be sure to follow the links below and let Maureen know you want a reservation.
Sept. 21 – The Profile Face Cane – reserve your spot here
Making this profile cane is surprisingly easy and we’ll spend some time making hair canes too. We can make bracelets, pins, or slides. I promise you we’ll giggle. Plus you’ll get a pdf file and a video link for later reference.
You can make pins from your face canes, put them on vessels or glass vases.
Or a cocktail shaker, how funny is that. Here’s three side of the same shaker.
Sept. 22 – Cane Mapping/Contouring – reserve your place here
This class is super fun and so far everyone that has taken this class with me has produced some wonderful pieces and had many “ah ha” moments. It’s a class about opening your mind to the possibilities that await you with all those canes you love to make.
These fairy dresses were made using my cane mapping technique, so was the design on the necklace below. Tracery tied for second place with the judges and won first place members choice in the IPCA’s Progress and Possibilities 2011. I’ll even show you how to display some of your work when you’re not wearing it. The fairy dresses above are actually pendants.
Tracery - Alice Stroppel
As you can see it’s a technique that can be used in many ways, big and small. Be sure to bring lots of your old canes, plus we can make some new ones.
Sept 23 – Pen and Ink on Polymer Clay – reserve you table here – With this class you’ll receive a pdf of face patterns and a link to a video for future reference.
Now this class is a blast. Again…you can use this technique on polymer clay bracelets, pendants, buttons, plaques, canvas, or whatever you can think of.
You can use just black and white or you can go full color. You don’t have to do a face, you can do simple graphics and produce fabulous pieces.
I created this cat and mouse pendant for a friends, fun I think.
This one is a favorite too. I’ll demonstrate how to construct these windows for your drawings and how to cover a bracelet.
There are endless ways to use this pen and ink technique, your imagination will run wild. And you won’t be able to leave until we’ve all made a Stroppel Cane.
I made these fairy dress slides for an exchange that was canceled but is going to take place next year at this same time. I had them all made and needed to just put them away and I’d be set. HA! I knew I wouldn’t be able to wait a whole year to post them, I also knew that by next year there would be something else I wanted to make for the exchange.
These dresses are 1 1/2″ x 1″ and are so much fun to make, I couldn’t stop. Good use of small bits of canes, even a Stroppel Cane or two thrown in.
I almost made it though, I put them away and haven’t thought of them for several weeks. Then the other day I was cleaning out a box full of “stuff” and in the bottom of the box was a bunch of 1″ x 1″ wooden blocks. I saved the blocks thinking… as always… that I might be able to use them for something… someday. You know how that is don’t you?
Well, I know you will find this hard to believe, I was shocked, but I actually did think of something to use them for in a very timely manner and while I still knew where they were.
I have been trying for a couple of years to figure out a way to display some of my items as well as some of my swap items. I have pins and masks and inchies that are little works of art. I want to look at them, not just put them away. Some I’ve framed, the inchies were easy enough, but others posed more of a problem.
The pins and slides I have could not be glued down if I were ever going to wear them. The mini masks were all over the place as far as a flat back goes. Besides, really, each one is a fabulous little art piece.
I painted the blocks black, drilled a hole in the center of the top, glued a piece of thick wire in the hole and tada…a stand for whatever. With the dresses, there is a hole drilled from side to side allowing it to “slide” onto a steal cable necklace. I simply drilled a hole in the bottom of the dress so it could now slide onto the wire in the cube. It won’t be glued so that it can be removed and “slide” back onto the necklace. I can’t tell you how happy this makes me.
I had this white block lying around and thought it would look cool to have a grouping. So you see, this idea is limitless.
Of course I can’t stop there. I did the same thing to this Stroppel Cane sweater girl slide.
Then there are the single beads below, all of which can be worn as just a single bead or in groups.
Or how about a whole set of matching beads? One minute they are mini graphic sculptures and the next you’re wearing them out to dinner.
Just slide them off the wire and slide them onto the necklace. Fun, fun for sure.
I think it’s a great way to display pins as well, just slide the closed pin back over the wire.
Okay, enough for today. My head is full of more ideas. Let me know if you do something like this, I’d love to see.
Look what came in the mail yesterday! This beautiful set of Shisha bracelets made by talented women of Samunnat Nepal.
I’ve been following the women of Samunnat Nepal ever since Cynthia Tinapple said she was going to visit the women there to share her polymer patterns.
I found out about Cynthia’s trip at a retreat we were both attending. We had a slide exchange and her slide was made from the polymer patterned “cloth” she was planning on teaching the women of Samunnat Nepal.
You can see they go together so well. What you can’t see is the reflection from the tiny little mirrors embedded in the pattern.
I wanted these bracelets because they go with Cynthia’s slide and I watched as she worked on one of the pattern sheets. And because it all means something to me, as Maureen Carlson always reminds me, everything has a story. So these pieces have a story with a beginning and a middle with the ending nowhere in site. The women of Samunnat Nepal are writing the rest of their story.
The main reason I wanted to own this bracelet set is because all the proceeds go back to the women and I wanted to support their efforts. You can read more about these beautiful women on A Colourful Journey website. It is the website “for Nepali women who have survived domestic violence and are developing ways to generate an income for themselves and their families. These women are affiliated with the non-religious, non-profit, non-political Samunnat Nepal project.”
Sometimes we polymer clay artists think that because we make polymer clay jewelry, we don’t want to buy others polymer clay jewelry, but I would encourage you to think about lending your support to these ladies and empowering their escape from violence. You won’t be sorry for a second, these bracelets will make you smile from the minute you open the package. And every time you look at them you will know you helped in a small way.
You can own your very own Shisha Bracelet, just visit Samunnat Shop on Etsy. Tell ’em Alice sent you. If nothing else, mark their shop as a favorite so your circle can get a chance to take a look.
Oh and by the way, they have other wonderful pieces of jewelry and are adding more all the time.
Thanks to Pamela Carman, I’m looking forward to next week-end! I’ll be spending two days with the South East Florida Polymer Clay Guild. One day of Pen and Ink on polymer clay and one day of Contours in Clay.
Pen and Ink on polymer is very interesting and everyone can experience exciting results no matter what your drawing talent.
Pen and Ink Class
And this bracelet class.
This week, I’ll prepare lots of Skinner Blends…thank you Judith Skinner.. and get ready to play with some great clayers down south. Look out South Florida….I”m on my way.
By the time our two day workshop was over, we were all totally into body parts. Feet and lips and noses and HANDS. The picture above is an indication of the fun we had, you can see it was a crazy time with a great group of talented friends. I think they all invited their muses to join us while some pretty impressive face and body parts came to life.
I love teaching, the ah ha moments that produce giant smiles and the looks on faces that say, “got it, I can do that”. It’s so satisfying to watch people step out of their comfort zone and realize how much talent they have.
Just look at these face and body parts that this class made. Everyone made their own sample parts so They’ll have them to look at when they’re ready to make their next character.
Seriously, everyone did a fabulous job and I’m so grateful to be able to share what I know. Thank you ladies.


Comments