27 videos, step by step, beginner cane workshop
What people are saying about this tutorial.
jennifer rose
Just finished this first workshop on how to make canes, and I must say I learned so much. This is exactly what I have been looking for, someone who could explain cane making in a step by step that process that I could replicate. I watched the videos, went into my studio and began to create all of the canes Alice showed. I finally have results I can be proud of, and I say thank you so much for doing this workshop. My only question now is when do we get more workshops. If you are only going to take one online class let it be this workshop. Thank you Alice for your hard work, and your dedication to helping others learn the joys of polymer clay.
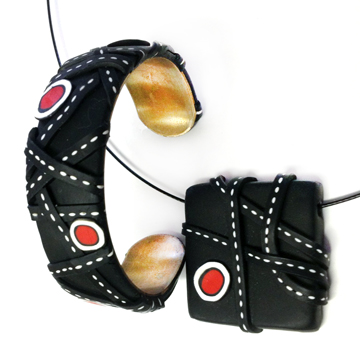
I have a slide exchange coming up and I have been experimenting with different designs. They have to be black and white with one color. The exchange is with a very talented group of polymer clay artists and I want to make something new and different. Different for me anyway.
This was the first idea that I had and I made a bracelet to go with it. I saw a pendent like this except instead of my dot-dot-dot cane there were real diamonds draped around. I like this one and got several compliments when I wore it.
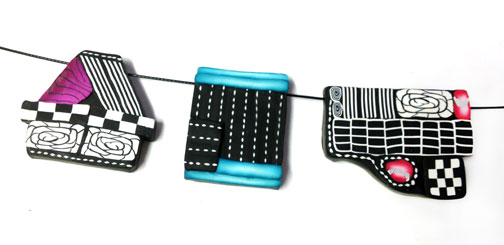
Next I made these three, once again using my dot, dot, dot, cane in each one. I like the one in the middle the best.
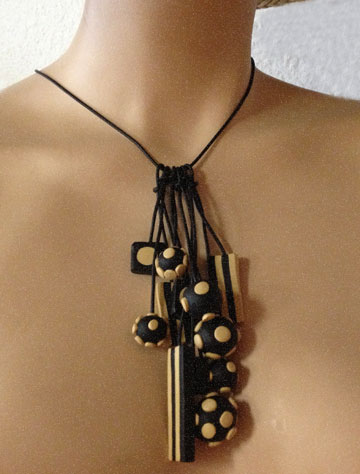
Yesterday I made these hoping they look a bit like ceramic bisque.
And then this “just a bit crazy” one that uses… what else but the dot, dot, dot, cane again.
In yesterday’s post I talked about how I don’t plan what to hang my pendants on or from. After thinking about it overnight, I decided that statement wasn’t actually true.
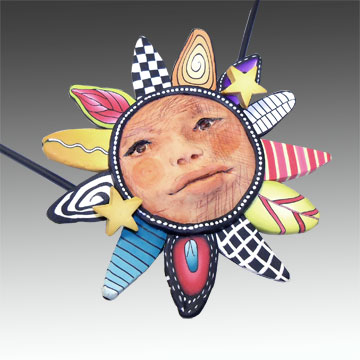
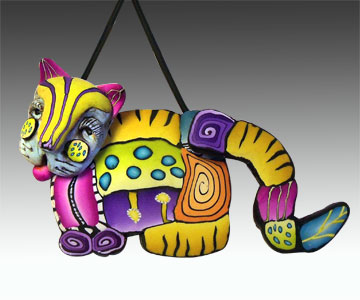
I’m always trying to come up with different ways to add a bail, invent a bail or create a different closure. The project I will be teaching at Fandango this year is a prime example.
The stars are the closure. It’s an easy solution and adds a 3D element to the piece, that and the sculpted face. This cat uses the same idea with the tail and the head as closures.
You can use this type of closure on almost any design and I’ll show you how at Fandango in a couple of weeks. And there is exciting news from Iris Weiss the Education Manager from Polyform Products, Polyform will be donating some blocks of Premo for my student to use in my class. Thanks Iris and Polyform.
This piece that I posted a couple of days ago is another easy bail alternative. Creating something different and new is something I really enjoy.
I love the creative process of working with polymer clay. However the jewelry making part, findings, stringing, etc, are not on my love list and barely makes my like list. And my usual joy comes from colorful, fun, jewelry. It’s when I decide to create something more sophisticated that I lack the materials on hand to be able to spontaneously finish the piece.
In contrast, I always make sure I have plenty of canes on hand when I begin creating, it’s something I preach to my students. If you have a wide selection of finished canes on hand when you sit down to create, things just flow more smoothly. Not having to stop and make all the canes that need to go into a piece make it possible to create without having to stop the flow.
That’s not to say I don’t start a piece by constructing a couple of new cane, it’s just that I know I have lots of fillers to choose from already made and waiting for me.
So you see, I do plan ahead more than I realize, just not when it involves stringing and findings. So I’m still going to take a look at why I have a block with planning when making something more than a colorful, fun pendant (other than the obvious reason of needing more tools, supplies, etc. ). I’ve accomplished it before and think I just need to get out of my own way. Sound familiar?
So in the mean time, I’ll just keep doing what I love, making fun and funky things to wear and work toward improving my major jewelry construction.
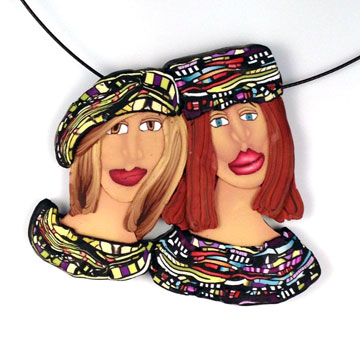
I think these Stroppel Sweater Girls look kind of like Barbara and Cher with red hair. Okay, did that make you smile? Yes? Then my job is finished for today.
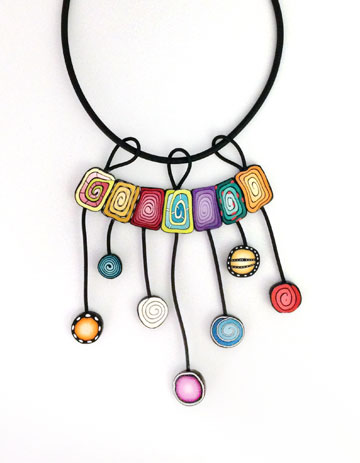
When I was getting ready to travel to Atlanta to attend the Synergy Conference, I wanted to make a few new things to wear. I’ve had a couple of ideas in my head for awhile and thought this would be the perfect opportunity to try them out.
The necklace or “slide” in the picture above was really simple and fun to make. It’s more fun to wear because it has motion. It’s made with spiral canes formed into rectangles and of course round canes. I’ve attached them together with Buna Cord and looped the Buna Cord at the top to allow me to slide whatever chain or cording through and TaDa….it’s ready to wear.
I really like this necklace too. It moves and dangles and is just fun to wear. But I’m concerned with the o-rings shelf life. I’ve talked with several people that say that after many years, they begin to disintegrate and thus your necklace falls apart. So it’s not something that I could ever sell, but maybe it I keep searching, I can find a replacement.
I have so many things to show you and talk about concerning Synergy and the inspiring things that went on, what was shared, the friends I got to see again, the friends I met in person for the first time and just the overall experience.
Unfortunately I came home sick and am just not getting back to normal. I have lots of catching up to do.
DO take a minute to click on the sun on the righthand side of this page and see what is being offered at this years Fandango retreat. I’m teaching along with Suzanne Ivester, Sydnee Holt, Linda Hess and Penny Jo Couch. I hope to see you there.
I made these fairy dress slides for an exchange that was canceled but is going to take place next year at this same time. I had them all made and needed to just put them away and I’d be set. HA! I knew I wouldn’t be able to wait a whole year to post them, I also knew that by next year there would be something else I wanted to make for the exchange.
These dresses are 1 1/2″ x 1″ and are so much fun to make, I couldn’t stop. Good use of small bits of canes, even a Stroppel Cane or two thrown in.
I almost made it though, I put them away and haven’t thought of them for several weeks. Then the other day I was cleaning out a box full of “stuff” and in the bottom of the box was a bunch of 1″ x 1″ wooden blocks. I saved the blocks thinking… as always… that I might be able to use them for something… someday. You know how that is don’t you?
Well, I know you will find this hard to believe, I was shocked, but I actually did think of something to use them for in a very timely manner and while I still knew where they were.
I have been trying for a couple of years to figure out a way to display some of my items as well as some of my swap items. I have pins and masks and inchies that are little works of art. I want to look at them, not just put them away. Some I’ve framed, the inchies were easy enough, but others posed more of a problem.
The pins and slides I have could not be glued down if I were ever going to wear them. The mini masks were all over the place as far as a flat back goes. Besides, really, each one is a fabulous little art piece.
I painted the blocks black, drilled a hole in the center of the top, glued a piece of thick wire in the hole and tada…a stand for whatever. With the dresses, there is a hole drilled from side to side allowing it to “slide” onto a steal cable necklace. I simply drilled a hole in the bottom of the dress so it could now slide onto the wire in the cube. It won’t be glued so that it can be removed and “slide” back onto the necklace. I can’t tell you how happy this makes me.
I had this white block lying around and thought it would look cool to have a grouping. So you see, this idea is limitless.
Of course I can’t stop there. I did the same thing to this Stroppel Cane sweater girl slide.
Then there are the single beads below, all of which can be worn as just a single bead or in groups.
Or how about a whole set of matching beads? One minute they are mini graphic sculptures and the next you’re wearing them out to dinner.
Just slide them off the wire and slide them onto the necklace. Fun, fun for sure.
I think it’s a great way to display pins as well, just slide the closed pin back over the wire.
Okay, enough for today. My head is full of more ideas. Let me know if you do something like this, I’d love to see.
Here’s a fun project I did a couple of weeks ago. I had to do a whole bunch of something for a trade and that led me to this fairy dress. Another one of my off the track wanderings. Can’t show my “whole bunch” yet, have to wait, if I can.
It’s another example of a slide using my contouring technique.
Today I’ve had exactly an hour at my clay table and computer, I had some database work to do for our business and I was watching a tutorial at the same time. shh don’t tell my husband.
Anyway…I have been looking at the beads from yesterday and don’t have the time today to jump into the ideas in my head, but did decide to add a color wash to bring out the valleys. Can you see the difference?
Now I’m going to…shudder….buff them. I’ll be back.
I have been taking pictures and videos of several items that I have waiting in line to go in my Etsy shop. I’ve decided that taking 5 pictures of something so that my customers can see the item from all angles is so time consuming. It’s why I put off adding things. My solution, we’ll seee how it works, is to take short little videos to show what they look like in 3d.
I was working on several things this weekend, more girlfriend slides in my Etsy shop and several of my new bracelets.
Two of the new bracelets were for the International Polymer Clay Associations competition Progress and Possibilities. I have never entered any competitions with my clay work except in a monthly Viola polymeristas once or twice. I hadn’t planned on sending anything to this competition until my friend Suzanne Ivester asked me why not. I told her , “I don’t know, I don’t know what I would send? She kind of wagged her email finger at me and made me think it was time to see if I could come up with a design.
I’ve been working hard to make my work as professional as I can, as smoothly finished and well made as possible. Now it’s time to take the next step and start pushing those other buttons like others approval, how will it measure up, and just plain ol’ fright.
Yep fright! You might think that is totally crazy coming from someone who blogs all the time, exposes my work to thousands of readers everyday, makes videos of my techniques and shows myself in these videos from time to time!
But it’s true, asking someone else to judge your work is totally different than just sharing it with those who want to take a look or actually buy something you’ve made.
But I don’t think I’m alone in feeling this way, so I’m going to pass on my challenge from Suzanne to you, make something and enter it in Progress and Possibilities 2011. There are three categories – Art Jewelry, Functional Objects and Sculptural Objects with three levels of expertise – Beginners, Intermediate and Professional. So you see, even if you are a beginner there is a place for you. If you are Intermediate like me, then I double dog dare you. If you’re professional…..well enough said.
I double dog dare you!
In the meantime, I’m still sending girlfriends to Etsy. I’ll show pictures of my new bracelets another day.
Have you ever had that “slap your forehead” moment, you know the one, the one where you say to yourself “why didn’t I think of this sooner?”
Well that was me yesterday, here is the result……….girlfriend slides. And why not I ask you, why not slides to go with the bracelets or instead of a bracelet? I know pins are good too but I love the necklace idea.
Sorry I know it sounds bad to say you love something you just did, but hey…..I would not be playing with clay if I didn’t kind of love what I was doing right?
So I’m off now to list these plus a fish slide in my Etsy shop. Dancing girl la la la girlfriend queen da da la la \/\/\/\/\/\/\/\
More to come of these I’m telling you, just watch!
Arlene Harrison from Harrison Hollow Designs left a comment asking what a slide was. Well my understanding was something that slides off and on a cord or wire. But later I began to think about the difference between a slide and a pendent with a bail. Or why isn’t the fish with the hole considered a bead? If I drilled the hole more in the center of the fish would it be a bead or does a bead have to have a design on all sides and be round?
What is the difference between my fish and the pendant I made for my class at Beads F.O.B. in Sarasota? I made the “bail” out of polymer clay for the class pendant and drilled a hole through the bail, with the fish I just drilled a hole straight through with no bail.
But when I googled bail here’s what I found;
Bail A finding that connects a pendant to a necklace. They come in different forms: some clip onto the pendant, some have mounts to glue the pendant to, and some attach to a ring on the pendant. The purpose is to hold the pendant flat when worn.
So maybe the pendant above is really a slide just like the fish? I don’t know …….I’ll just have to ask Marty and Karen at Beads F.O.B.. But the good news is I can tell you how to make whatever they’re called.
Once I’ve finished my mosaic fish I mount it on a piece of clay (double thickness of the widest pasta machine setting) and cut out with a exacto knife.
Then I poke a hole straight through the body of the piece and then insert small rivets that you can purchase in the scrapbook department.
I bake it and then remove the rivets and re-drill the hole with my Dremel tool then replace the rivets with a tiny bit of super glue. Make sure you don’t fill the hole with super glue. The rivets just finish the hole and neaten everything up.
Here are all my almost finished fishies, some are going to my Etsy shop. But I have to finish them by signing the back with my name and the date, so it will be later today.


 Yesterday I made these hoping they look a bit like ceramic bisque.
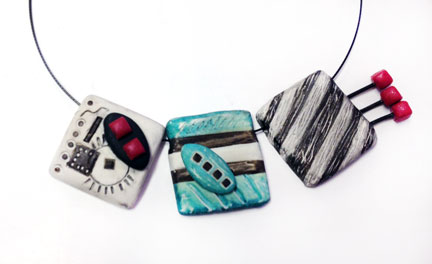


Comments