Just finished this first workshop on how to make canes, and I must say I learned so much. This is exactly what I have been looking for, someone who could explain cane making in a step by step that process that I could replicate. I watched the videos, went into my studio and began to create all of the canes Alice showed. I finally have results I can be proud of, and I say thank you so much for doing this workshop. My only question now is when do we get more workshops. If you are only going to take one online class let it be this workshop. Thank you Alice for your hard work, and your dedication to helping others learn the joys of polymer clay. Jennifer Rose
I was cleaning up my work space after covering the hand in the last post and made this Stroppel Cane Jelly roll Cane.
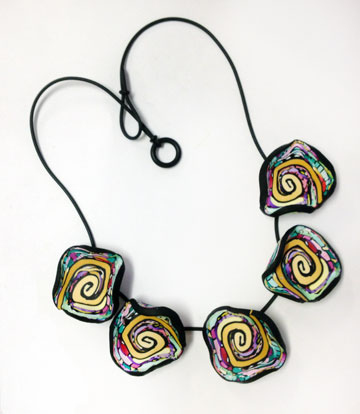
From my pattern business years ago I still have hundreds of brass button covers that for some reason I still have. Okay I admit, it’s because I’m a keeper of “things I might be able to use in my art projects” kind of person. I also have lots of rubber cording. I decide to combine the two making these “beads” removable and interchangeable.
Of course your cording has to be thin enough and flexible enough for the clasp to close.
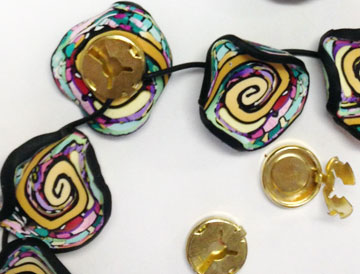
The second thing I have a few of are brass button on a shank. I pushed one through each slice of my cane and baked them
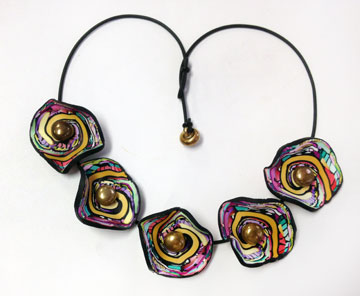
All I had to do is run the cord through the button shank and tada. The cord was just tight enough to keep everything in place and keep them from sliding. Both of these necklaces lay well and look very interesting.
There’s a discussion on FaceBook about Buna Cord or Rubber cording. Several people say that years later the cord gets brittle and falls apart. I’ve heard this before, but I haven’t had it happen to me.
You might want to consider a different cording material if you are going to make anything like this and offer it for sale. These are just for me.
I made these beads several months ago when I was experimenting with amber colors. Last week I bought this blouse to go with a skirt I already had. It’s to wear to my nephew’s wedding this month in Brooklyn. When I got home I brought the blouse into my studio so I could mix some colors in polymer to go with it.
I remembered this necklace and I was floored by the match. Magic happens!
Just a quick post about my experiment. I’m kind of liking the one in the middle and maybe the one on the right. The one on the left is a going to the “yeah right” jar.
They look different in person, they are so dimensional and you can’t see it here. They are truly some of the funkiest beads I’ve ever made.
Still working on them and other applications for the technique. Not giving up yet.
Now on to what I’ve really been doing…twice a day ……everyday for the last two weeks (and it will continue for another two).
MANGOS…..lots and lots of mangos. I know they have nothing to do with polymer clay, maybe this could be the “etc.” part. They are keeping me for my clay, so they do play a role, kind of, sort of.
This is just from this morning. I’ll have this many or more this afternoon. I have to be quick or the squirrels beat me to them and they pick the best ones to take only a bite or two.
I’m pealing, dicing, and freezing bag after bag. I put a perfect size of one cup in every bag. After about the 300th bag I start to lose my enthusiasm for it all. But I soldier on knowing that in December I’ll be soooooo happy to open the freezer and see all those bags of mangos.
Plus, the margaritas and smoothies you can make with these frozen mangos are to die for.
This freezer is full, I have to move these downstairs……….see you guys later.
Today I’ve had exactly an hour at my clay table and computer, I had some database work to do for our business and I was watching a tutorial at the same time. shh don’t tell my husband.
Anyway…I have been looking at the beads from yesterday and don’t have the time today to jump into the ideas in my head, but did decide to add a color wash to bring out the valleys. Can you see the difference?
Now I’m going to…shudder….buff them. I’ll be back.
Over the last few weeks, I’ve spent more time at my clay table. The problem is, I don’t have many finished things that I can share.
Most of what I’ve been doing is experimenting with techniques and applications. Some of these experiments haven’t made it past the approval stage. I’ve been trying to apply what I stress in all my workshops, that is, play, experiment, stretch, because what’s the worse that can happen? You have to throw something away? So what? We always learn something along the way.
The beads up above are one of those experiments, working with Ultralight. Only the first stage, I can envision the next steps, lets see how it goes.
I’ve also been making slides to exchange on a retreat that is coming in August. I’ve had so much fun, but I can’t show them to you yet.
I’ve been adding to my cane collection, inventing different canes for my workshops. It’s one of my favorite things to do. So my work space is a mess and I wouldn’t have it any other way.
In the picture above, amoung all my canes are two new tools that I find I’m using more and more. They are from the Clay Lady, Penny Jo. I’m not using them at all like Penny Jo intended, but I knew that before I ordered them. I love tools. You can order your own in her Etsy shop
I’ve also been working towards being able to give classes and workshops right here on my blog, I’m in the middle of the learning curve, so stay tuned. I just keep thinking how much fun this is going to be.
Aren’t these beads just wonderful? Rebecca Watkins aka Artybecca and I made a trade and I think I made off with the best part of the bargain. Rebecca hand carves each one of these beautiful beads and now I have these to look at, wear and enjoy. Thanks you so much Rebecca, I’m so happy we got to meet each other in person, I had such a great time playing with clay!
This is my half of the trade, the first piece I made entirely from a Stroppel cane.
I just have to tell you …. I love teaching …. and …….. I love teaching new caners. The smiles and looks on the faces of the ladies in my class this weekend at Beads F.O.B. in Sarasota just put me in a good mood for the next month at least.
Thanks to Karen at Beads F. O. B. for keeping all the paperwork straight and Marty for all her work and for letting me come join the fun. Looks like I’ll be going back to teach again soon so check back to see when you might be able to come join us.
We made so many canes and turned some of them into beads and some into pendants, I’m only showing the pendants here.
Joan was having a great time and already had plans for a volunteer project and began working on it before class was over.
Marlene
I heard this high little yell from Marlene and wondered what was wrong. It was all excitement at her table, she had just successfully reduced that little leaf cane and was tickled with herself. It reminded me of the first time I reduced a cane and all the possibilities that were running through my head.
Marty
Marty made earrings and enjoyed the whole creative process. She is one fun polymer clayer.
Lois
I looked up one time to see the biggest grin on Lois’ face. She had just made several successful canes in a great combo of colors and I could see the wheels turning behind those smiling bright eyes.
Christine
Christine said she couldn’t go to sleep the first night and couldn’t wait to get back to work on her canes on Sunday. Her enthusiasm shows in her work.
Cathe
Cathe’s work is big and bold. Her color combinations are bright and work so well together.
I’m so sorry that Marina had to leave early and I didn’t get a picture of her work.
(two days later, update) Marina sent me a picture of her work, I’m so happy to be able to include it. I just didn’t feel right for her pieces to be missing. Thanks Marina!
Marina Montagut
I love how everyone created their own colors and Marina loves to do mini piece. I can’t wait to see what she comes up with.
I also didn’t take a class picture. We ran over time, we were having so much fun, and people started to leave before I remembered the group photo. Thanks to all my student, I really appreciate how easy you made it to show you what I know, it was great fun.
Arlene Harrison from Harrison Hollow Designs left a comment asking what a slide was. Well my understanding was something that slides off and on a cord or wire. But later I began to think about the difference between a slide and a pendent with a bail. Or why isn’t the fish with the hole considered a bead? If I drilled the hole more in the center of the fish would it be a bead or does a bead have to have a design on all sides and be round?
What is the difference between my fish and the pendant I made for my class at Beads F.O.B. in Sarasota? I made the “bail” out of polymer clay for the class pendant and drilled a hole through the bail, with the fish I just drilled a hole straight through with no bail.
But when I googled bail here’s what I found;
Bail A finding that connects a pendant to a necklace. They come in different forms: some clip onto the pendant, some have mounts to glue the pendant to, and some attach to a ring on the pendant. The purpose is to hold the pendant flat when worn.
So maybe the pendant above is really a slide just like the fish? I don’t know …….I’ll just have to ask Marty and Karen at Beads F.O.B.. But the good news is I can tell you how to make whatever they’re called.
Once I’ve finished my mosaic fish I mount it on a piece of clay (double thickness of the widest pasta machine setting) and cut out with a exacto knife.
Then I poke a hole straight through the body of the piece and then insert small rivets that you can purchase in the scrapbook department.
I bake it and then remove the rivets and re-drill the hole with my Dremel tool then replace the rivets with a tiny bit of super glue. Make sure you don’t fill the hole with super glue. The rivets just finish the hole and neaten everything up.
Here are all my almost finished fishies, some are going to my Etsy shop. But I have to finish them by signing the back with my name and the date, so it will be later today.
I’ve been busy this week making slices to exchange at a retreat I’m going to in September. Very excited about it and I’ll tell you more about it another day.
I’ve also been making a zillion, yes that many, skinner blends for a fun new workshop I’ll be teaching in Sarasota, FL at Beads, F.O.B., Inc. on Saturday, August 20th – 10am – 4pm and Sunday the 21st from 10am – 1pm.
Marty Montague is the owner of Beads, F.O.B., Inc and she and Karen Johnson is manager, designer and teacher at the shop. They both attended my pen and ink class last month and we all had such a good time Marty asked me to teach a cane/bead class for her. I’m delighted.
It’s a two day workshop for people new to polymer clay, don’t worry you won’t have to buy lots of equipment, I have pasta machines to share, but you will be investing in lots of clay. The up side of that is you will be “stocking” your cane pantry with enough colors, blends and canes to make hundreds of beads or pendant with the techniques I’ll show you.
It’s also a workshop for those who have been playing with clay for awhile but have just never tried caning and are ready to take the plunge.
I’ll be showing you how I make reasonable sized to small canes to use all kinds of fun projects. I never make giant canes because I don’t like to have lots of one cane, I’d rather use my clay stock to make hundreds of small interesting canes. It makes it easier on your pocketbook if your just starting out.
I’ll spend some time with skinner blends, I’ve learned a few important things over the years that I’ll share. Plus we’ll be using the skinner blends to make many different canes and beads.
So here’s what you’ll be learning
Create a Skinner blend
Make these basic canes: stripe, checker board, jelly roll, bulls eye,
flowers and some fun little accent canes.
Use tons of tips gleaned from my years of practice. If there is an
easier way, I’m going to do my best to find it.
Learn several ways to make beads.
Finish a simple yet striking pendant.
This strand of beads are just a sample of the beads you’ll be able to make from the canes we produce in this workshop.
I’m still making samples for this class and will be posting them over the next couple of week. To find out more about this class download my pdf, to register call Karen or Marty at 941-921-0871
I’m not sure if their August newsletter is out yet, but it will be shortly. You can download it from the front page of Beads, F.O.B.
I was making inchies for the International swap and fell in love with the little squares. After I finished all my valentine squares for the swap, I couldn’t wait to put some of my girls on the little squares and make some beads. This bracelet is for sale in my Etsy Shop.
And naturally they have to be friends, a blonde………
Another blonde………
And one with black hair…….a twist on my girlfriends bracelets.
And how could I not include a set of big lips???
I used buna cord for stinging. I didn’t want to have to make four more focal beads or a bunch of little ones. It seem to have worked very well. I wore it around the studio all day yesterday and it was very comfortable.


Comments