Polymer Clay Canes for Beginners 27 videos, step by step, beginner cane workshop

What people are saying about this tutorial.
jennifer rose
Just finished this first workshop on how to make canes, and I must say I learned so much. This is exactly what I have been looking for, someone who could explain cane making in a step by step that process that I could replicate. I watched the videos, went into my studio and began to create all of the canes Alice showed. I finally have results I can be proud of, and I say thank you so much for doing this workshop. My only question now is when do we get more workshops. If you are only going to take one online class let it be this workshop. Thank you Alice for your hard work, and your dedication to helping others learn the joys of polymer clay.
Online Workshops with Alice Stroppel
[caption id="attachment_102" align="aligncenter" width="100" caption="Member IPCA"]  [/caption]
|
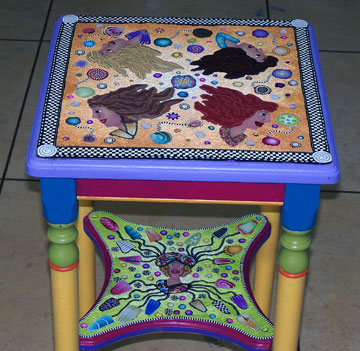
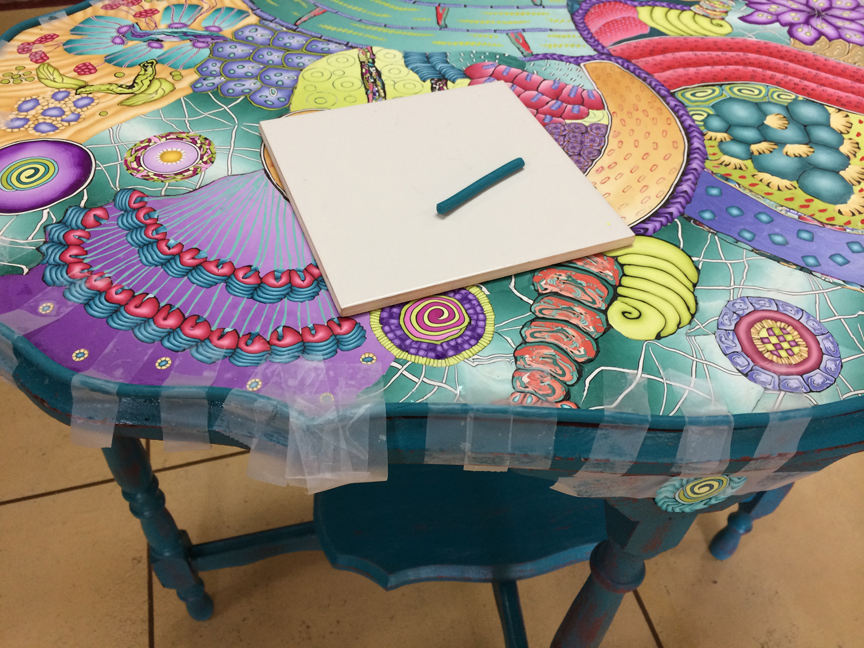
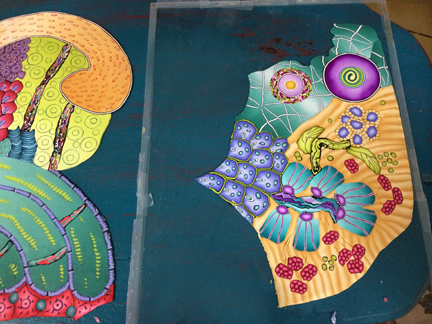
I’ve been working on the polymer clay cane mapped top of my little table off and on for days. Right now I’m not able to work days in a row, but can only get to my studio 3 or 4 days a week. So getting this piece finish it taking awhile.
I thought I might not share with you what happened, you know, admitting to a huge mistake and all, but then I decided that you might benefit from my lesson learned. Besides, (laughing) I was able to save it so I don’t look to stupid.
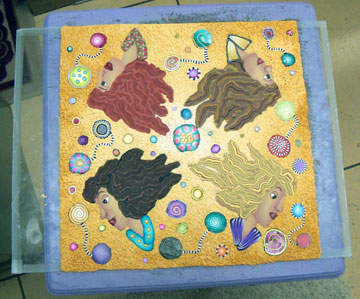
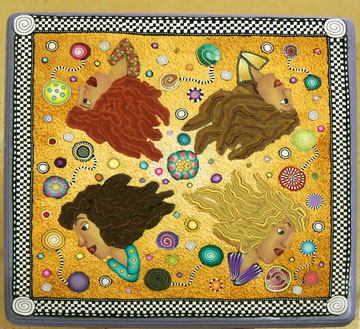
I’d already baked the top once with only the girls on the glass. See last post. I finished the background and cane slices and places it on the table top to see how it looked. I added some more cane circles and then baked it again.
I added my dot, dot, dot cane around two edges of the baked piece and then a row of black and white check. The reason I only did two ends was because my glass wasn’t big enough to do the other two sides.
I baked it again and I was very happy with the way it was coming along. Then…..DISASTER….I can’t show you pictures, because I had to work quickly to try and save the piece and all my work.
Here’s what happened. I removed the baked top from the glass and put it on a large ceramic tile that I work on. I thought, great, this is just the right size to finish the edges. I added more dot, dot, dot cane and checkered canes to the remaining two edges. I finished off with a larger dot, dot, dot cane.
Fabulous, now to bake it and see how it fits the top. I had planned to figure out the very edges once I could really see how much room I had left.
I considered using an extruded piece that I could bake and then glue in place. I received a new CZeXtruder from Kimberly Idalski and want to try it out on the edge. I’ll be posting more about using the new extruder in another post.
Well………..I put it in the oven, baked it the normal time, the buzzer went off, I opened the oven and the piece was a total mess! YIKES!
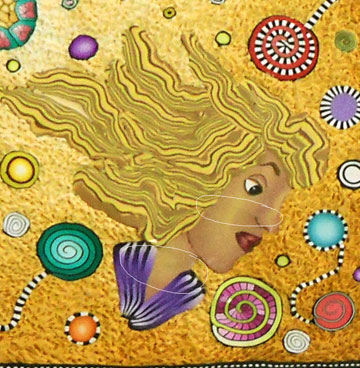
Buckling in the center and a couple of other places and so drastically the blonde girl had cracked right in two across the middle of her face and neck. Circled in white in the picture below, this is after the fix and I’m still amazed a how well it turned out.
I won’t repeat what I thought and said in the minutes that followed……. but I was able to save the entire piece and honestly I still can’t believe it. I wish I had pictures of the before.
Here’s what I did to save the piece. At first I just used a towel to press the bulging clay gently back down. It seemed to help but it wasn’t enough and the pressure wasn’t even. The tile was still extremely hot. I used another tile the same size to place on top of the piece to apply even pressure. I first placed a piece of paper on top of the design, I didn’t want the second tile to create a shine.
I remove the tiles from the oven tray and onto a cooler surface, not a cold one, just cooler. When I had completely cooled I removed the top tile and paper and it had pretty much gone back into the original shape. You can imagine how relieved I was. I’ve ruined many things in my day, but this was the biggest, most time invested piece that I “almost” lost.
I glued it down quickly to my table top. The blonde girl was actually in three pieces, but I put her back together like a puzzle and glued all the pieces in place. You can barely see hair line cracks and that my friends is the ONLY way you can tell the was a near disaster.
Now, there are two things that may have cause the buckling. At first I thought it might have been because I moved the rack up one level, I wanted to bake another piece at the same time and that put the whole thing closer to the top of the oven, you know, heat rises. And that may well have contributed, but this morning I really think the main problem is that it was on the large tile. I actually had the tile at an angle in a broiler pan and air could get underneath it. But the tile was very hot and I think the glass must not get as hot or maybe not hold the heat as well.
I bake in a regular home oven, by the way.
Whatever the reason, I will stick to baking my cane mapped pieces on glass and I won’t move away from the center of my oven.
Here’s the finished top, whew is all I can say. I’m still not sure about the very edges and I want to add more slices to the leg etc. More when I can….

For a couple of years now, I’ve been using a “light box” that I made myself out of an old cardboard box, paper, and muslin. It really has worked well for me but it began to be worse for wear and I decided to order a “real” one.
Cynthia Tinapple mentioned something on her blog, Polymer Clay Daily, or maybe in her newsletter, StudioMojo, (couldn’t find it on either) about a portable lightbox that people were using. I put it on my Amazon wish list and to my surprise, I got it for Christmas. I should have posted it to my shopping list instead….
Anyway, when I opened it, it was huge and wouldn’t fit in my photography space. I should have taken a closer look at the size. Anyway I sent it back and continued to look. I found Modahaus and their tabletop set up. The really cool thing is that I can take photos with my iPhone or my camera. Sometimes I just want a quick picture for my blog and sometimes I need a more professional photo.
There are several toppers that allow you to use different devices. The one in this picture is for an iphone. I do have a set of lights that I use, one on each side, that I’ve had since my sewing pattern days.
I have both a Steady Stand and a Tabletop Studio. I just wish I would have ordered the next widest Tabletop Studio. I might just have to anyway.
I think the price is reasonable and I’m very happy with the quality and the performance of this product. You can see all their products on their website Modahaus.
The other cool iphone helper is this iphone tripod adaptor from Studio Neat. When I first wanted to video a few things with my iPhone, I found that there wasn’t any way to attach it to a tripod. I found this cool adaptor and now I take my videos with my iPhoto. A far cry from the $1,000 plus camera I had a few years ago and now doesn’t take such great videos.
There’s also a snap app for iphones editing videos, it’s iMovie. I have the full version on my computer, but this little app is perfect for small projects. Sorry, put I don’t know about any other editing apps for other phones. Been a Apple girl for over 30 years and not switching now.
go have fun…

I love black and white. I haven’t made any black and white bracelets for sale in awhile and decided I needed to take a minute and create some.
 These are for the Pen and Ink class I’m teaching at the Creative Journey Studios in Buford, GA on the 22nd of this month. I’ll user these to show how I draw my faces directly onto the cured polymer clay. These are for the Pen and Ink class I’m teaching at the Creative Journey Studios in Buford, GA on the 22nd of this month. I’ll user these to show how I draw my faces directly onto the cured polymer clay.
On the 21st I’m teaching my profile face cane. So I’ve been busy with blending face clay too. Oh and while I was making black and white scraps, I added some colorful scraps and made several Stroppel Canes that have magically turned into pins for the pin exchange during Fandango next month. Still have a bunch to go…but I’ll get there.
I’m just smiling and clayin’…..

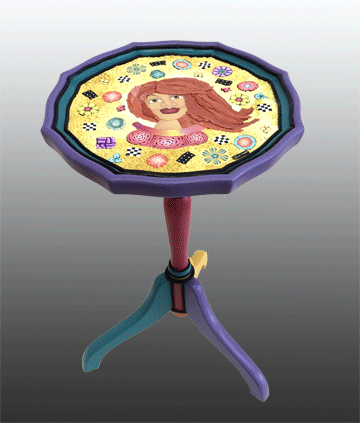
I’m still waiting for the black and white tile to be delivered for my pink flamingo bathroom…see the post below. While I’m waiting, I thought I’d show you my other project.
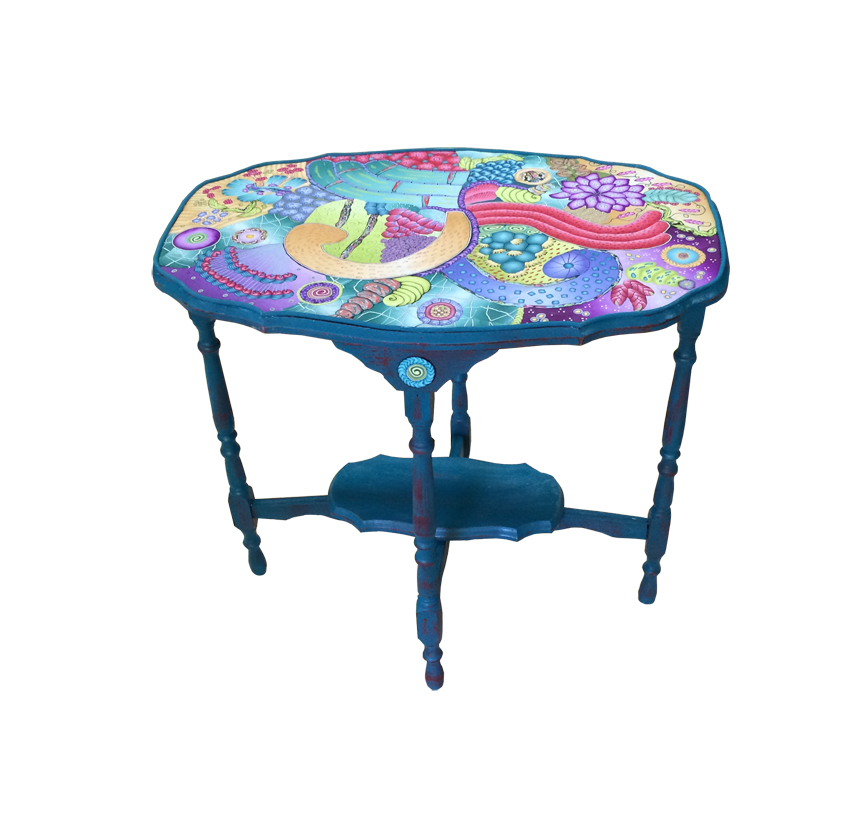
This is a cute little gate-leg table I found about 6 years ago at a thrift store. I think it’s probably from the 20s or 30s. It just screamed to be taken home and covered with polymer clay. Then poor little thing, it’s been sitting in the corner for all these years and just last week got a good coat of black paint on the legs.
So now I just have to design something for the top. I’m so torn between putting several of my girls on it and doing something serious. Okay I can hear you and I agree, why try to be serious now? Okay so help me here, tell me should I put lots of girls or make a new giant cane and add two large girlfriends? I can almost see it now can you?
Here’s the table closed. Isn’t it cute?

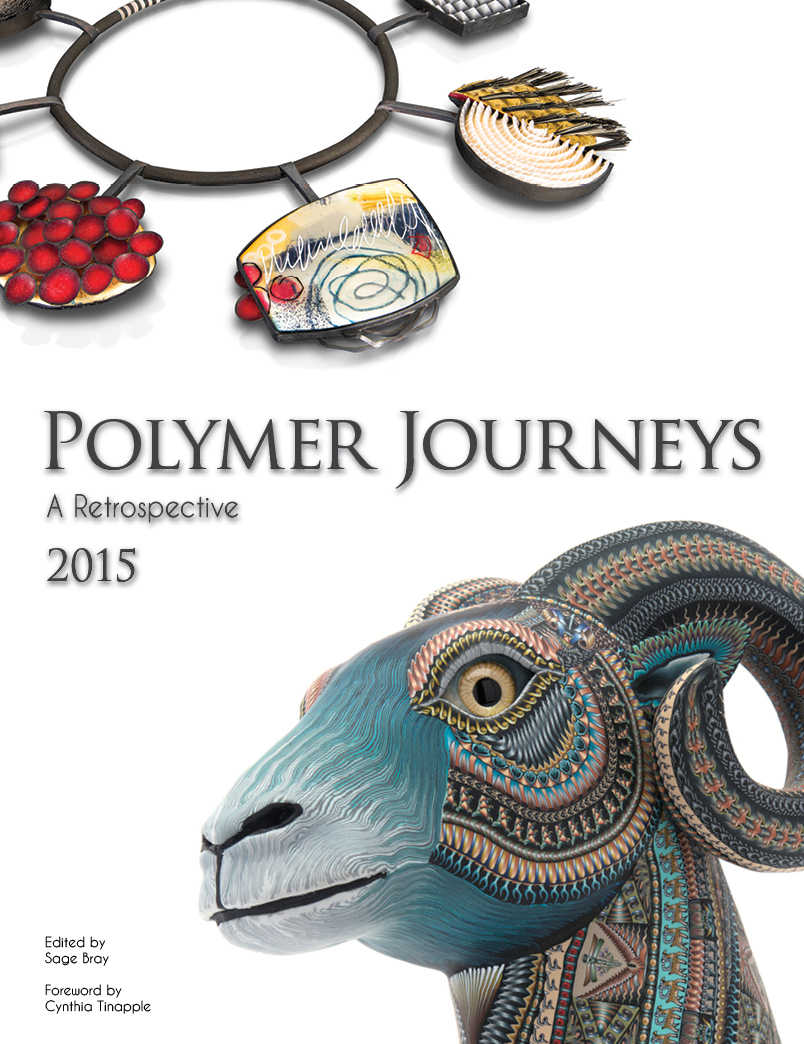
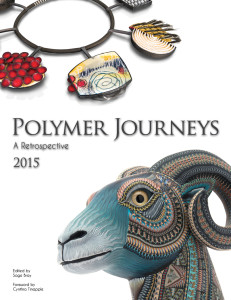 I’m proud to say that one of my pieces is included in this inaugural issue of an exciting new polymer retrospective, Polymer Journeys. Sage Bray is the mastermind behind this publication along with her exceptional magazine The Polymer Arts. I’m proud to say that one of my pieces is included in this inaugural issue of an exciting new polymer retrospective, Polymer Journeys. Sage Bray is the mastermind behind this publication along with her exceptional magazine The Polymer Arts.
It’s a beautiful look at some of the worlds most talented polymer artists. A fabulous coffee table book even for those who don’t work in clay.
Thank you again Sage and team.
I’m pretty excited about offering this new cane mapping workshop for furniture at Studio 215 In downtown Sebring, FL .
I have a full size kitchen stove that is just waiting to be filled with student’s work.
Class size is limited to 6 students, I hope you can be one of them.
Download application here
Cane Mapping Furniture
Cane Mapping Furniture
3 1/2 days
Thursday – Sunday
June 23 – 26, 2016
Limited to 6 students
$250.00
$100 deposit required”
Learn how to cane map on a large scale. We’ll be covering a small table (you provide) with colorful polymer canes.
Tables should not be larger than 20” in any direction. You should have your table completely ready to accept your artwork. Sanded, painted etc. If you are painting it yourself, don’t paint the surface where your artwork will be attached.
Bring your favorite canes and create your person piece of art-furniture.
Once you learn how to cane map for furniture, you’ll be able to apply that knowledge to large wall pieces and other items.
Day one – plan your design, make skinner blends and canes.
Day two – begin mapping your design.
Day three – Continue with your design and do final prep to your table.
Last day – Apply finished art to your table.
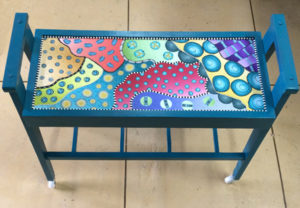
This is a little cart saved by my sister Sheryl. Her neighbor was throwing in out. A bit of paint and some polymer and it’s taken on a new life.

This table is special to me, it was our first telephone table in our first apartment. I won’t be teaching faces canes in this workshop, but you could bring your own.
Here’s another thrift store find. But there is no reason why you can’t can’t bring a new table.
I’ve been obsessed with birds over the last few months. (I’m blaming Laura Prohater and Barb Harper, you two know why *g*) It’s all ending with this crazy bird, or maybe its just the tip of the iceberg, maybe there are more of these guys in my future.
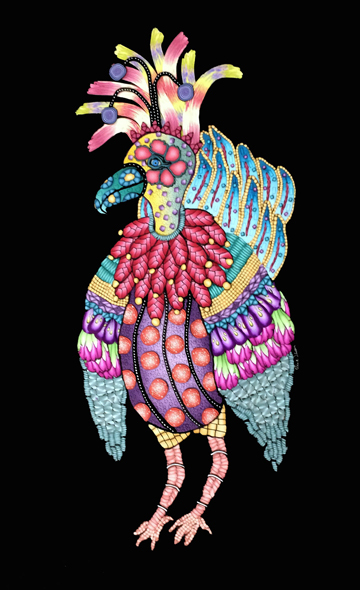
He’s 18″ tall and I’m either going to frame him or free hang him. I’m working on a hanging solution that will allow me to hang my characters without a frame.
Now the real reason birds have haunted my dreams. I’ve been working on these bird bowls for an exchange I’ll be taking part in. In the beginning I thought I must have lost my mind to think I would ever finish 26 bird bowls. especially since several broke apart in the oven until I figured out you can’t take the bowl out and add more things and then bake again. I think it was late one night and I was oh so tired. But lesson learned. 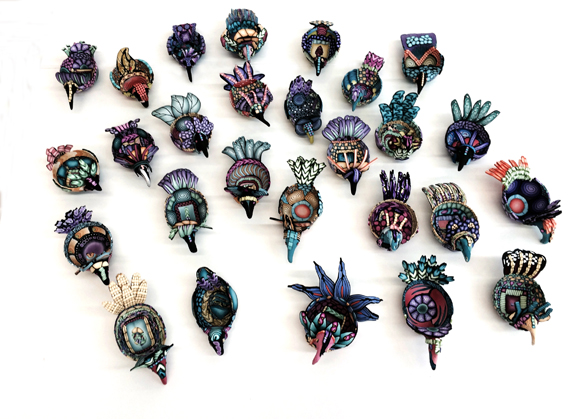 I really have learned so much about making bird bowls so there might be more on my table soon, or maybe even a workshop at Studio 215. I really have learned so much about making bird bowls so there might be more on my table soon, or maybe even a workshop at Studio 215.
I used quite a bit of extruded canes with these birds and with my Charming Canes. Looks like I’m on an extruder kick. It fun, effective, and attractive. so what’s not to love?
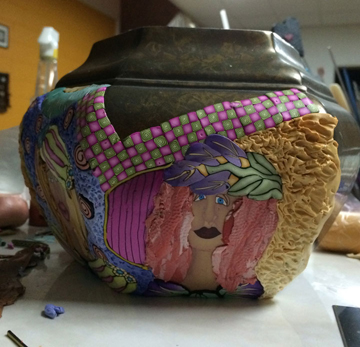
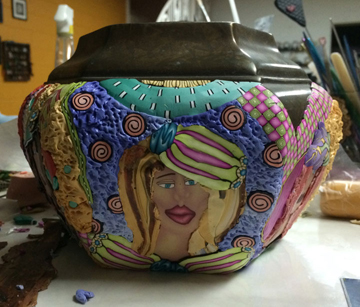
I found this tea set while I was working on my silver pitcher, it was a really good deal at my local antique store. I mentioned in the silver pitcher post that I was working on something else and it was going to be fun. (for me at least) Well it’s been over a month since I started it and I’ve done oh so many other things since then. But I finally got back to it yesterday and I can see it is going to take me several months to finish it.
I’m labeling it my year long project. Alice in Wonderland tea/coffee set. I can already see that there are going to be challenges along the way. I have to remember that eventually the silver will tarnish and the pieces will have to be polish and rinsed. I’ll have to careful that the finishes don’t rub off and all the pieces are secure. It will be interesting I think, so follow me down the rabbit hole if you dare.
First of all I do not plan on using this tea/coffee set. I don’t think the clay would fair well, plus the insides of the tea and coffee pots are in the greatest shape. But most of all, I don’t serve tea and coffee with a silver service! Who knew? It’s going to be purely for display.
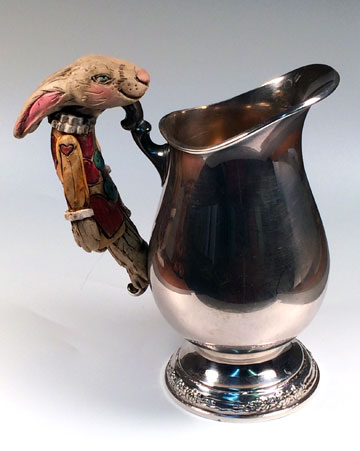
This was the first figure I sculpted. one of the Queen’s herald rabbits. I sculpted him right onto the handle of the creamer. There are going to be more things added to this piece, it’s not finished.

I’m notorious for jumping around so I jumped right to the Mad Hatter. I had a couple of problems with him and I’m still working on them. The first thing is that I sculpted him about three weeks ago and he’s just been sitting there. (lesson # one, if you begin it, finish it then) I put the finishing touches on him and placed him on the tea pot. Well, naturally he was not as pliable as when I first sculpted him and he didn’t want to conform. Sounds just like the Mad Hatter doesn’t it?
I placed him on the tea pot, supported his tea cup with a bit of polyfil and put him in the oven. When I brought him out of the oven, he had slid up on the pot. I placed a towel over him and gently moved him back into position and press him just as gently into place. Well…this works well for thinner pieces, but he’s thick and he cracked a bit along the middle, his head fell off (“off with their heads” said the Queen), plus I broke the tea cup off and it took his finger with it. No problem, glued the crack together, and glued his head back on.
Then I had fun adding color using markers, make up and my new fun coloring toy Inktense sticks. (water color in stick form)
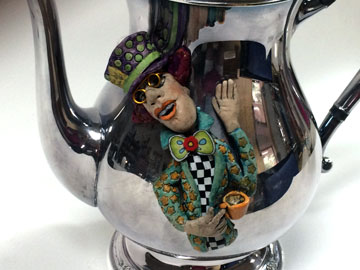
I glued him to the tea pot (superglue Gel), I had to hold him in place while the glue dried, but he stayed put. Then I couldn’t find the little tea cup that had broken off so I made another cup and finger and attached it with TLS. I actually like this cup better so all’s good. I put the tea pot with the Mad Hatter back into the oven and baked again. Alice is going to go right next to him and the dormouse and the March Hare will probably end up on the other side. Lewis Carroll certainly liked rabbits I think. The White rabbit and the herald and the March Hare all appear in this adventure.
Next I have to cover him with TLS so that his finish won’t come off when it’s time to polish, then back into the oven again. Whew. We’ll see how that works.
So this is my adventure, I’m learning and have fun. I’ll post more as I progress, but don’t be surprise if other things get posted about in-between.
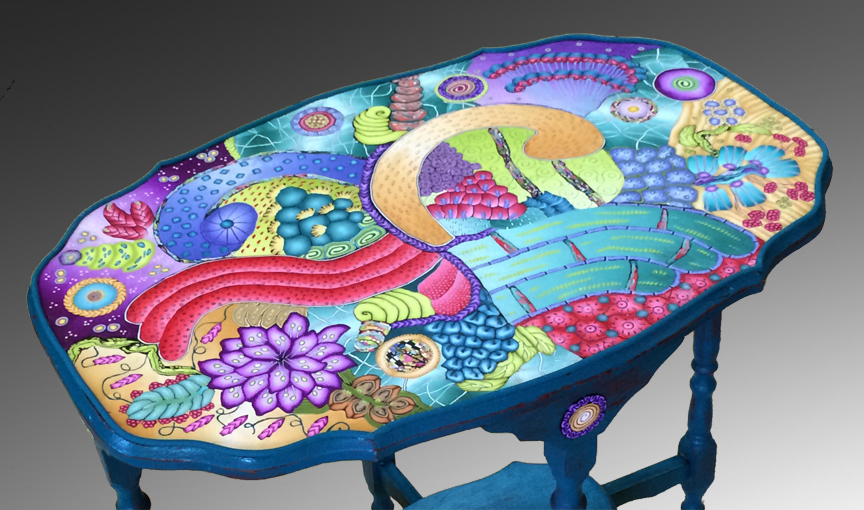
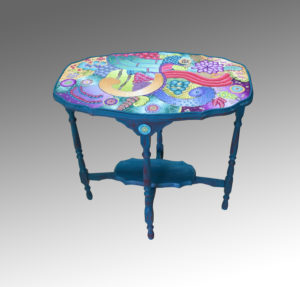
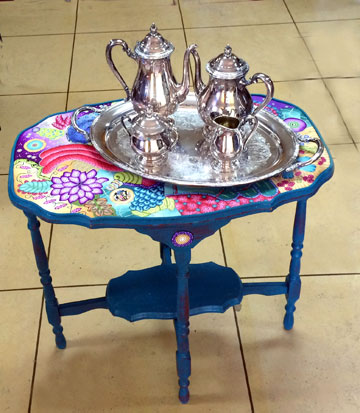
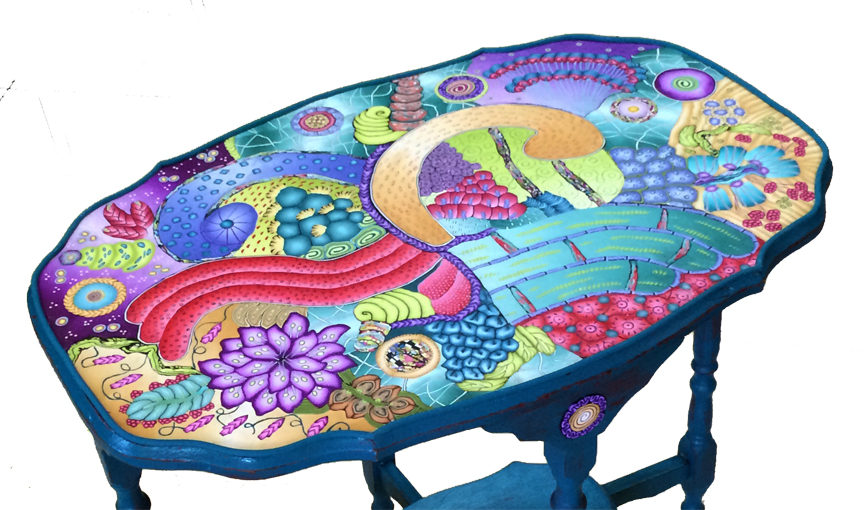
A reclaimed table finds new life in my house. It started out as a wobbly table made from solid oak but with a few years and coats of red paint under in it’s history. I brought it home and almost ave up on fixing the wobble, but fortunately my husband, who is not a wood guy, saved the day and came to the rescue for both me and the table.
I spray painted teal over the red and then sanded a bit here and there. Let her dry and then I was ready to start. I’ve been doing large pieces to frame and hang on the wall and thought why not give furniture a try.
This is the same technique I use for my smaller pieces of wall art too, I call it cane mapping. Laying out a map and filling it with clay.
I started with a smaller table and it worked pretty well so I decided to give this larger one a go. It’s 28″ H 29″ L 18″W.
I start out by making a paper pattern of the top and draw my design on the paper. Then I place the pattern under a large piece of glass and just start laying clay.
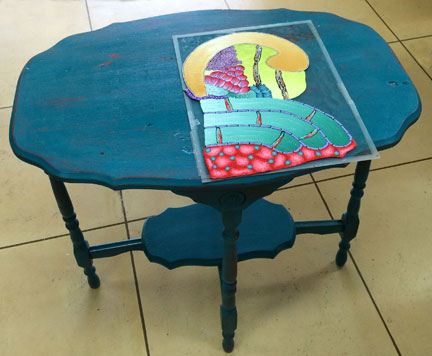 Once I have a good deal completed I bake it and then move on to the next part of the pattern. I end up with several large puzzle pieces that I then glue onto the table top. If I work on too large a piece I tend to rest my hand on on drop something on the part that was finished and have to redo parts of it, Baking in pieces helps to preserve the work I’ve already completed. Once I have a good deal completed I bake it and then move on to the next part of the pattern. I end up with several large puzzle pieces that I then glue onto the table top. If I work on too large a piece I tend to rest my hand on on drop something on the part that was finished and have to redo parts of it, Baking in pieces helps to preserve the work I’ve already completed.
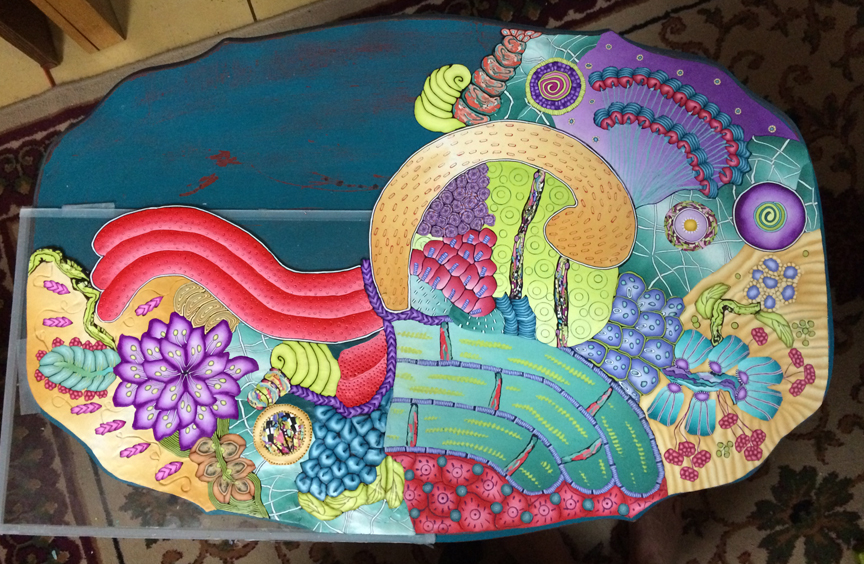
I use Liquid Fusion clear urethane adhesive. It dries fairly quickly, but takes 24 hours to completely dry. When I was finish with all the pieces for the top, I glued them together right on the wood.
Then I exuded a matching teal round snake from the edge. I baked it in four sections in roughly the same shape as the edge of the table. I use Premo because it’s flexible and it was easy to apply. However, to make sure it stayed in place, I taped it all around and left it until morning.
I don’t add a finish to the top, if I could stand to do it, I might sand and buff it. But until I get myself a do-boy…well…it will just get pretty with age and develop it’s own patina. I feel this way… it’s plastic…water won’t hurt it…you can wash it with a damp rag. The only thing I will do it make sure to use a coaster for hot beverages. I know the bracelets that I made years ago and wear often have this wonderful feel to them. So I say use it what’s the worse that can happen?
Thanks for all the wonderful words of encouragement, the likes, the shares, on Facebook and thank you in advance for any comments left here. On to the next project!!!
Follow me on Facebook if you want. https://www.facebook.com/alice.stroppel
I’ve been having so much fun on Facebook with this project. I posted pictures of the first part of the project featuring six of my girls with the tag line, “Bet you can’t figure out what this is going to be”. So many of you had great guesses and wonderful compliments, I thank you so much for playing along because it made it that much easier for me to continue working on it until it was finished.
   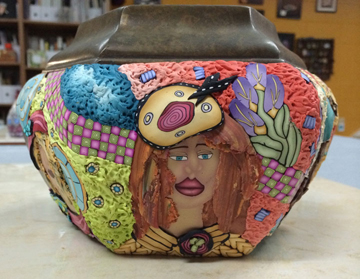 
As I continued to work and post pictures you continued to guess.
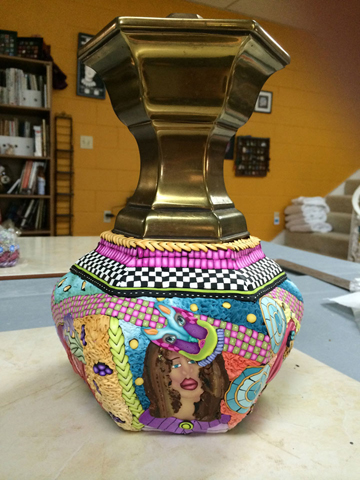 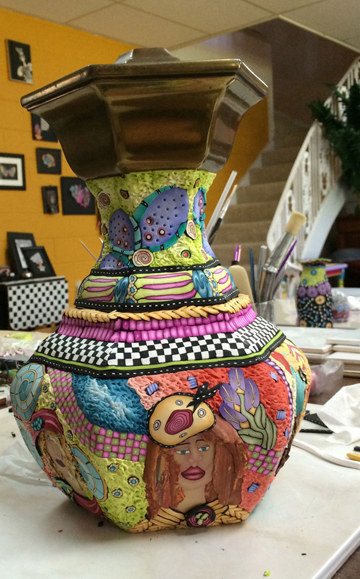 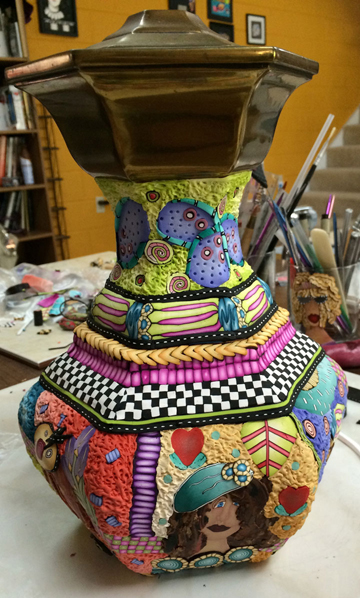  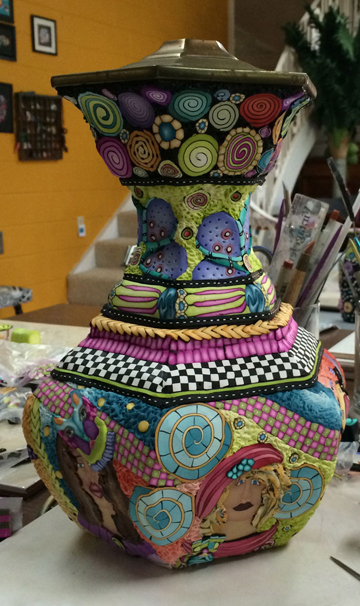
It kept getting taller and taller. ……..
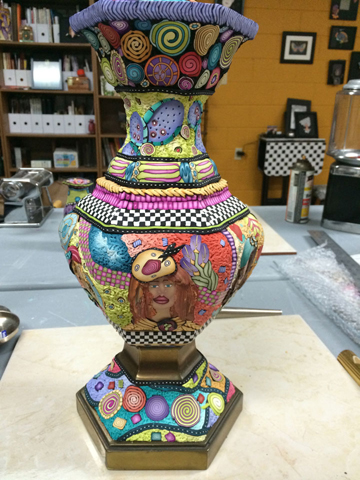 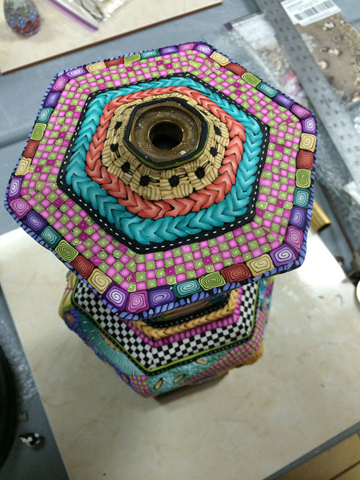
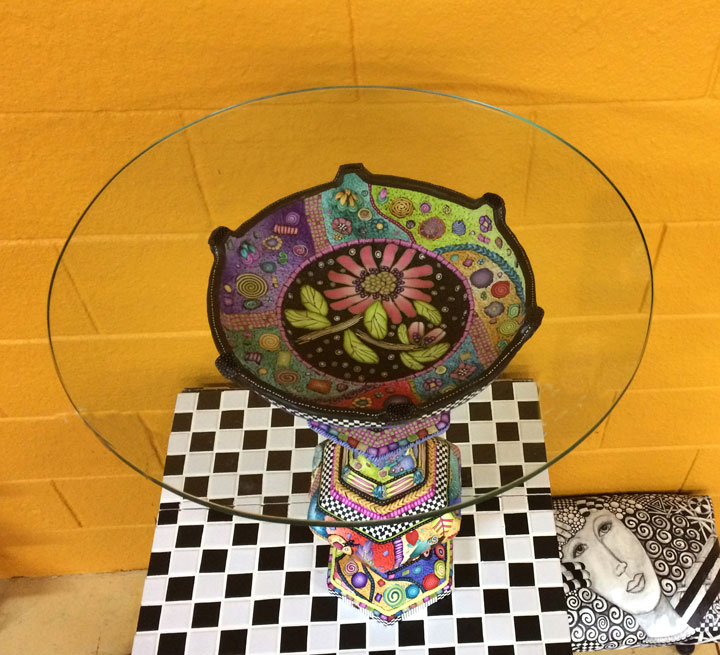
……until I finally finished it and here is the big reveal…TADA…It’s a table.
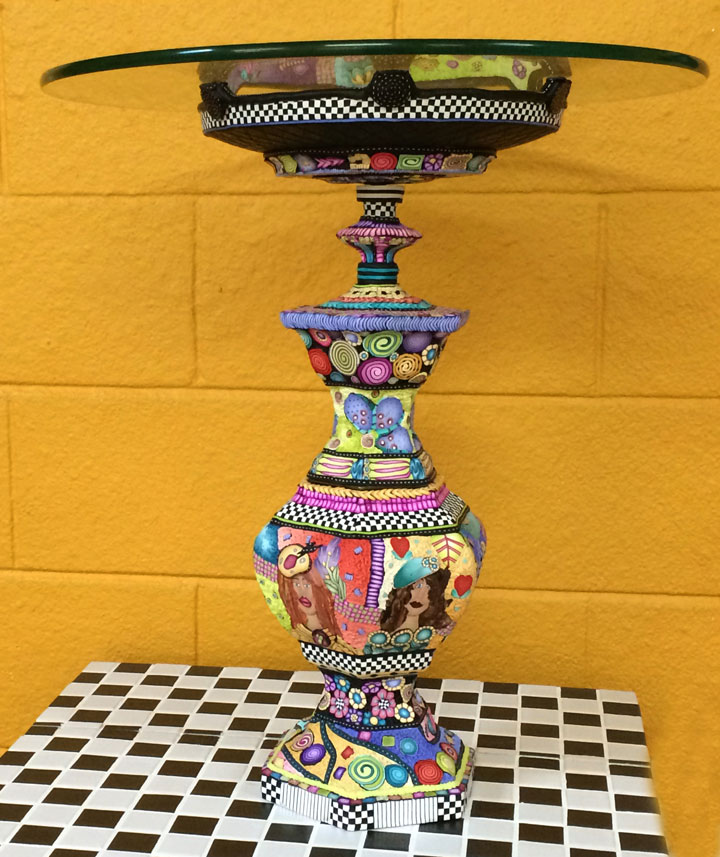
I found two base metal lamps at my local thrift store and combined pieces from each to create this crazy table. It’s very sturdy and well weighted. You might even classify this project a found object project.
I have a couple more lamps that I bought but they don’t come apart so I’ll see how they work out in the oven.
By the way, I bake in a full size oven that I have in my studio and it was easy to bake this table because is was in pieces. The next ones will be a challenge I think.
I cover a bit of each piece with clay and then bake it so I won’t mess up what I’ve just done. when it’s cool, I add more clay and bake again. I can do this as many times as I want and bake for as long as I want because I have calibrated my oven and I know that it is always on the correct temperature.
So what’s your next big project?
|
|


Comments