

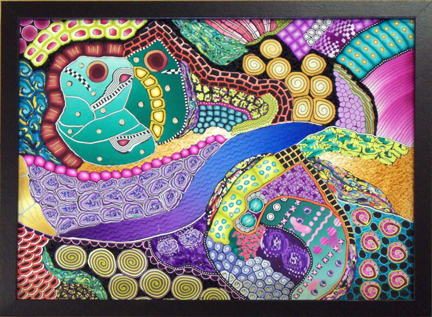
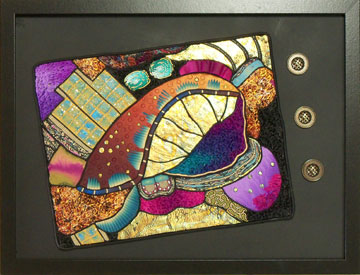
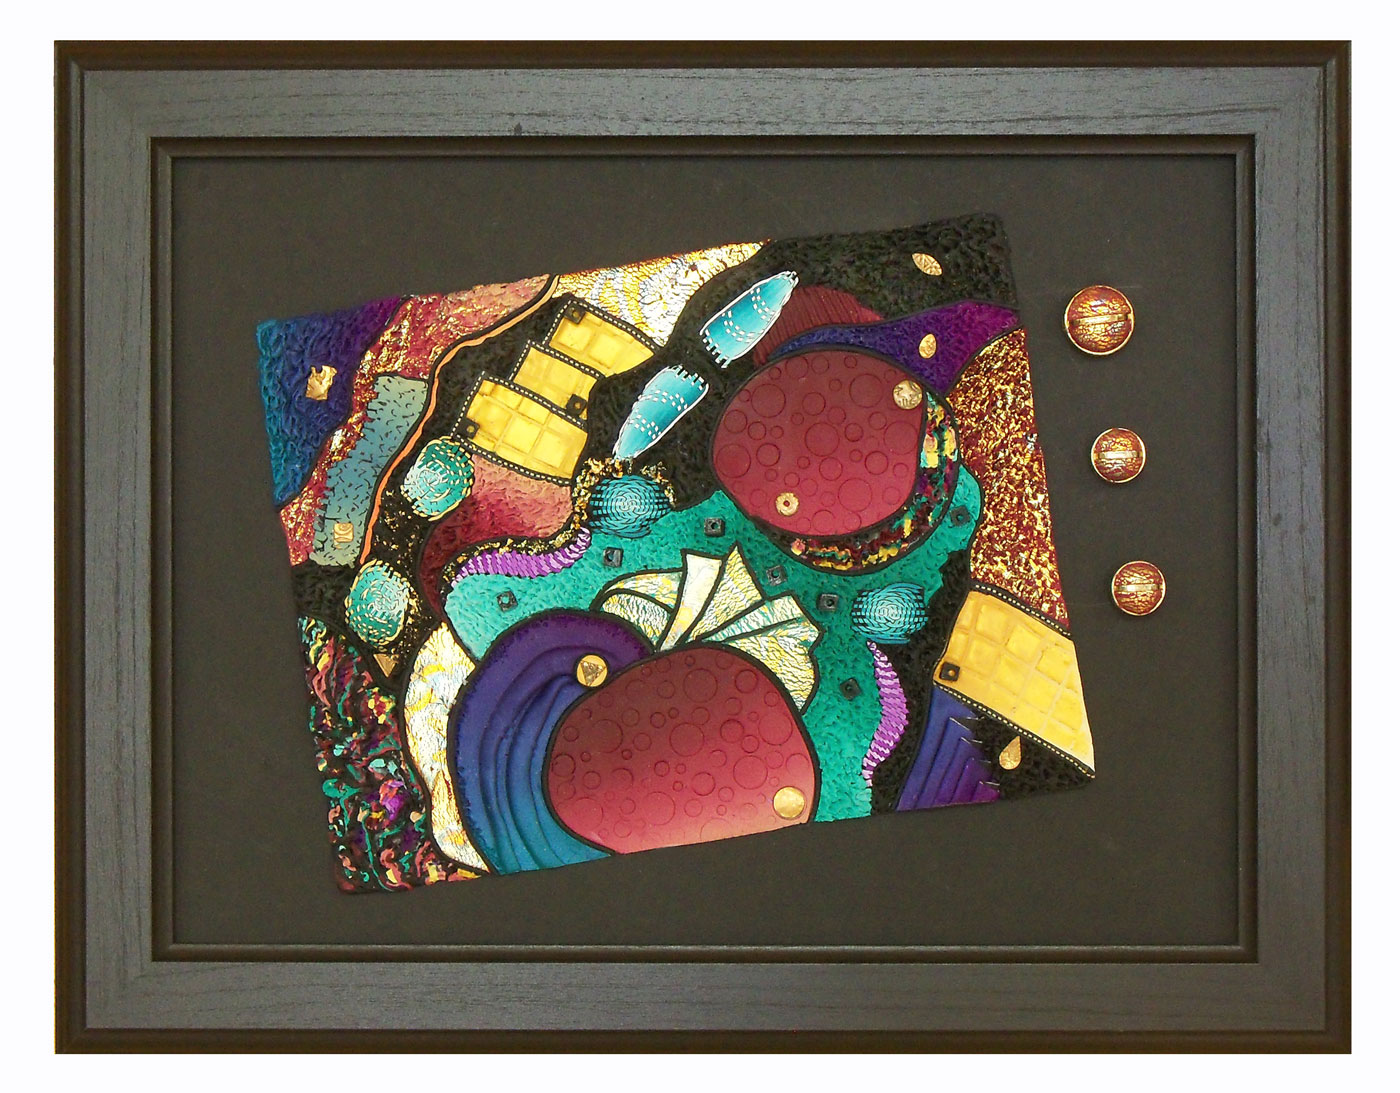
Frame 20″ x 20″, design mounted on white mat board. It’s an interesting piece in that the metal leaf makes it pop and shine differently from every angle.
Still having fun just doing.
|
|||||
|
27 videos, step by step, beginner cane workshop
 What people are saying about this tutorial.
jennifer rose
Just finished this first workshop on how to make canes, and I must say I learned so much. This is exactly what I have been looking for, someone who could explain cane making in a step by step that process that I could replicate. I watched the videos, went into my studio and began to create all of the canes Alice showed. I finally have results I can be proud of, and I say thank you so much for doing this workshop. My only question now is when do we get more workshops. If you are only going to take one online class let it be this workshop. Thank you Alice for your hard work, and your dedication to helping others learn the joys of polymer clay.
What people are saying about this tutorial.
jennifer rose
Just finished this first workshop on how to make canes, and I must say I learned so much. This is exactly what I have been looking for, someone who could explain cane making in a step by step that process that I could replicate. I watched the videos, went into my studio and began to create all of the canes Alice showed. I finally have results I can be proud of, and I say thank you so much for doing this workshop. My only question now is when do we get more workshops. If you are only going to take one online class let it be this workshop. Thank you Alice for your hard work, and your dedication to helping others learn the joys of polymer clay.[caption id="attachment_102" align="aligncenter" width="100" caption="Member IPCA"]
 [/caption] [/caption] |
Frame 20″ x 20″, design mounted on white mat board. It’s an interesting piece in that the metal leaf makes it pop and shine differently from every angle. Still having fun just doing.
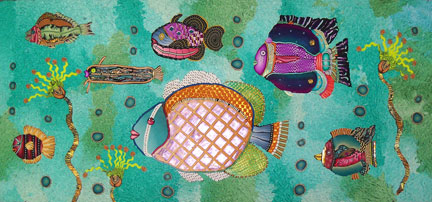
I’ve finished another polymer clay cane mapped painting. Now that’s a mouth full… I usually spend a bit of time looking at the painting before I bake it. wondering if I should make any adjustments. But when things really pop out is when I photograph the finished piece and look at it on my computer screen. Do you see the fish? Seems like I can’t get away from the fantasy fish even when they aren’t in the plan. Pretty funny if you as me, wonder what a psychoanalyst would have to say. I think I need to take a photo before baking from now on. On the other hand, it’s certainly interesting to just let things happen.
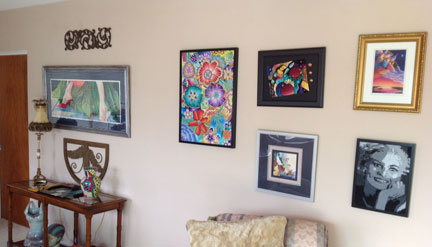
Happy New Year Everyone! I can’t wait to get this new year started, I truly finished with 2013 and I’m looking forward to an inspiring 2014. I finished this fantasy fish painting a couple of weeks ago but couldn’t post it because if was a gift for my oldest son Brad. Brad is a master diver and often spends time in an underwater world. It’s safe to show it now, he has it and hopefully it’s up on a wall somewhere. This painting is 9″ x 20″. I’m working on two more large polymer clay paintings now. One is huge, 28″ x 40″ …I know, I’m a little bit crazy, but hey, what’s the worse that can happen? That’s one of the things I love about polymer clay, if you don’t like what you’ve done, just start over. The clay can be recycled and isn’t lost. Someone asked me to show a photo of the work hanging on the wall. Here’s a shot of some of the painting hung. It’s a new wall, that is, we rearranged furniture and there I was with the beautiful long wall to decorate, so it’s still a “work in progress” but I’m enjoying having some of my polymer painting in my house and not just in the studio.
Have a great year! Oh and by the way, I’m adding the fish picture again because Facebook only gives me the last photo as the image to post to my page. Use to be you had a choice…geezzzz.
I went to my annual Christmas party with my best FF’s last night. Each year we have a good gift/bad gift exchange, you know the deal when you all draw a number and the first person opens the first gift and then the next person can steal it or open a new one? Well we do that for both good gifts and bad. Coming up with a bad gift is easy, sometimes it’s something just too silly or funny or a regift from past bad gifts. We’ve been doing this for over 15 years, so there is plenty of old bad gifts and trust me they do show up again. Good gifts are well…good and sometimes a lot of stealing goes on. This is my contribution this year. I enjoyed making it very much because it was going to end up in the home of one of my friends and because it got me back in the studio. I’m looking forward to really rocking the clay after the 1st of the year. Merry Christmas and Happy Holidays to all my friends both here in the States and all over the world. And a Happy New Year!
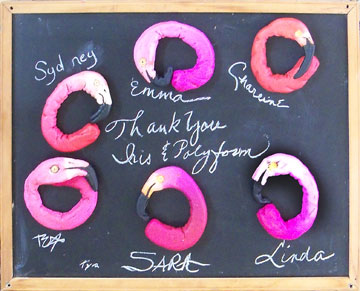
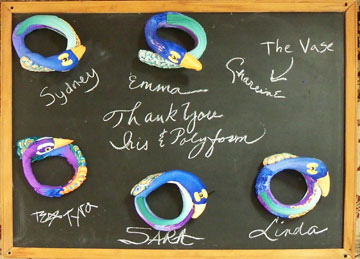
Look at these great flamingo bracelets made by my friends Sydney Carter, Emma Simpson, Charline Ahlgreen, Tyra Ahlgreen, Sara Pietruk and Linda Eastman. We had so much fun they all wanted to do it again the next day only this time it was Peacocks. I just love how each one turned out. A giant thank you to Polyform and Iris Weiss for donating the clay for this workshop. Everyone was delighted and they used every bit making canes and Skinner blends for these funky, fun bracelets
Charline decided to made something different with her peacock. So cool…
Thanks everyone and I’ll see you again soon.
I’m happy with this unconventional framing even though it would not have been my first choice. When I started looking for a frame for it, I didn’t have one that would fit. I had just spent a small fortune on frames and didn’t want to run out to buy another one. I started to center it on the mat but then I began to play around with it and decided to put it at an angle. It needed something else, having the raw edges showing and because they were so straight I covered some buttons with clay and added them. If you double click on the picture you’ll be able to see it closer. I was influenced by my fellow retreater in many ways. I hope to explore and expand my wall pieces and continue to add texture and interest.
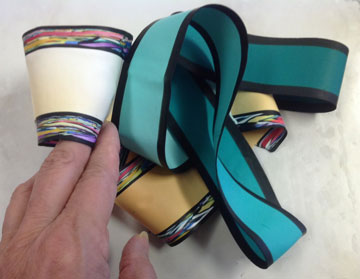
Well this was productive. I have two tall cylindrical glass vases that I wrapped the thin strips of polymer clay around and around. I layered paper between each revolution. These strips are 29″ long, that’s as long as I could make the strips because I was using sheets of Skinner blends. I’m going to see if I can make even longer ones with solid colors. Of course I had to add some Stroppel Cane to one of the strips. hehehe More to come…..
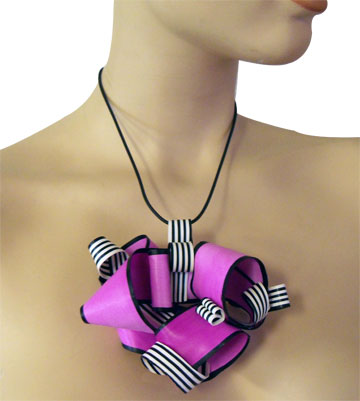
Here’s another idea I’ve had in the back of my mind. I just ordered the new Lark 500 Paper Objects and was inspired by Lydia Hirte‘s incredible work. She creates some fabulous Jewelry sculptures with paper. I wanted see if I could do something similar in polymer clay. I really want to do a large scale piece for the wall using these thin pieces, but first I was experimenting to see how thin I could get the clay and what I could make it do. I used Premo and it really is amazing to work with. It bends and doesn’t crack at all. This piece is incredibly light and it’s been so much fun to play with. It’s very bright I know and I’m not really a pink girl, but this certainly says, “Here I Am!” It would stand out on black for sure. I’ve just spent a ton of money on quite a few frames and have way too many ideas. I’m already working on a giant 27 x 39 piece that I’m very excited about and will tell you more later. Let’s see which project wins out.
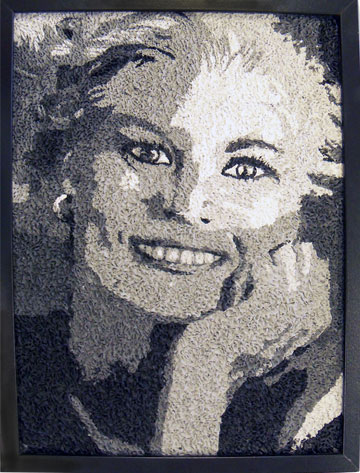
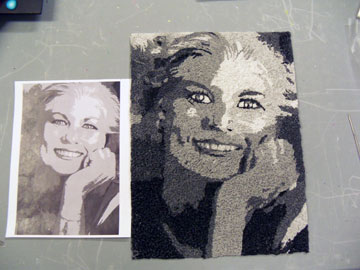
So here I am with the finished portrait. I’ve learned a couple of important thing about this process and I’ll share them with you. I had a great time doing this and I’ve managed to make an anniversary present for my husband. He actually liked it very much, reminds him of all the years we’ve been together, 44 years is a bunch.
I somehow lost track of my shades of gray and didn’t follow through with the right shade on the top right. By the time I got to the bottom and the arm I realized my mistake and didn’t have enough of the lighter shade mixed so… I just continued with the darker shade. It’s okay, I’m still happy with the over all outcome but lesson #1…mix enough clay. It was just hard for me because I had trouble mixing that much gray from perfectly good black and white new clay. I actually have enough scrap gray thank you very much! If it would have been any color, I could always used the left overs for something else. I believe I might do it again just to see how different it will look if I actually follow the picture. Whaaat? follow the pattern, pheeew.. but this time it’s going to be a color.
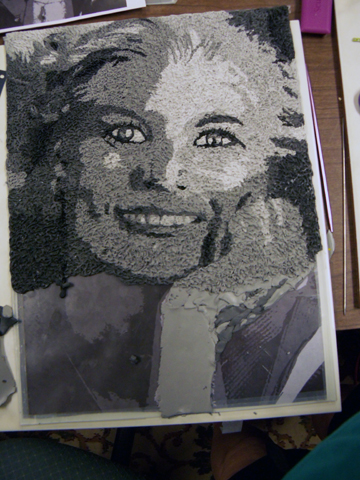
Part of Lesson #2 I already knew, there will be places that you have to fill in. The lesson came in when I realized I was in a big hurry to finish it last night and didn’t take enough time to cover well at all. I had to spend that time this morning filling in anyway. So Lesson #2 is take your time. HA! Part of the problem was it was hard to see, the paper picture on the back of the glass didn’t let light through and it was night time. ( cant’ think of any more excuses for this one)
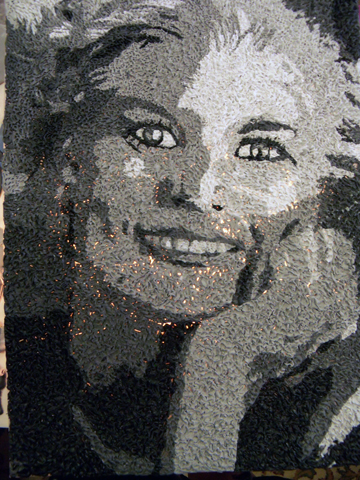
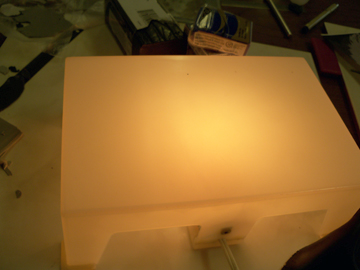
I have this little light box that came in handy for finding the holes to fill in. I just placed the piece on top and filled away.
Here it is a little more than half way finished. First I lay out my clay following the picture and then stipple it with a knitting needle, my fingers are not very happy with me. I think you might really enjoy giving this a try. It was pretty easy to do and not as time consuming as other techniques. You could do it with a drawing as well, or a photo of a landscape, it doesn’t have to be a portrait. And it doesn’t have to be a large wall piece.
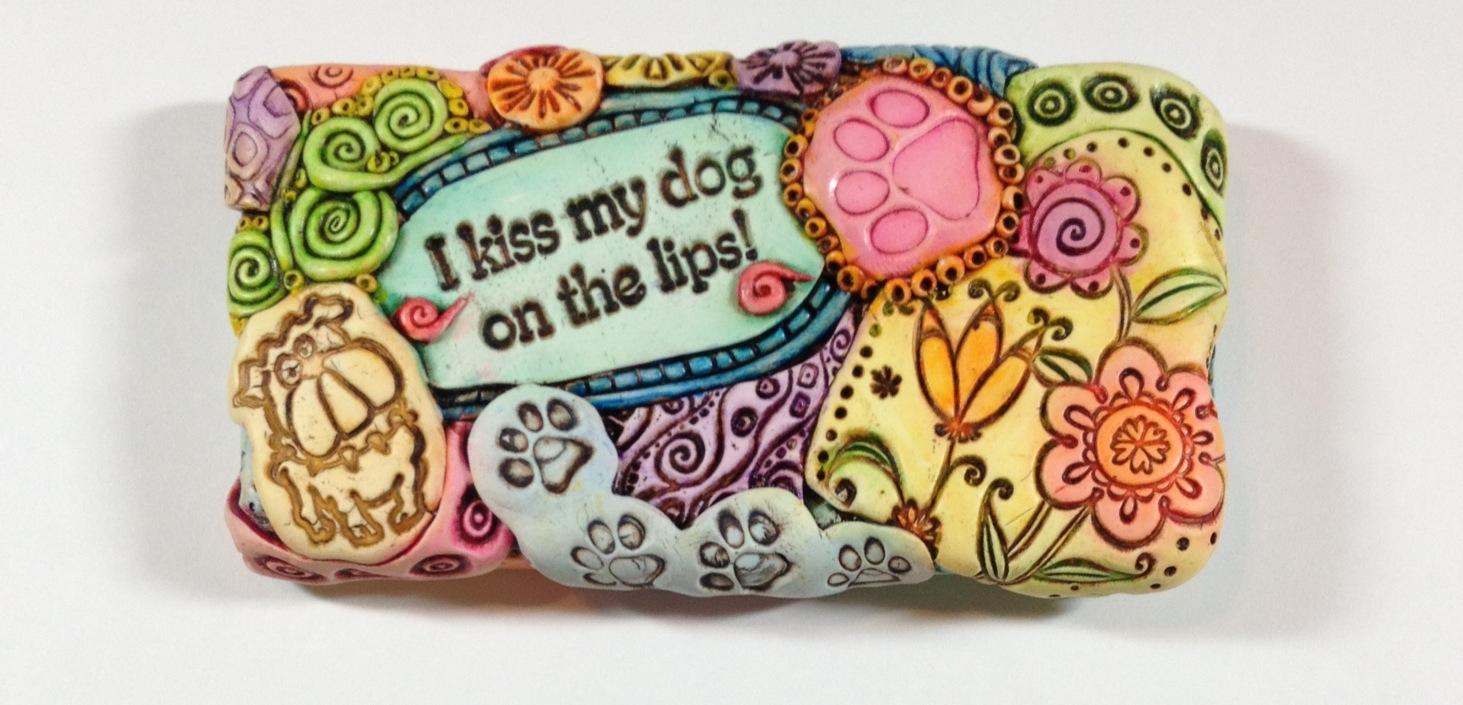
My friend Christine Kaczmarek spent a couple of days in my studio playing with clay. She brought along a project she was working on for her father with a favorite family saying and a pretty fabulous tree. There even is a bit of a Stroppel Cane across the bottom…go figure. She also tried out the recipe for Premo Sea Green and we both think it’s pretty close. It’s one of the discontinued colors that I really miss. I have two block of it left, so I hope the recipe will work. Christine has been experimenting with stamps and oil paints with some pretty cool results. I love this one and the saying just makes me laugh. She a true dog and cat lover and sell great doggie and kitty pendants in her Etsy shop.
We had a great time clayin’ and laughing. Thanks for coming to see me Christine, see you again soon.
Christine Kaczmarek |
        |
|||
|
Copyright © 2023 Polymer Clay Etc. - All Rights Reserved Powered by WordPress & Atahualpa |
|||||

Comments