Just finished this first workshop on how to make canes, and I must say I learned so much. This is exactly what I have been looking for, someone who could explain cane making in a step by step that process that I could replicate. I watched the videos, went into my studio and began to create all of the canes Alice showed. I finally have results I can be proud of, and I say thank you so much for doing this workshop. My only question now is when do we get more workshops. If you are only going to take one online class let it be this workshop. Thank you Alice for your hard work, and your dedication to helping others learn the joys of polymer clay. Jennifer Rose
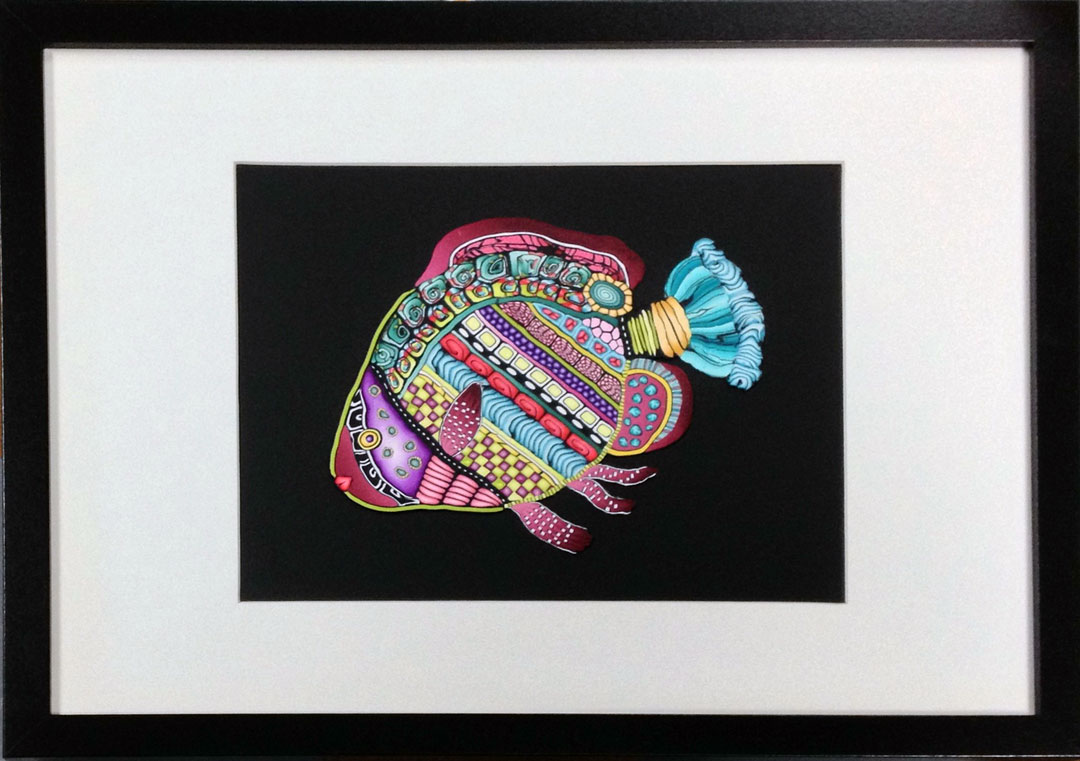
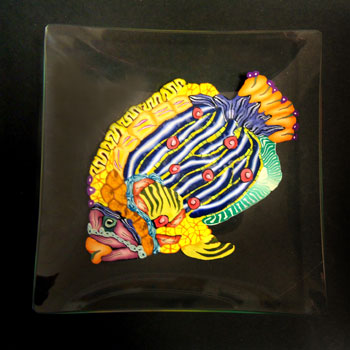
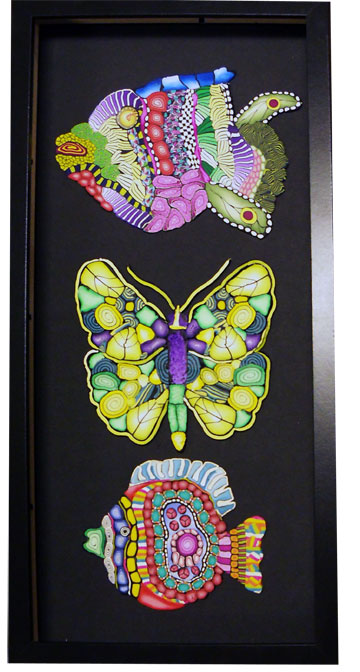
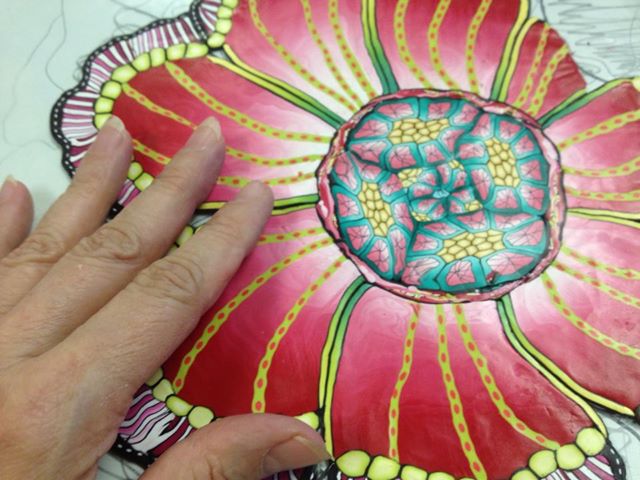
Yesterday a friend of mine who is fish crazy, in a good way, asked me a couple of questions about my fish and if I had any for sale. Not for her, but for something else. The truth is I really don’t. the ones I have I use as demos in my cane mapping class, I have hanging on my walls or have given away.
I started this fish with just part of the tail when my friend Chrissie Baker was here in my studio. I wanted to show her how I did my big wall pieces.
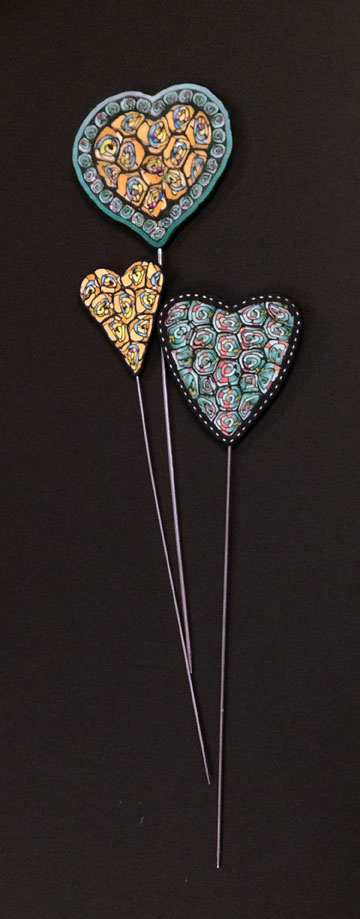
So when I came to the studio this morning and was beginning to clean up my work table after my Stroppel Cane #2 video. I actually started cleaning the day before but got side tracked making hearts plant stakes out of the Stroppel #2’s that may for the film. Can’t throw them away of course…see.
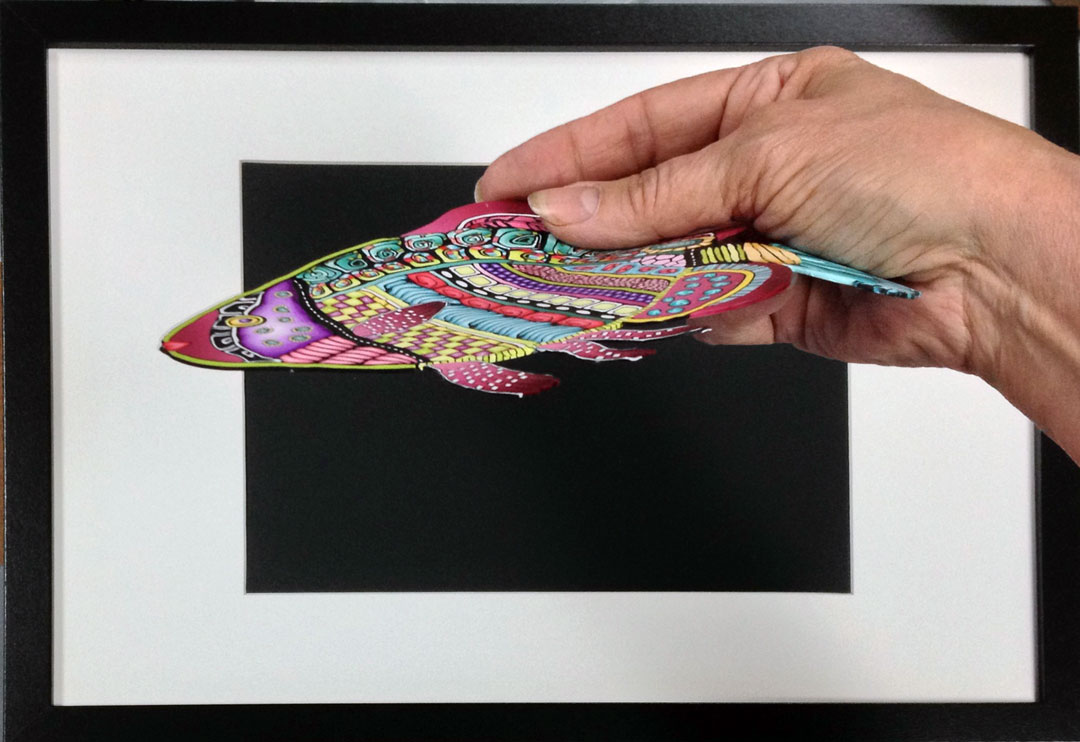
Sorry, back to the fish. before I put all my canes away, I decided to use some of them to finish the fish. What fun it was, really lost myself in it. But what I wanted to show you was how thin these designs are and how easy they are to frame. So now I can say I have one for sale at least.
Oh and you can see how I used some more of my Stroppel cane #2 across the back of the fish. (first photo)
I call this technique cane mapping and it’s how I’ve done my large wall piece and this table.
If you are near Palmetto, I’m teaching a one day cane mapping workshop on June 7th. You must have lots of pre-made canes to bring with you. We won’t have time in class to make many if any. Skinner blends work best for me. Message me on Facebook, or leave a comment here.
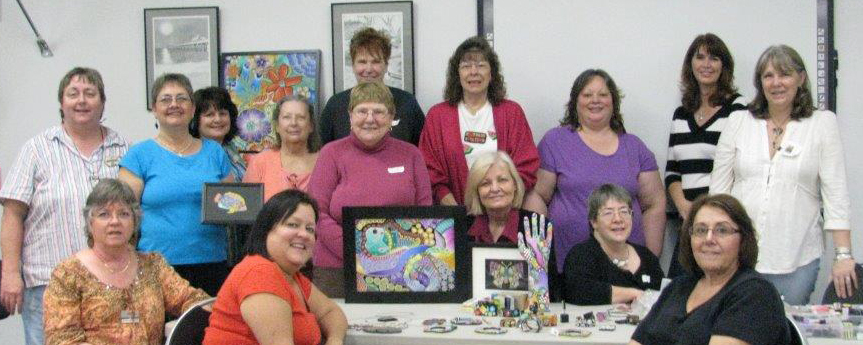
Thank you Kim and Sydney for the photo. The always fun group at Florida Gulf Coast Polymer Clay, thank you all for having me.
Well everyone’s smiling, that’s always a good thing I think. I know I had a great time and was so excited to see the canes everyone made. The exciting thing is that there is going to be a part two to this workshop.
I’m going back in June and we’ll explore how to turn all those canes into wall art, objects and more. So everyone has homework hehehe.
I also shared my new Stroppel Cane #2 with this group. It’s a little different and fun. I’m going to film it today and post it tomorrow so you can play with your scraps tomorrow if you like the way it comes out.
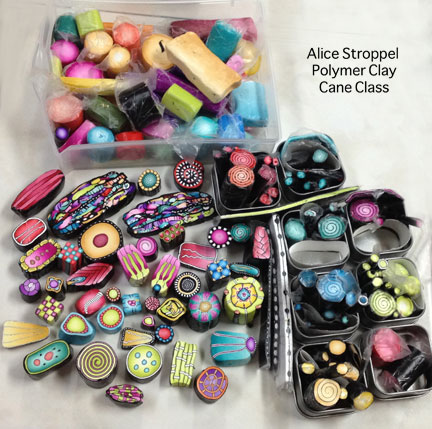
Here’s a picture of some of the Premo blends and the canes we worked on in this workshop. I have to send a big shout out to Iris Weiss and Polyform. they generously donated all the Premo clay for this workshop. Everyone went home with clay to “do their homework”. Thank you so very much Polyform and Iris.
I’ve always used Premo polymer clay. I wasn’t interested in putting forth the effort to condition the harder clays and I was so invested in Premo by the time the others came out with a softer clay that I just never switched. I love many of the Premo colors. I make my face canes with Premo and they are more complicated for sure, so Premo works for me with my more complex canes.
My approach to caning is a bit different than the norm. I don’t worry too much about everything being perfect, I don’t mind if my canes are a bit wonky so my caning style may make some want to look away.
Some caners are producing more than just a few pieces for sale. Either in their online shops, in galleries, at festival, or they are wholesaling to stores. Others are doing precise design work and have refined their caning skills.
I don’t sell that many finished pieces, so I never make very large canes. There a several more reason why my canes tend to be small to tiny. I don’t want to surround them with translucent, I don’t want to have to reduce then very much and I want to create a new design each time I make something from the canes.
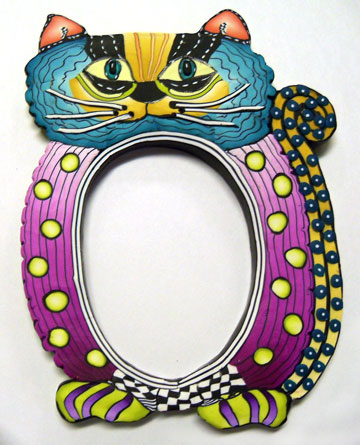
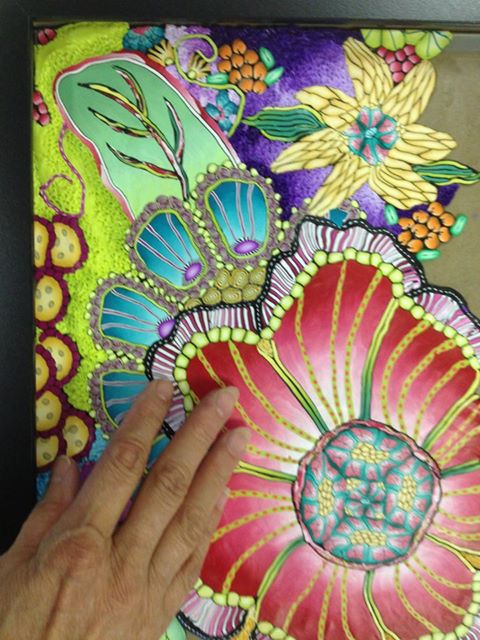
Example: I could have made a large cane for this cat bracelet but I used lots of smaller canes. There will never be another one exactly like this one, I like that. I call my process Cane Mapping but you could say it was like mosaic work without the grout.
This fish is made the same way
As are all my wall pieces.
Explorations – Alice Stroppel
I have a very laid back approach to cane making. there truly are NO mistakes with my canes. It kind of takes the stress off of building canes, at least it does for me.
The artists that can be exact and create those fabulous intricate designs have my complete admiration, their work is stunning, I just can’t do it so I don’t try.
There are lots of you out there that are just like me, I know it. You want to cane but are afraid, you don’t want to waste all that clay, it makes you nervous to even think about it, you don’t think you’re good at it.
By starting with a bit of freedom attached to you caning, you can learn without stress and then later if you want to evolve, move on, learn to make the more complex canes. Or stay here with me, it’s all good.
Online right now is a great group on Facebook led by Rian Sanderse called 52 Weekly Cane Projects. It’s a fantastic way to practice canes with any pressure and it’s free. It’s a pretty wonderful thing Rian is doing for the pc community. This last week she featured my Stroppel Cane and Ronit Golan’s scrap cane. go join, you’ll have fun.
If you or your group is interested in taking my canes and/or cane mapping workshop/s please leave me a message on the comment page or on Facebook. I’d love to come met you all if I could.
I’ve finished another polymer clay cane mapped painting. Now that’s a mouth full…
I usually spend a bit of time looking at the painting before I bake it. wondering if I should make any adjustments. But when things really pop out is when I photograph the finished piece and look at it on my computer screen.
Do you see the fish? Seems like I can’t get away from the fantasy fish even when they aren’t in the plan. Pretty funny if you as me, wonder what a psychoanalyst would have to say.
I think I need to take a photo before baking from now on. On the other hand, it’s certainly interesting to just let things happen.
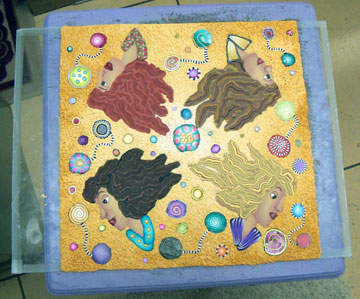
I’ve been working on the polymer clay cane mapped top of my little table off and on for days. Right now I’m not able to work days in a row, but can only get to my studio 3 or 4 days a week. So getting this piece finish it taking awhile.
I thought I might not share with you what happened, you know, admitting to a huge mistake and all, but then I decided that you might benefit from my lesson learned. Besides, (laughing) I was able to save it so I don’t look to stupid.
I’d already baked the top once with only the girls on the glass. See last post. I finished the background and cane slices and places it on the table top to see how it looked. I added some more cane circles and then baked it again.
I added my dot, dot, dot cane around two edges of the baked piece and then a row of black and white check. The reason I only did two ends was because my glass wasn’t big enough to do the other two sides.
I baked it again and I was very happy with the way it was coming along. Then…..DISASTER….I can’t show you pictures, because I had to work quickly to try and save the piece and all my work.
Here’s what happened. I removed the baked top from the glass and put it on a large ceramic tile that I work on. I thought, great, this is just the right size to finish the edges. I added more dot, dot, dot cane and checkered canes to the remaining two edges. I finished off with a larger dot, dot, dot cane.
Fabulous, now to bake it and see how it fits the top. I had planned to figure out the very edges once I could really see how much room I had left.
I considered using an extruded piece that I could bake and then glue in place. I received a new CZeXtruder from Kimberly Idalski and want to try it out on the edge. I’ll be posting more about using the new extruder in another post.
Well………..I put it in the oven, baked it the normal time, the buzzer went off, I opened the oven and the piece was a total mess! YIKES!
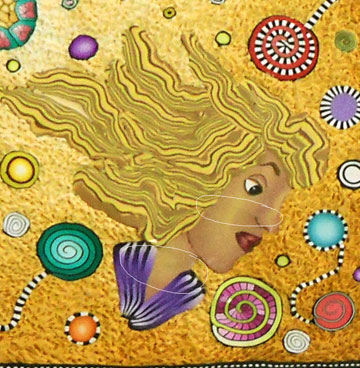
Buckling in the center and a couple of other places and so drastically the blonde girl had cracked right in two across the middle of her face and neck. Circled in white in the picture below, this is after the fix and I’m still amazed a how well it turned out.
I won’t repeat what I thought and said in the minutes that followed……. but I was able to save the entire piece and honestly I still can’t believe it. I wish I had pictures of the before.
Here’s what I did to save the piece. At first I just used a towel to press the bulging clay gently back down. It seemed to help but it wasn’t enough and the pressure wasn’t even. The tile was still extremely hot. I used another tile the same size to place on top of the piece to apply even pressure. I first placed a piece of paper on top of the design, I didn’t want the second tile to create a shine.
I remove the tiles from the oven tray and onto a cooler surface, not a cold one, just cooler. When I had completely cooled I removed the top tile and paper and it had pretty much gone back into the original shape. You can imagine how relieved I was. I’ve ruined many things in my day, but this was the biggest, most time invested piece that I “almost” lost.
I glued it down quickly to my table top. The blonde girl was actually in three pieces, but I put her back together like a puzzle and glued all the pieces in place. You can barely see hair line cracks and that my friends is the ONLY way you can tell the was a near disaster.
Now, there are two things that may have cause the buckling. At first I thought it might have been because I moved the rack up one level, I wanted to bake another piece at the same time and that put the whole thing closer to the top of the oven, you know, heat rises. And that may well have contributed, but this morning I really think the main problem is that it was on the large tile. I actually had the tile at an angle in a broiler pan and air could get underneath it. But the tile was very hot and I think the glass must not get as hot or maybe not hold the heat as well.
I bake in a regular home oven, by the way.
Whatever the reason, I will stick to baking my cane mapped pieces on glass and I won’t move away from the center of my oven.
Here’s the finished top, whew is all I can say. I’m still not sure about the very edges and I want to add more slices to the leg etc. More when I can….
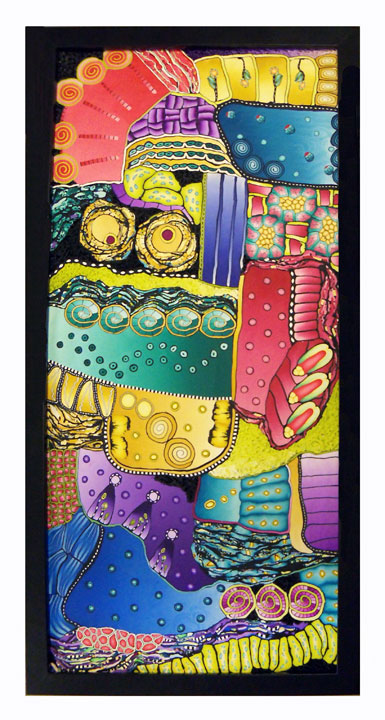
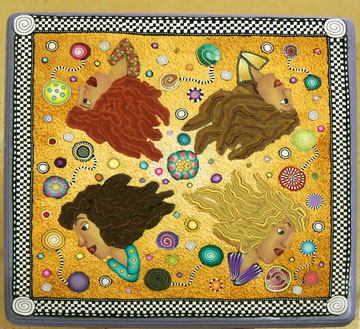
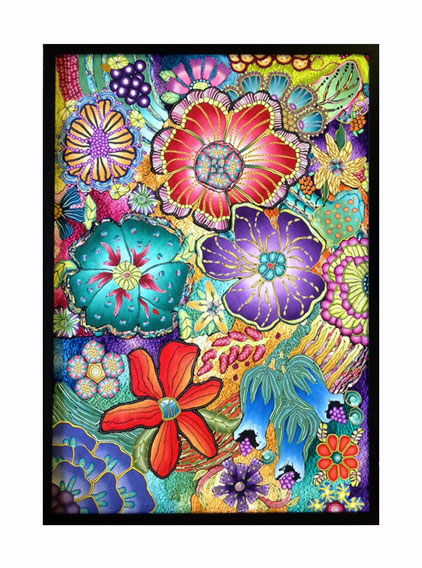
This is the second large wall art piece made of polymer clay. It’s 9″ x 20″. About half the size of the first picture, Wall Flowers. It’s totally random pops of color that has already been speaking differently to each person. I began working on it with this view as the way it should be hung.
Explorations – Alice Stroppel
But when I posted it on Facebook yesterday, people started telling me they thought it should be hung a different way.
Explorations – Alice Stroppel
Nikolina Otrzan , Orson’s World, said she saw it hanging like below, and I quote, “because those “eyes” look to me like Pink panther in distress. Nik, you’re so funny.
Yvette Macy wants to sing, “We all live in a yellow submarine.”
Explorations – Alice Stroppel
Maybe I should take a vote. voice your opinion, leave a comment. I think it will be interesting to see what ya’ll think and what you see. I’ll tell you what I think in a couple of days.
In the end, my son Jason will decide because this one is going to him.
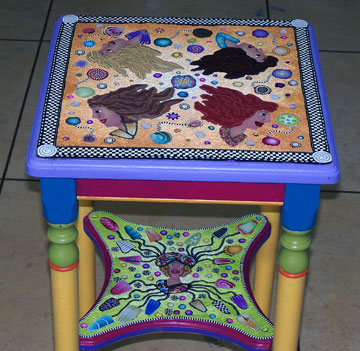
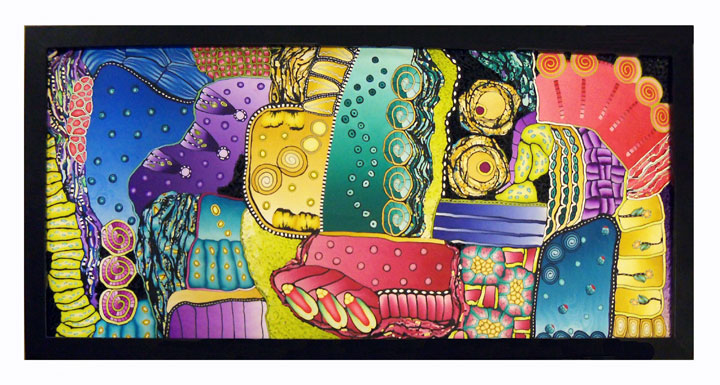
Top – Linda Boyd, Middle – Monica Sauls, Bottom – Barbara Snapp
Every Monday evening, three friends i’ve known since we were kids, Barbara Snapp, Monica Sauls and Linda Boyd, come over to my studio and we play with polymer clay. I was so excited by these cane mapping pieces they finished last Monday, I just had to share them with you. Remember these are relatively new clayers.
It’s the same technique I use to make my large Wall Flowers and I teach in one of my workshops.
How they ended up spending time in my studio in the first place is pretty funny.
Sebring, where I live, my home town, my mother’s home town, is pretty small. Granted, it’s grown quite a bit over the years, but it’s still a small town by most standards. Even so, most people don’t know that I work with polymer clay or even what polymer clay is or can become.
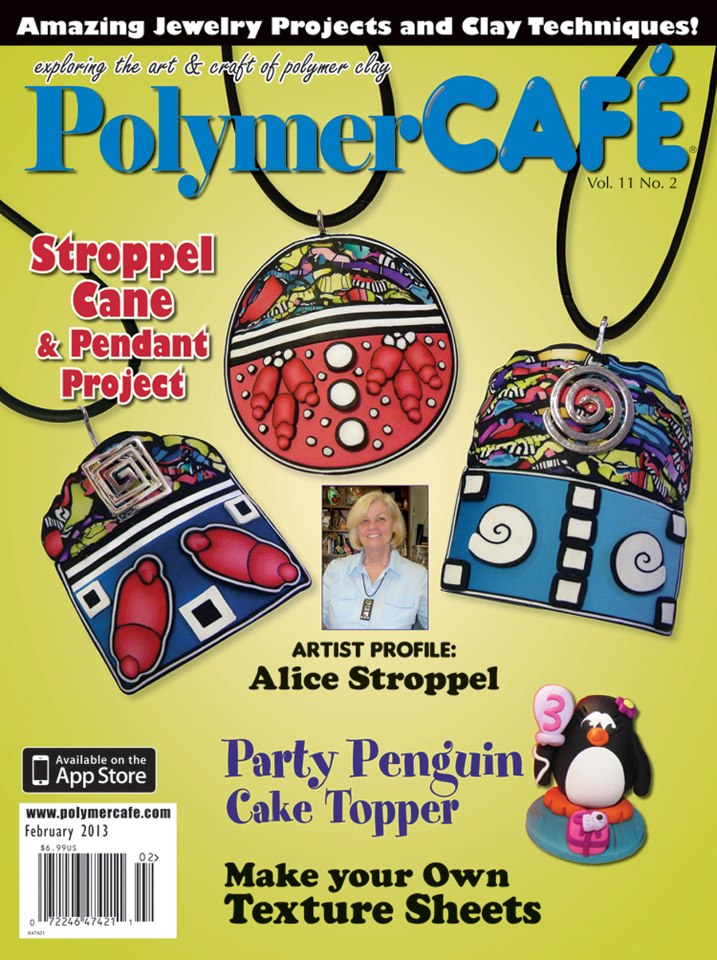
Shortly after I was on the cover of Polymer Cafe, I was walking through Home Depot (looking for stuff to use with polymer I’m sure) and ran into Monica. She asked me if my ears were burning from being talked about. I smiled and worried what I might have done now!!!. She told me how Barbara was in Books-a-Million, (yes we finally have a large book store) and picked up several craft magazines including Polymer Cafe´. It wasn’t until she got home that she really looked at the cover. She said, “That’s Alice!!!”. Too funny.
I’m showing you this cover so you can imagine how funny it was for Barbara to see my face staring back at her.
So Monica said she and Barbara and some others might be interested in learning more about polymer clay. Music to this “polymer clay is for everyone” crusader. Besides as much as I love the internet and all you guys, it can get lonely working in my studio without another polymer clayer to share with. So the thought of new pc players coming to spend time with me in the studio was exciting.
It’s been several months now, with a pretty steady exploration of polymer clay. Gradually, canes are being stockpiled and things are starting to really come together. I really think they’re having as much fun as I am. Linda said, “I didn’t like Mondays very much and now I know I get to play with clay, so I can’t wait.” Makes my heart sing.
Here’s wishing you all have someone to clay with from time to time.
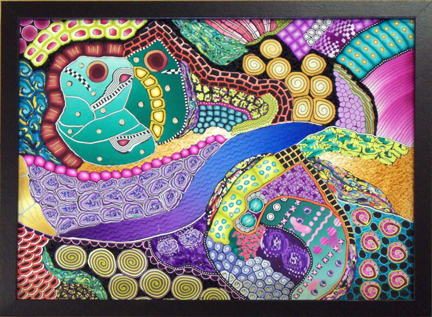
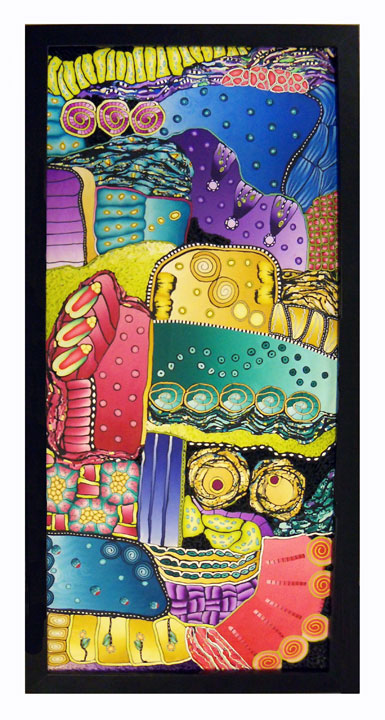
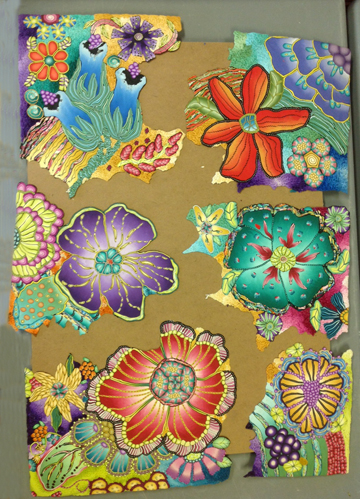
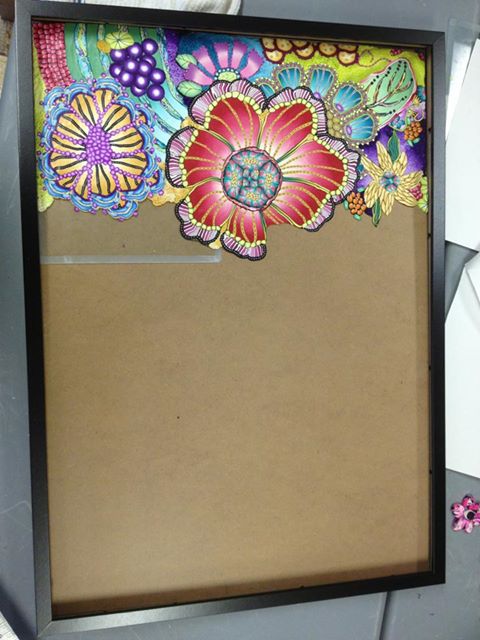
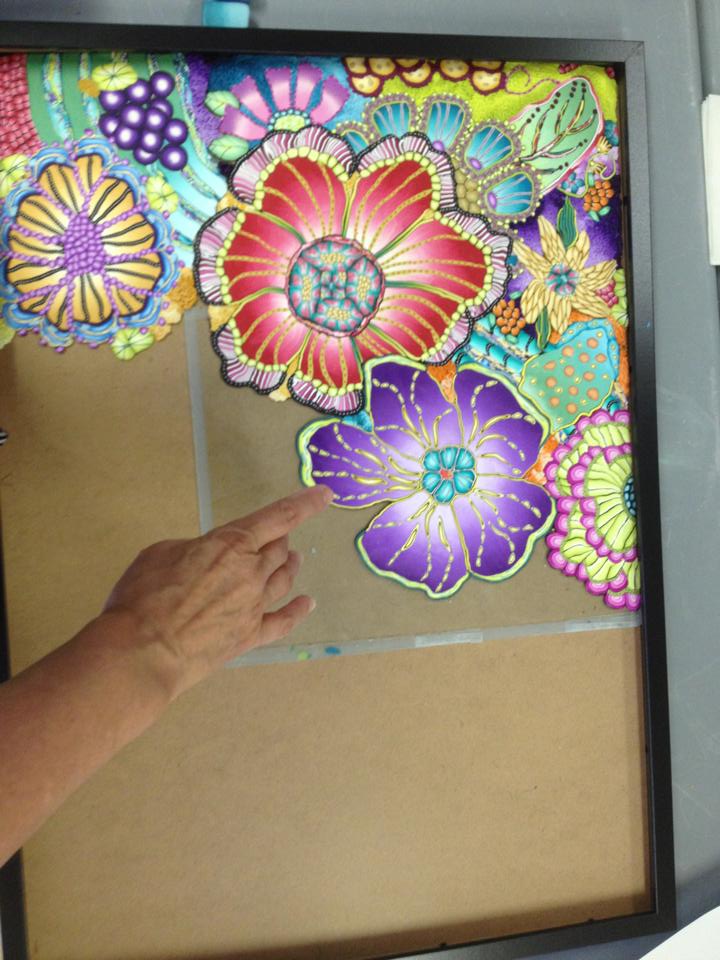
This is my newest adventure, I pushed myself to create something large and more complicated than in the past. I used my Cane Mapping technique with an added twist.
It’s a large piece, 19″ x 27″, framed it’s 20 1/2″ x 28 1/2″. I bake my polymer clay in a regular kitchen oven, but even so I had to construct it in pieces like a giant jigsaw puzzle.
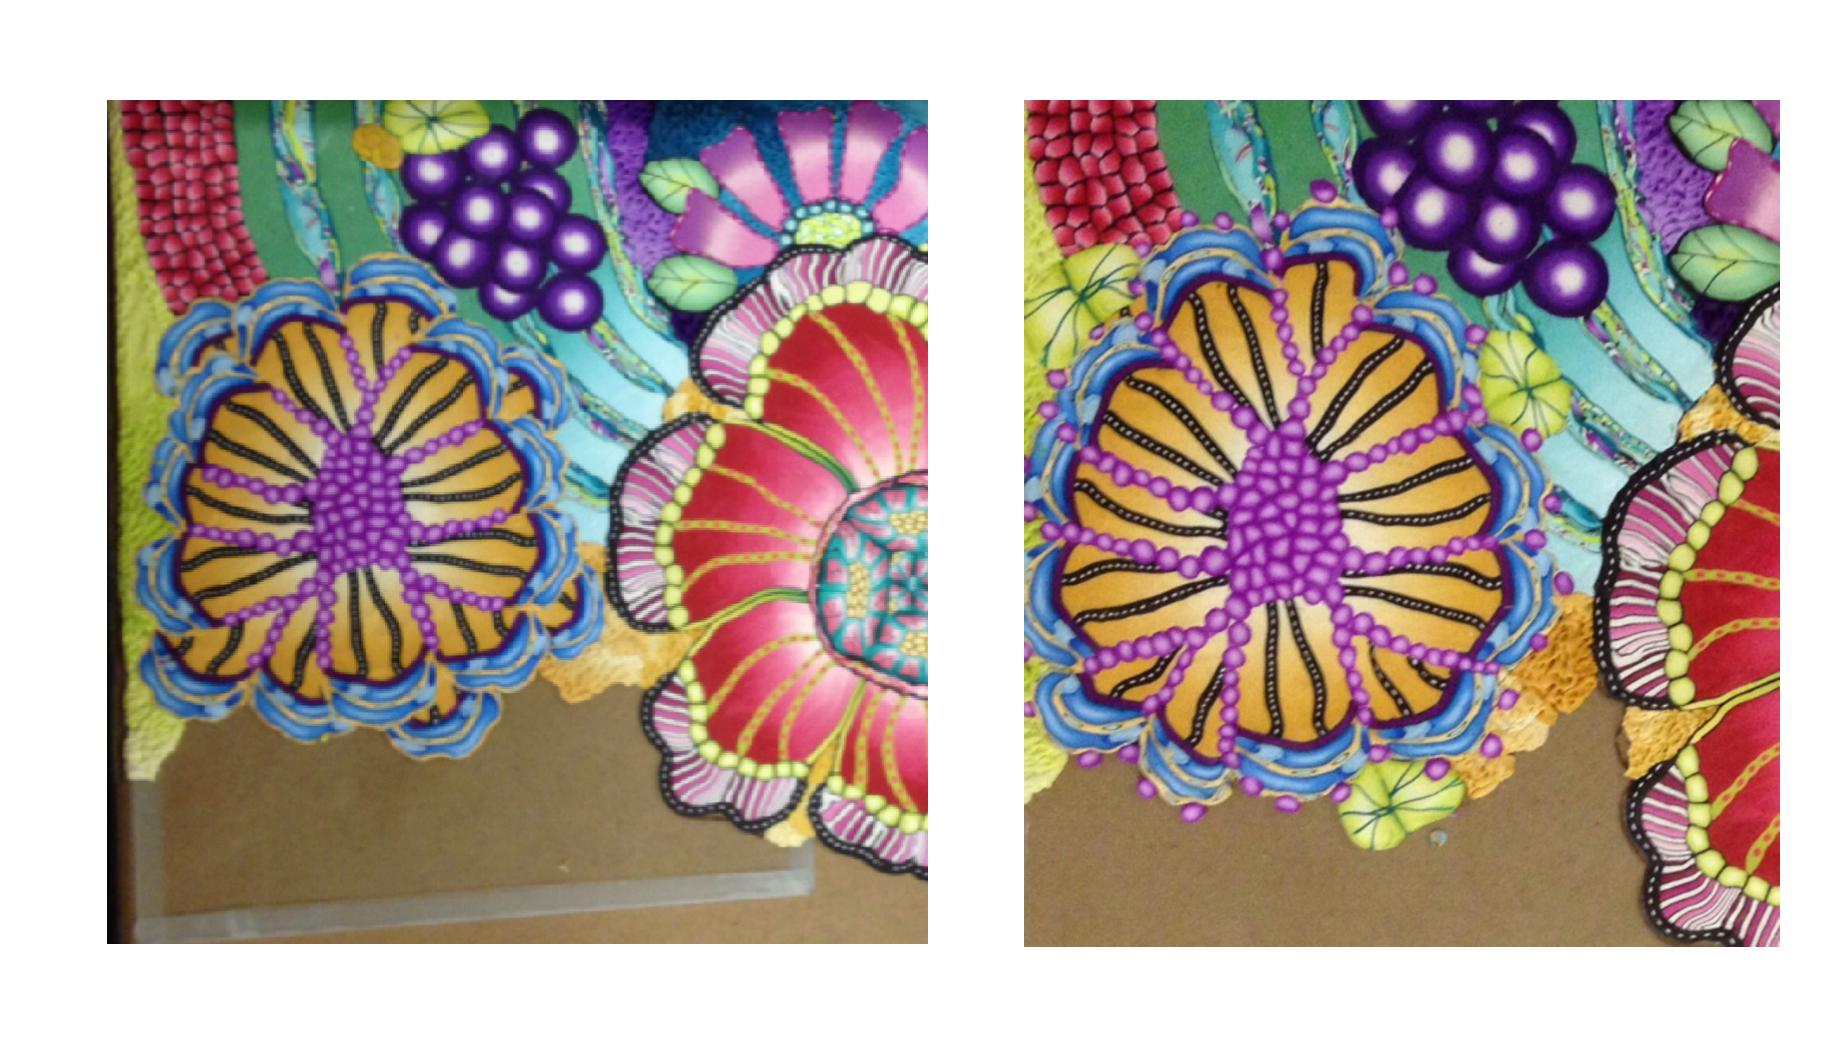
After baking a pieces, I constructed the next piece on a piece of glass and by fitting it to the last piece. I placed a roughly drawn pattern behind the glass, but as you can see by this picture, I didn’t follow it exactly.
I continued this way until all were pieces were baked and then glued them to a back board. Actually this board came with a frame I bought. Here’s a look at each step as it was completed.
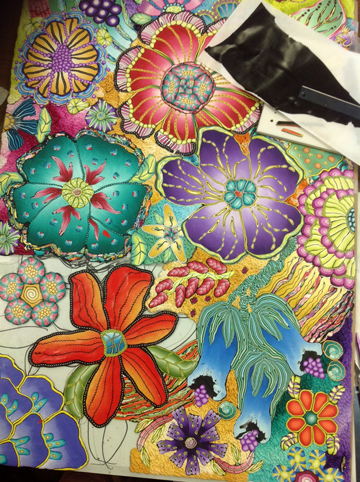
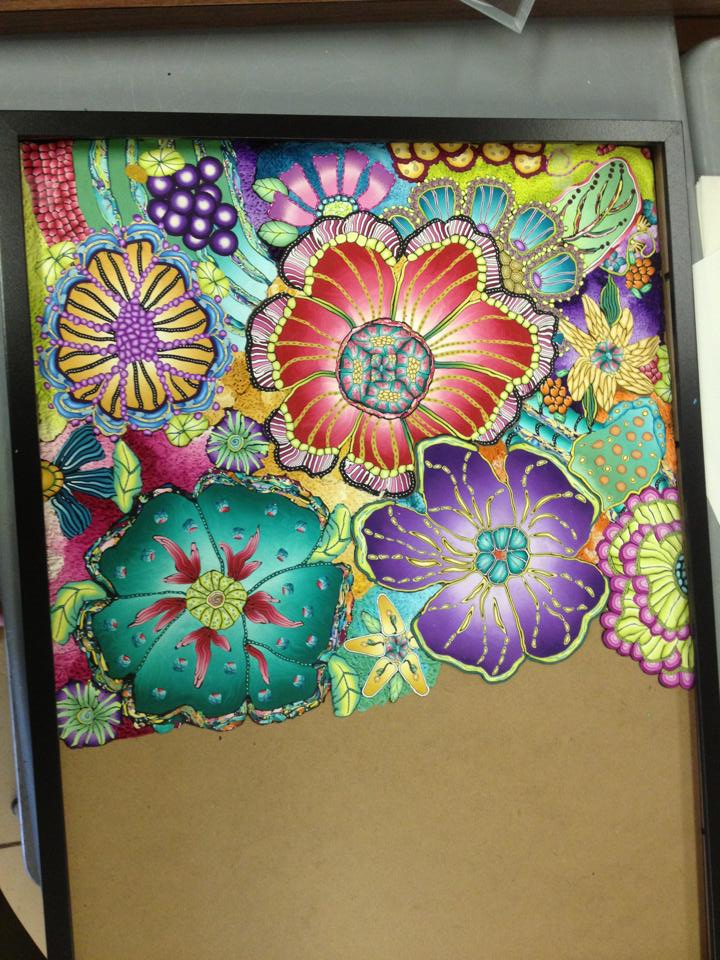
After completing and taking a picture of this step, I realized how disjointed some of the yellow flower petals looked. So before I baked it, I made some corrections.
Not completely satisfied, but knowing this was as good as it was going to get, I baked it and moved to the next section. Once again I used my and for size reference.
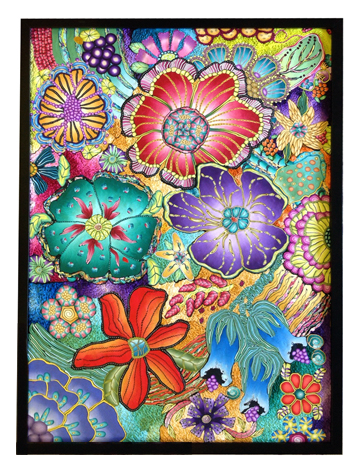
And once again the finished piece. I certainly learned a lot and look forward to making many more.
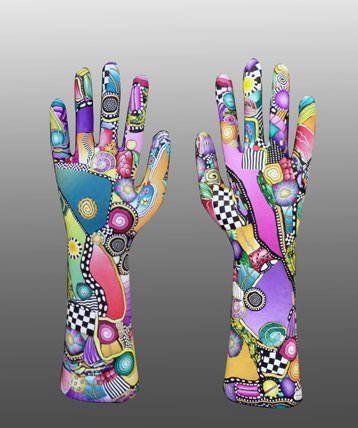
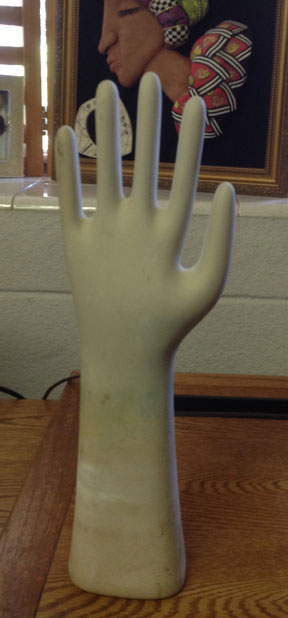
I bought two hand molds at a flea market several months ago with the intention of coming right home and covering them with clay. It certainly wasn’t right away but believe it or not, I’m proud I actually got one of them covered before the year was out. Usually projects like this sit around staring at me forever.
This is one hand, I’m just showing you both sides at the same time. I still have some work to do on it before I begin on the second one. I have a bit of ……*choke, cough, choke* ………sanding to do and buffing it up. You see how much I wanted these, I do not like to sand or buff. but it will be worth it.
These are colorful, funky and a perfect sampler of many of my canes. I’ll be happy to have it to remind me of them all.
These hand are molds for rubber gloves. The flea market vendor had about 20 of them and I wanted to buy them all. I know, I know, I’m having trouble finishing two so what would I do with 20? Anyway, I’m glad I bought the two. You can find plenty of these glove molds online should you be so inclined to cover one.
Even if you didn’t cover them, they would make great display pieces just like they are. Hang your necklaces or bracelets from the fingers.
now…..what should I do with the second one. Black and white? more color? hmmmmmm.
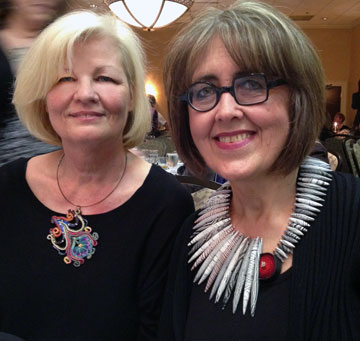
I can only say that I was delighted to have this picture with Kathleen Dustin wearing her stunning Necklace. She is such an incredibly talented artist and the polymer clay community is so lucky to have her as one of our polymer divas continually leading the way to excellence.
The entire Synergy 3 – Seeking Higher Ground was about striving for excellence, improving and growing. Becoming the best that you can be.
The piece I’m wearing I’m sad to admit was made at the last minute. I am challenging myself to continue with the design and improve it if I can.
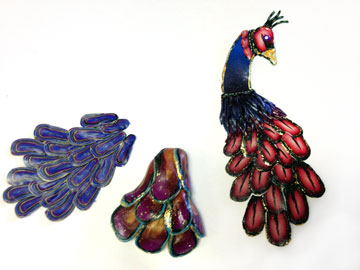
I have a beautiful peacock shawl given to me as a gift that I wanted to wear wear the night of the banquet. I worked on a couple of designs but wasn’t happy with them.
Even though I say it was a last minute thing, I did try out several ideas before moving on to the one I actually wore.
Here are the first three attempts at a pendant. The one on the far right was actually too literal and I wasn’t happy with that. The other two just weren’t coming together. Everything was just too constricted.
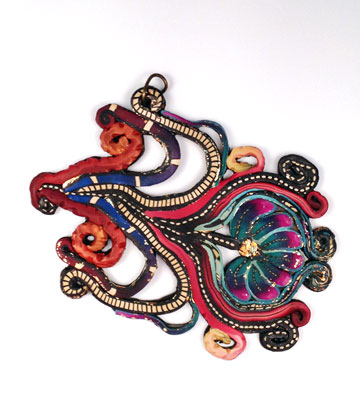
I liked this one better, but wish I’d started on it weeks before I needed to wear it.
I decided to use my cane mapping technique and add a touch of metallic. It certainly matched my shawl better and I liked the flow. The bad part was not having a fabulous chain to hang it from, even though I wore it just the same. That seems to me to be one of my largest setbacks, making a piece and not thinking about the rest of the story.
It’s why I usually just do pendants and “slides”. I don’t have to think about the rest. I plan to give that part more thought in the future.
So this is my challenge…….plan, plan, plan and Make it Sing
Wish me luck and go spend some time on Kathleen’s webiste if you haven’t been there for awhile.
“We’re all mad here.”
― Lewis Carroll (The Cheshire Cat), Alice in Wonderland
I feel like I followed the White Rabbit into a hole and don’t know when I’ll get out again. I began the long put off task of cleaning out my spare room. I won’t go into details, it’s just too scary. I didn’t need halloween, I had my own frightening adventure in my house.
But I’ve taken a day to play with clay and get something out of my head and into a design. It’s my contour cat bracelet. I think he is related to the other Alice’s Cheshire Cat, don’t you?
Here’s the other side.
And here it is on my wrist. I can tell you from experience that I always get compliments and comments when I wear my boldest contour bracelets, mainly because they’re so crazy.
I have lots more work to do on “the room” but I can’t stay away from clay for long. I agree with the Cheshire Cat, I am a bit crazy when it comes to clay. See you next time.


Comments